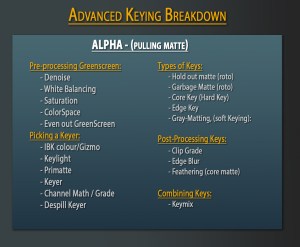
Here is the first part in the advanced keying series. I’ve started with the ALPHA section, and made a custom slide for just ALPHA, where you can see the many topics I plan on covering in future videos, but for now I am just covering 1.1 Pre-processing the Green Screen. Here is the slide for ALPHA:

It’s a long video, but it’s full of useful tips and techniques. I recommend watching the whole thing if you get a chance, but if you’re in a rush and want to skip to certain sections here are the Timecodes for you:
0:00 Intro
1:12 Denoising
5:56 Colorspaces
13:11 White Balancing
21:28 Saturation
25:33 Evening out the GS
35:21 Outro Recap
here is the Neat Video plugin website I mentioned for reducing noise on an image:
here is the link to some keying tutorials from nuke station for you guys to look through if you need them, most all of them are excellent:
http://nukestation.com/category/keying/
Please guys, I know I covered a lot but if you have any questions, or if you would like me to do a written recap on all the sections here in this blog post, please just let me know and I’d be happy to write it up for you. Leave a comment with any questions, or if you think I messed something up, or if you’d like to contribute to the conversation and have anything to add to this tutorial. I enjoyed putting this together and look forward to the rest of the keying tutorials I plan on putting together. Please share if you learned something =)
Cheers,
Tony
Thanks, mate. Valuable input, especially that IBK stacking. One thing that worked for me was decreasing the saturation of the footage (before IBK colour and IBK gizmo) down to 0.5, sometimes even 0.25(don’t go below that). and then adjust the alpha channel using a color lookup curve, usually just creeating an S-curve for both black and white point. This will create big holes in the core of the matte, but will get fine details like hair.
Marvelous content, thanks a lot !!
I see you have shuffle nodes in the flow. What are they for and how are you setting them up? Am still new to nuke.
Shuffle nodes are for rearranging channels, typically RGBA, or Red, Green, Blue, and Alpha. You can do stuff like switching the red and green channels to making interesting images. In this case I am just telling all of the channels to become the Alpha Channel, meaning RGB and A will all look the same (the alpha). This saves me time of having to keep switching to “alpha view” in my viewer when I switch back and forth between the original plate and the key alpha.
Hello Tony!
This is fantastic, and I´m just learning so much, and leaving behind old fears of Keying 🙂 I really appreciate this, sincerely.
One thing I couldn´t find are the images, files and .nks that you used. Is there a way to get them?
Thanks so much and keep up the good work!
Carlos
Hi. Thank you so much for the lesson! It is still useful! It’s 2023 outside 🙂
I don’t know if anyone will answer me, but… I don’t really understand the difference between LOG and LIN colorspace.
I have a video for example, but I don’t understand what it is. how do I know?
Can you send me a video, or write how to understand it!
Thanks!