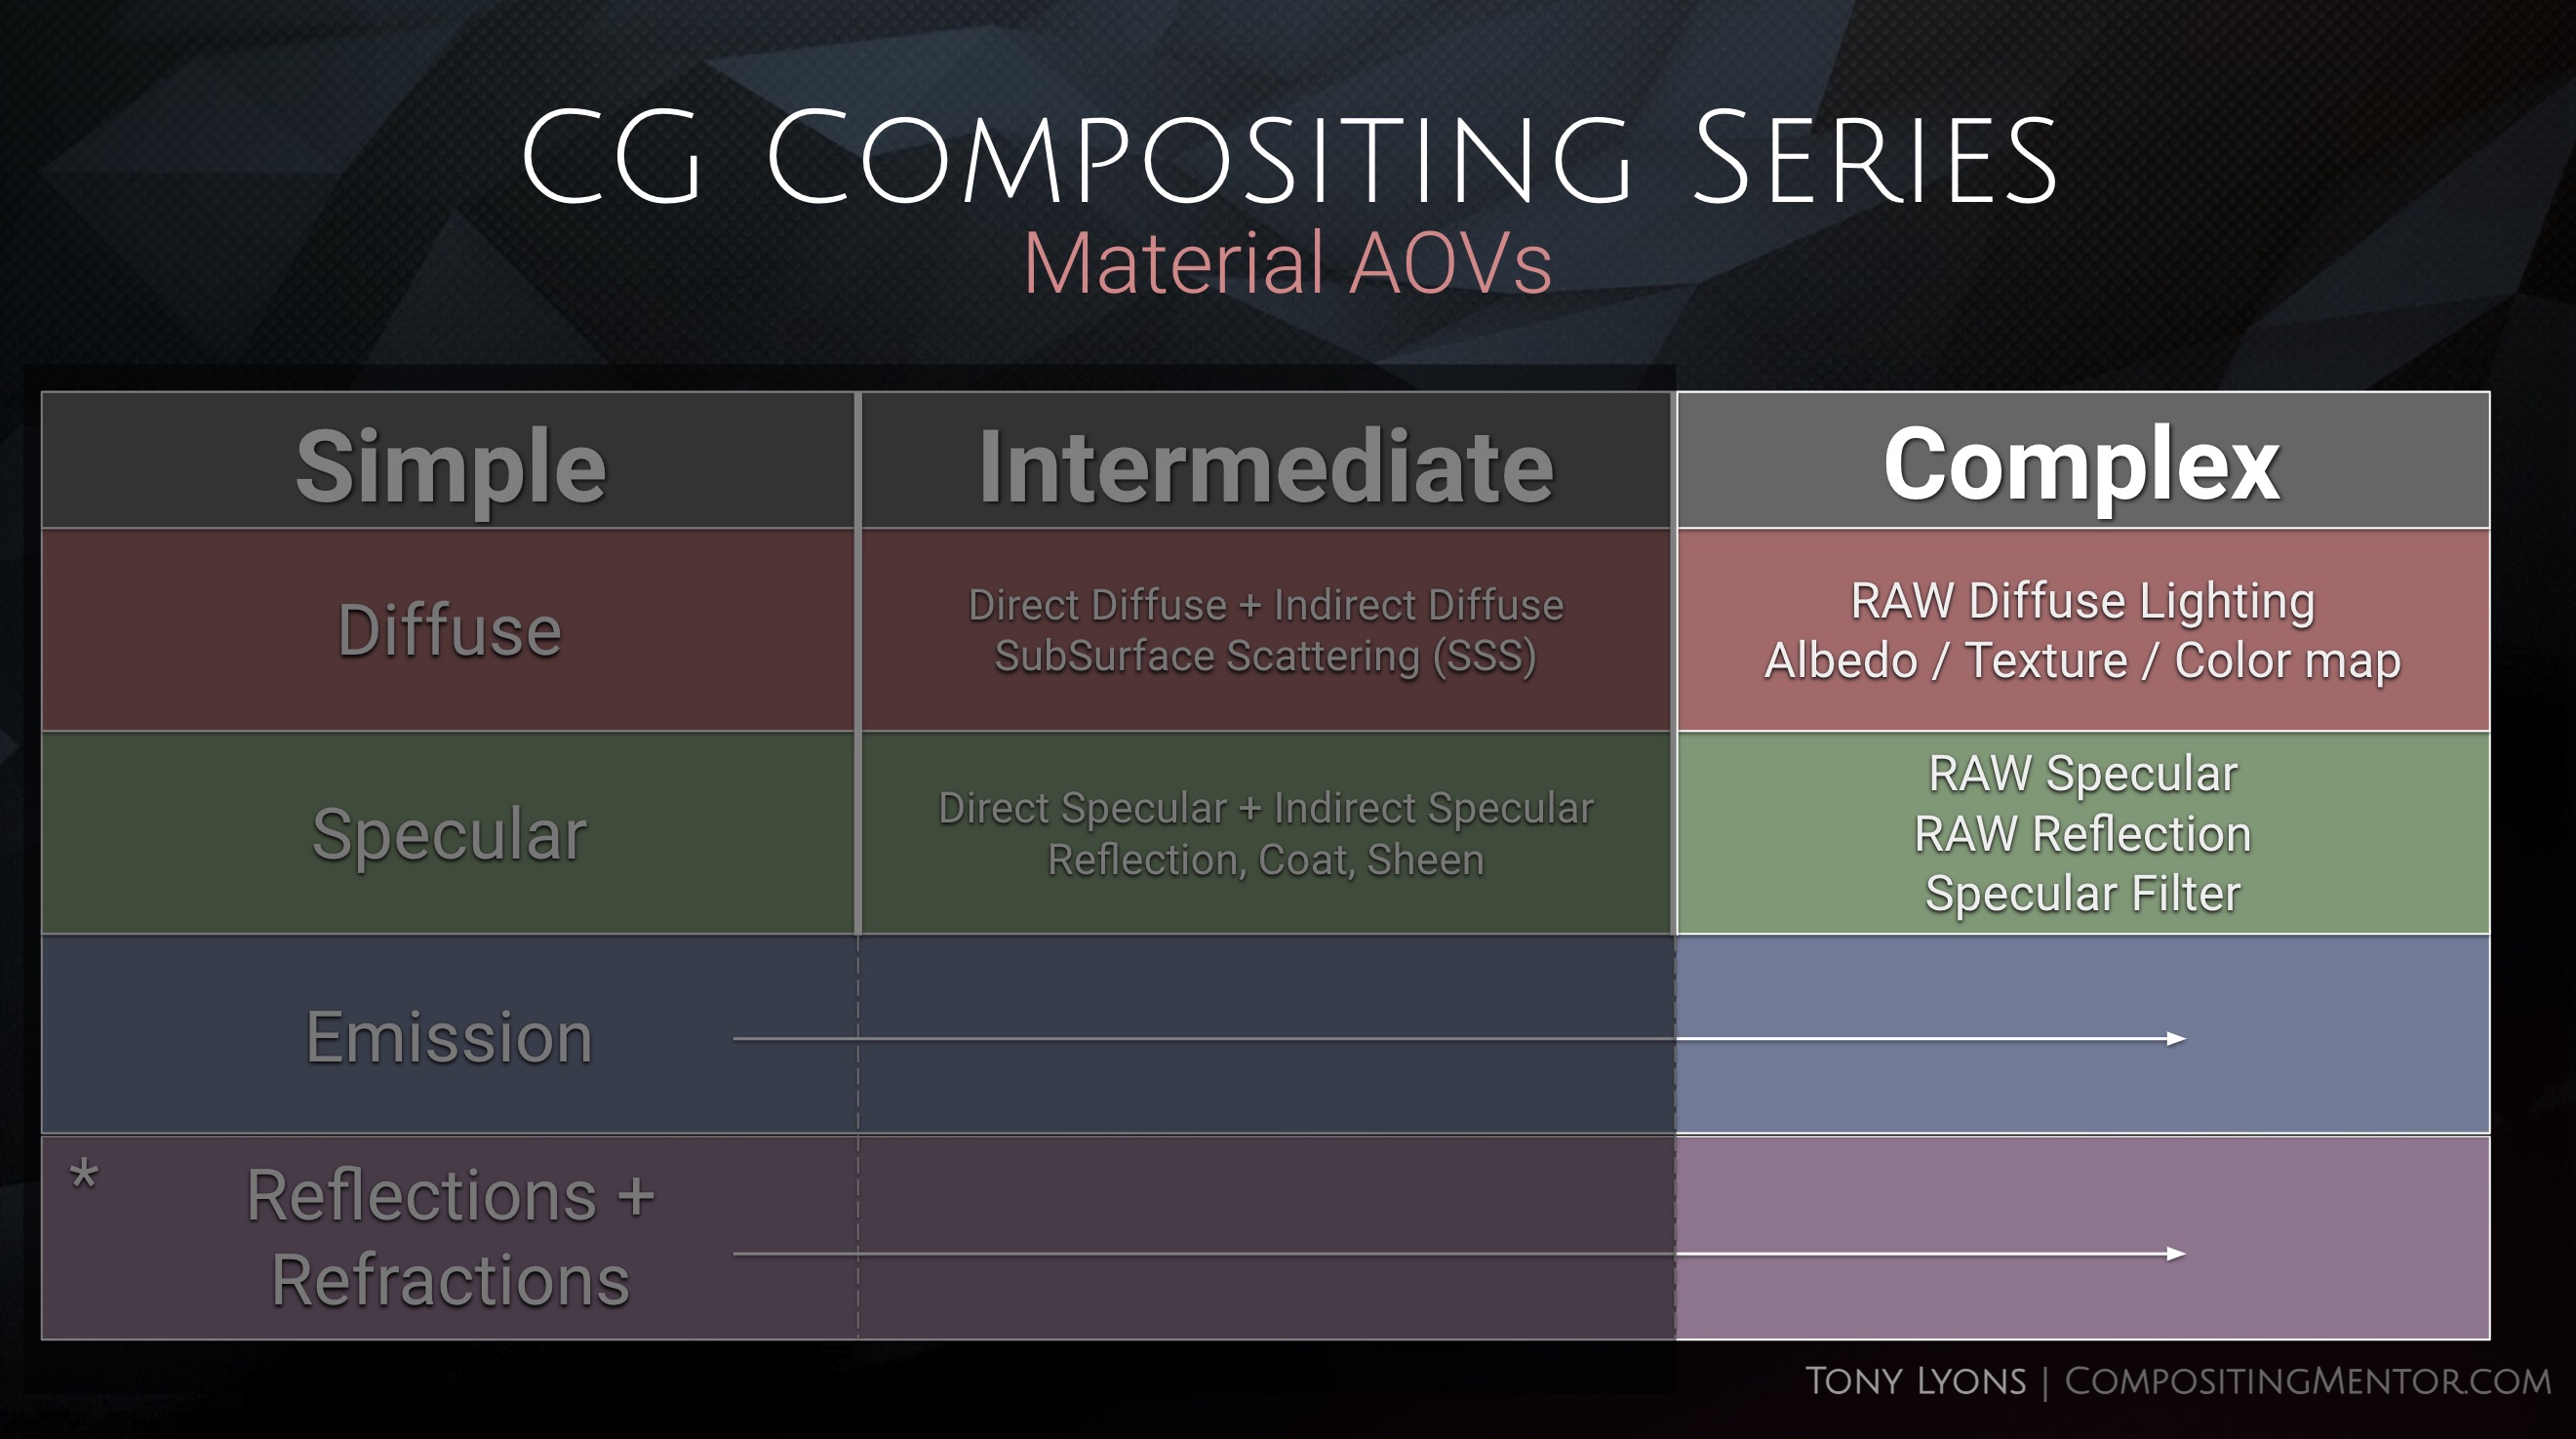
Albedo & RAW Lighting (Complex) Passes
In this tutorial, we go further down the levels of complexity into the most complex category, which includes Albedo and RAW Lighting. These are the smallest components of AOVS, the building blocks, and unveil how lights, textures, and materials come together to produce the beauty render.

What is Albedo?
- An Albedo Map is the base color or texture map that defines either the diffuse color or specular tint of the surface.
- Remember that in Physically Based Rendering (PBR) depending on whether a material is Metallic or Dielectric (non metallic), determines whether the albedo color is used as Diffuse Color or Specular Color.
- It knows what to use the albedo for based off of a black and white metallic map
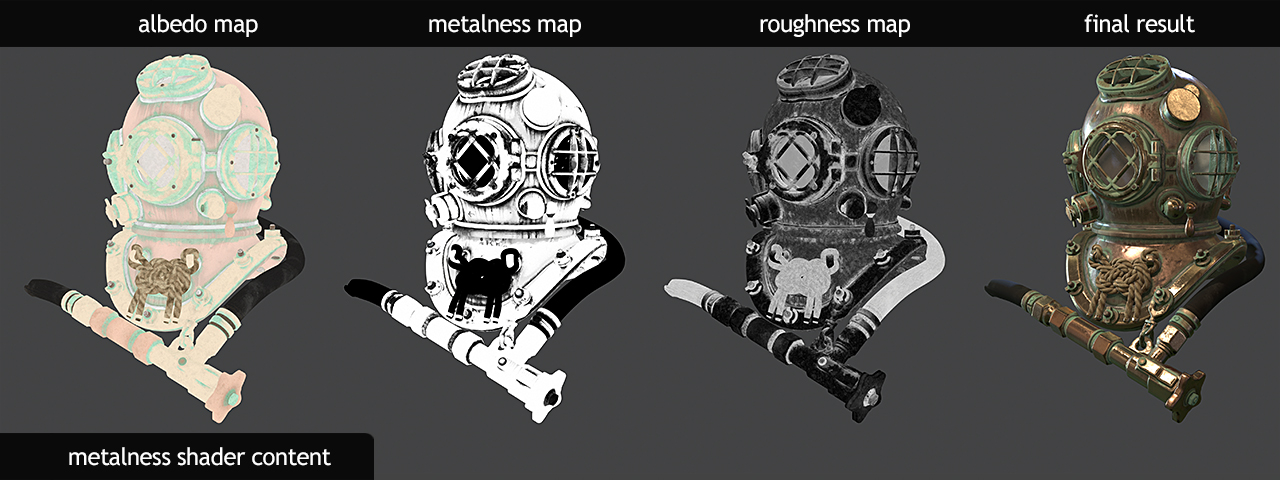
What’s the difference between Albedo and Diffuse?
- Diffuse contains lighting and shading information such as highlights, shadow and light color. It’s object’s color / texture in the lit scene.
- An Albedo Map is basically the object’s texture as it would appear under uniform lighting, without the influence of shadows or highlights.


Other names for Albedo
- Texture
- Color
- Base Color
- Diffuse Map
- RAW Diffuse Color
- Diffuse Filter
Common terms:
- “Map”
- “Filter”
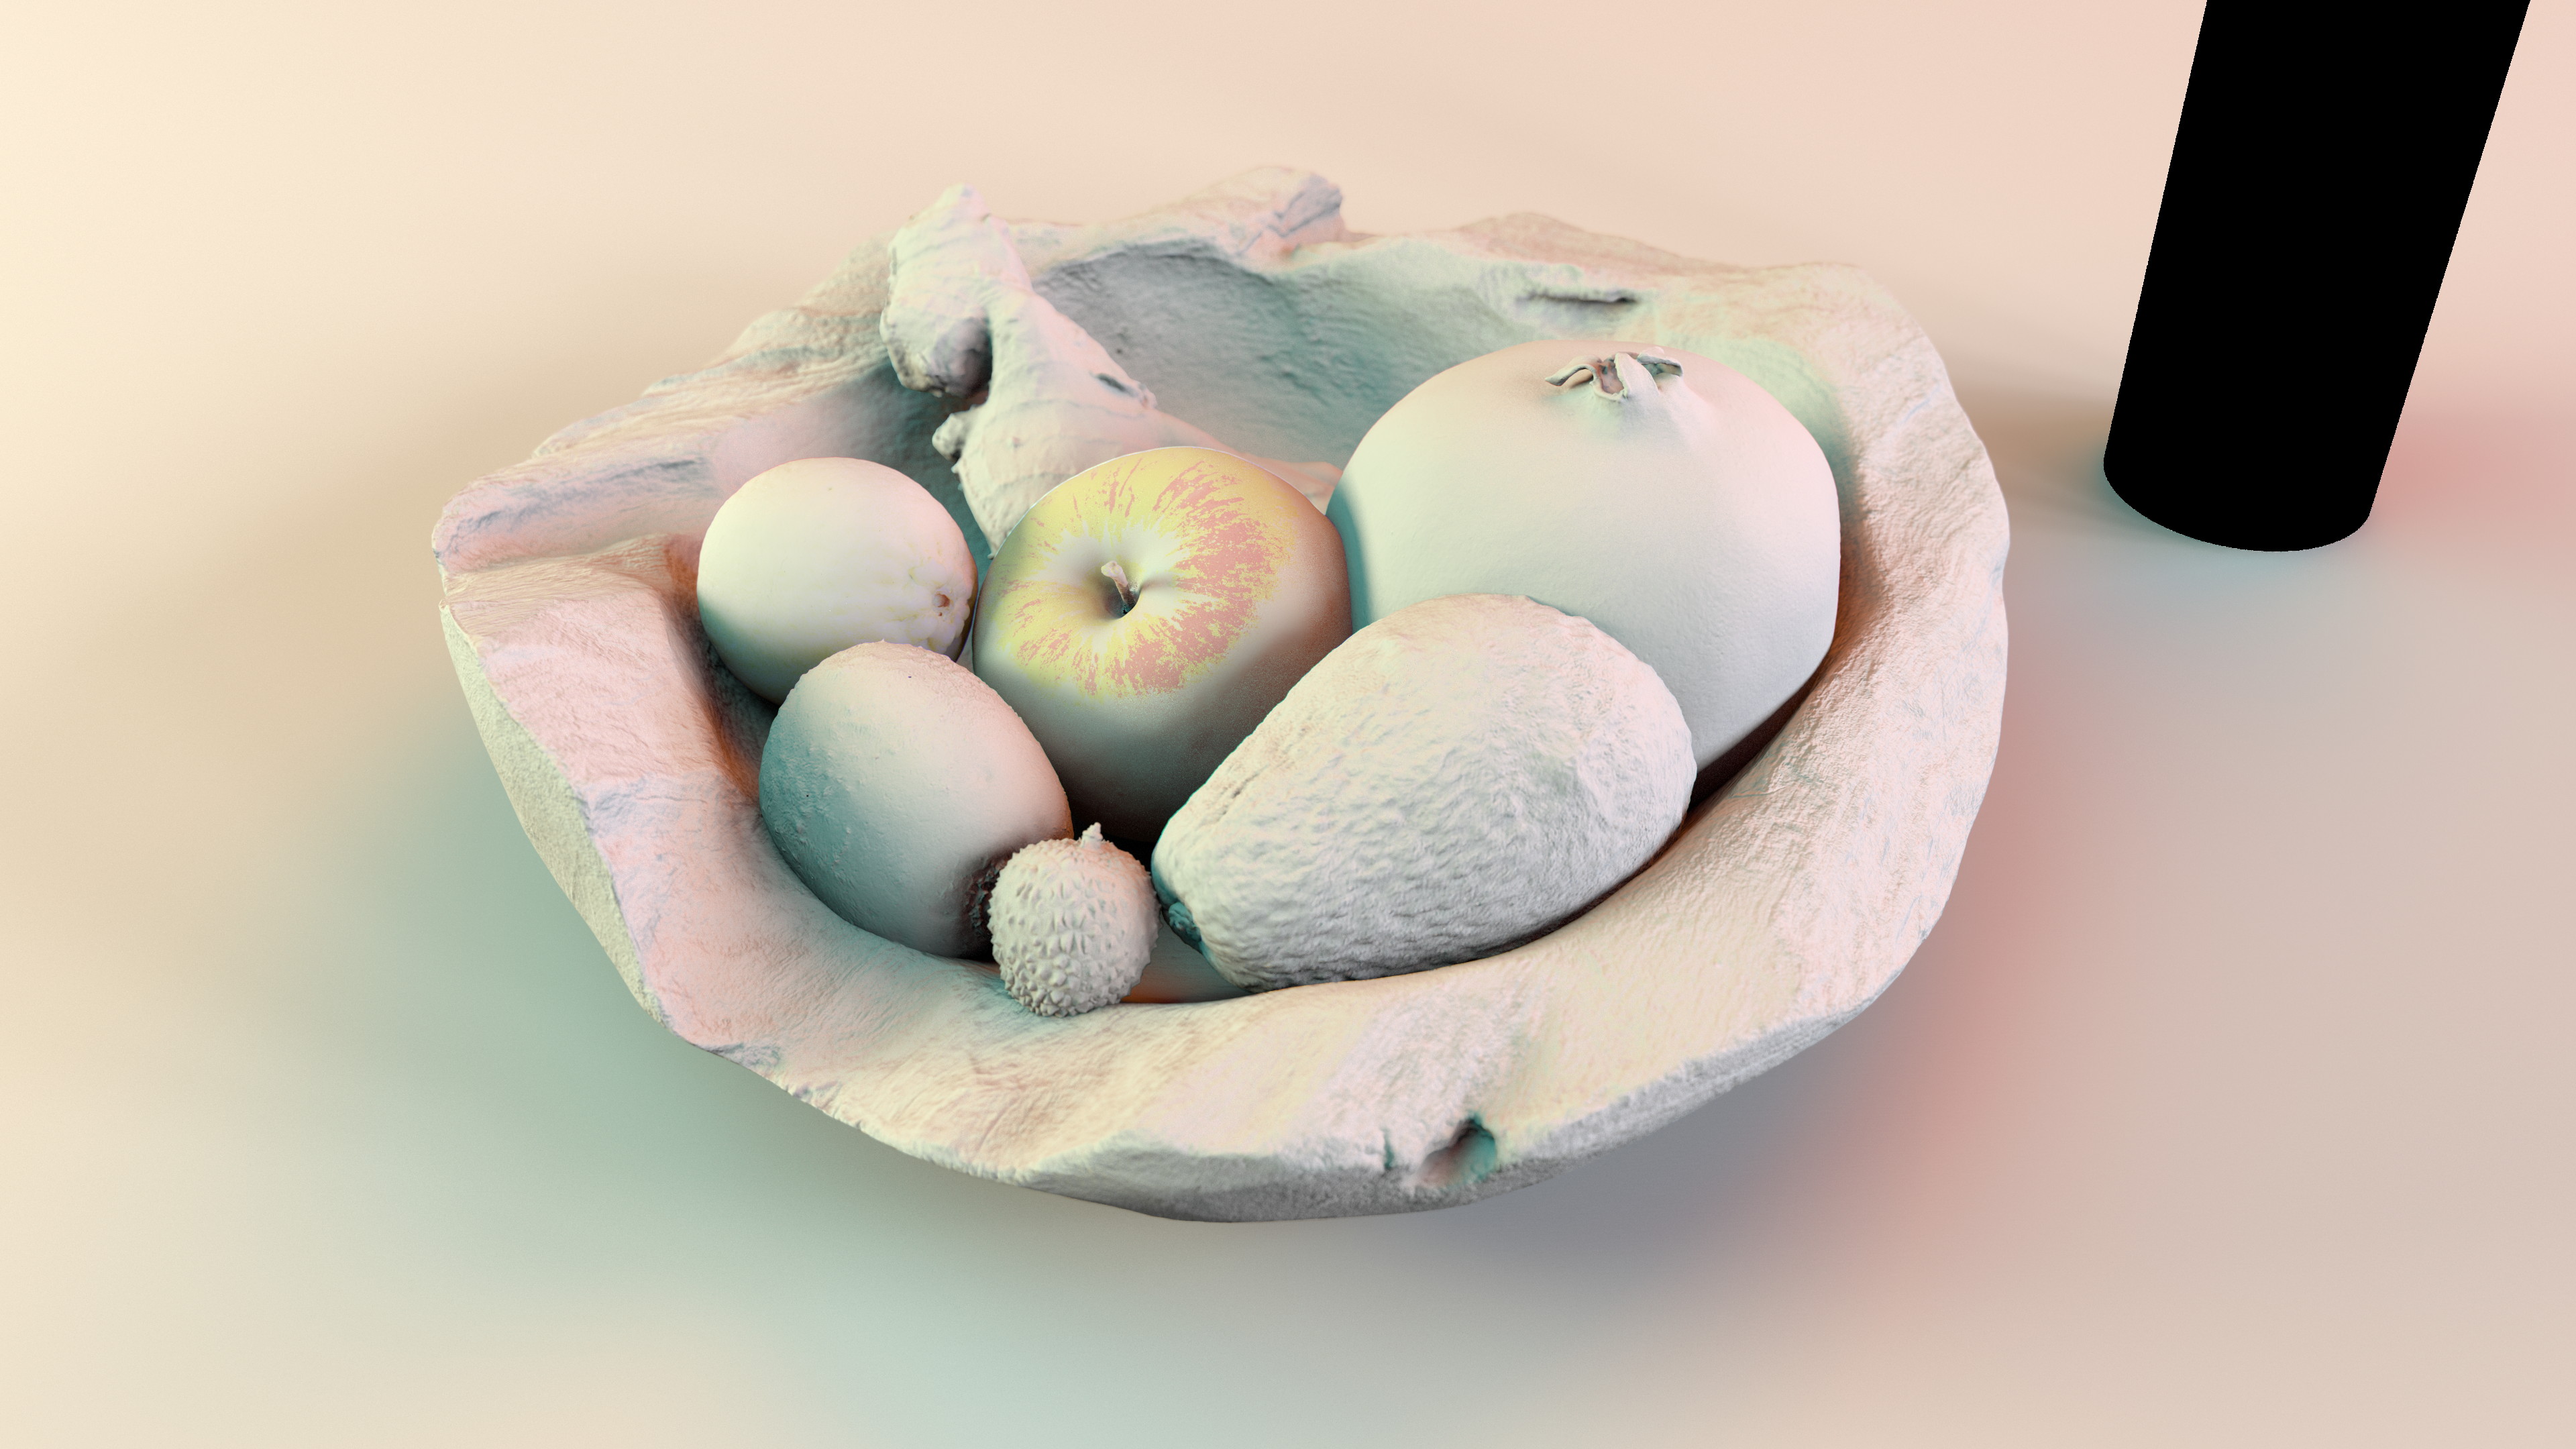
What is RAW Lighting?
- RAW Lighting is the pure lighting information of the scene, without any specular, object colors, or textures.
- A pass that describes how light is affecting in the scene.
- This multiplied with the Albedo makes up the Diffuse Pass.
How are they combined?
Albedo and RAW Lighting are always multiplied together, not plussed
Diffuse = Albedo * RAW Lighting

What is RAW Specular and Specular Filter?
The RAW Specular pass is that objects in the scene would look like if they had a 100% reflective chrome shader on. It renders everything uniformly reflective.
Specular Filter is like a mask or a albedo multiplier, that limits the visibility of the RAW specular reflective pass to certain areas. The thought process is: Might as well render everything reflective, and then decide where and how much it is needed.
Just like the albedo and the RAW Lighting, RAW Specular and Specular Filter are multiplied together to form the final Specular pass
Specular = RAW Specular * Specular Filter

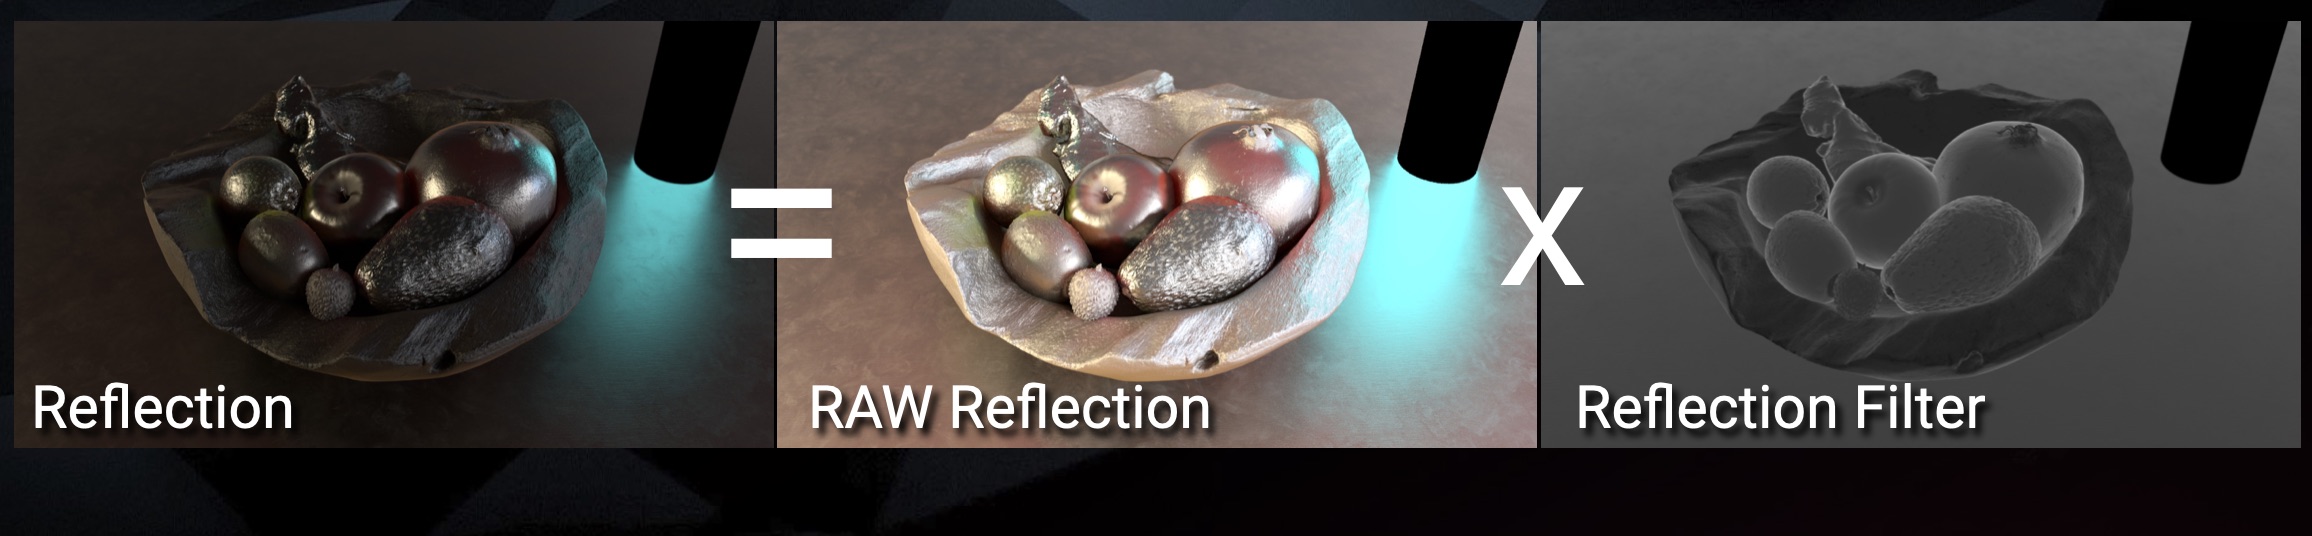
What is RAW Reflection and Reflection Filter?
RAW Reflection and Reflection filter is essentially the same thing at RAW Specular and Specular filter. You might see this term depending on the renderer. Sometimes Specular is referring to Direct Specular and Reflection is referring to Indirect Specular.
The more important take away is you want pair the “RAW” pass with it’s “Filter” or “Albedo” pass. They get combined and multiplied together to equal the final pass
Reflection = RAW Reflection * Reflection Filter
RAW Direct Diffuse & RAW Indirect Diffuse
Just like the normal Diffuse pass, RAW Lighting passes can also be split into Direct and Indirect Lighting. So you can end up with the RAW Direct Lighting and the RAW Indirect Lighting. Both passes are using the same Diffuse Albedo, so it is only the lighting that is split, not the albedo.
Total RAW Diffuse = RAW Direct Diffuse + RAW Indirect Diffuse

RAW Direct Specular & RAW Indirect Specular
And just like the Diffuse RAW passes, we can also break up the RAW Specular passes into RAW Direct Specular and RAW Indirect Specular.
Again both Direct and Indirect Specular will use the same Specular Filter pass.
Total RAW Specular = RAW Direct Specular + RAW Indirect Specular

Diffuse Equation
Knowing the diffuse equation will help us understand how it is built, and more importantly, the math behind splitting the Diffuse pass into it’s individual components of Albedo and RAW Lighting. Let’s go over a basic equation and reinforce some math concepts:

x = Albedo
y = RAW Light
Diffuse = ( Albedo * RAW Light )
Diffuse = ( x * y )
In math, certain operations cancel each other out. Just like Subtraction cancels out Addition, Division cancels out Multiplication
( x + y ) - y = x
( x * y ) ÷ y = x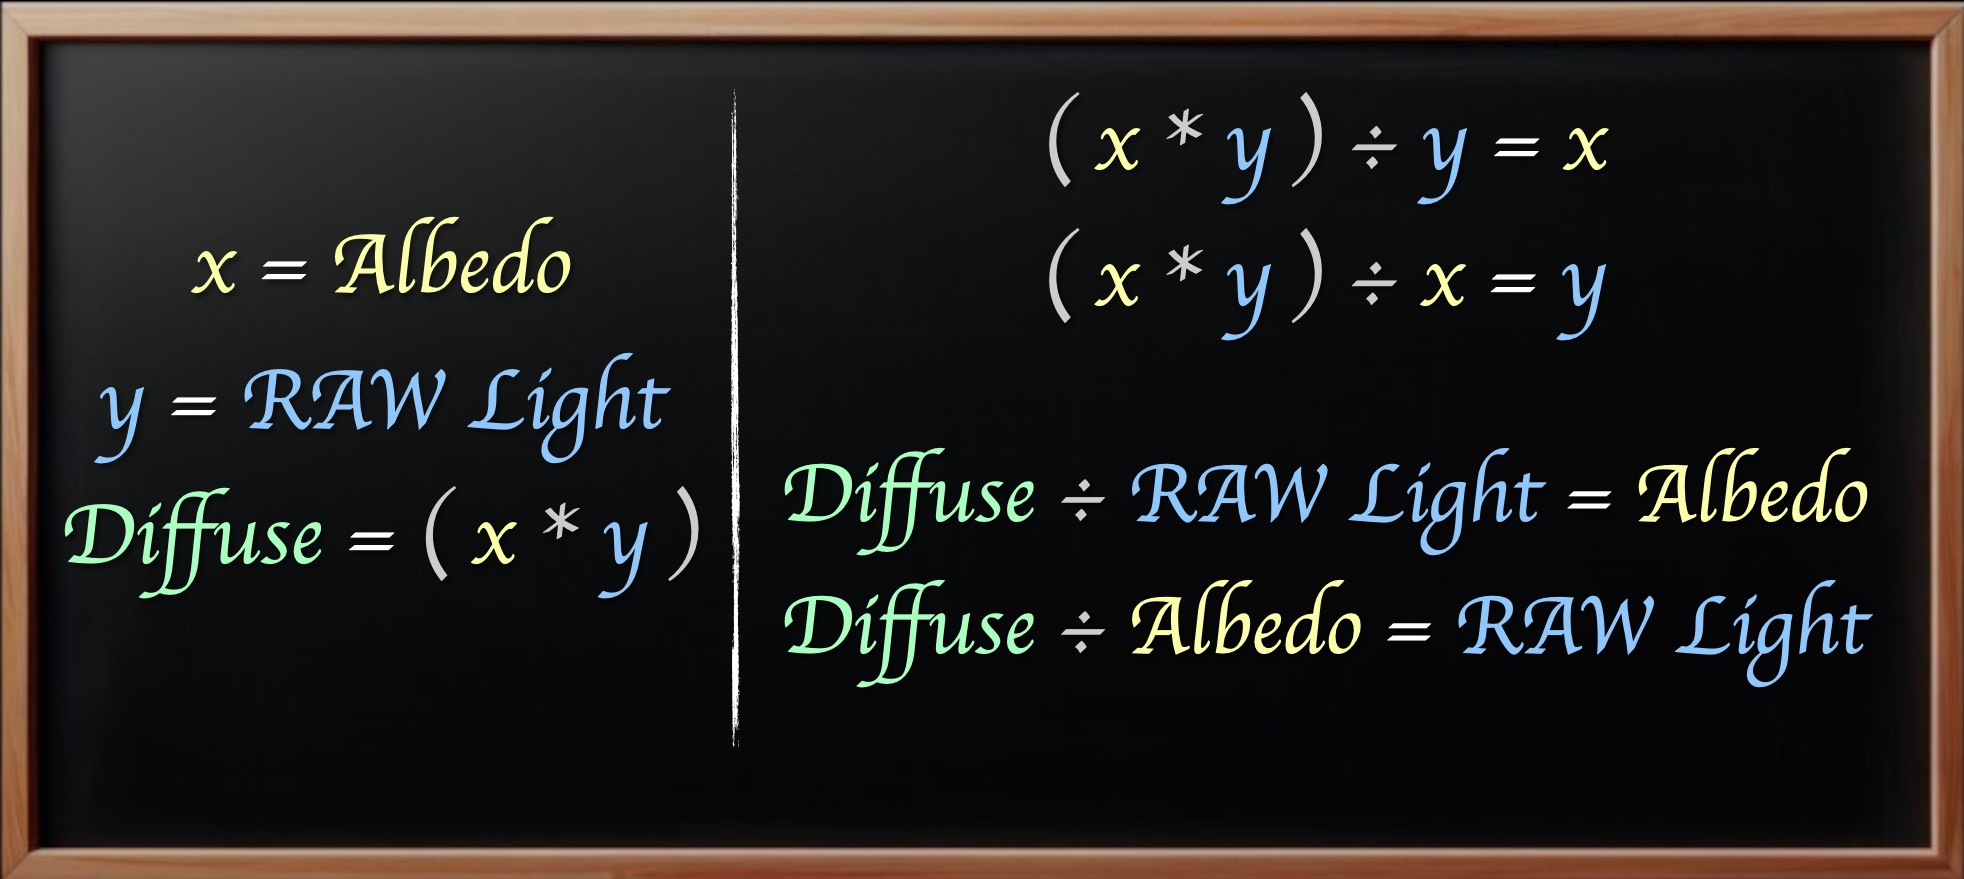
We can take the Diffuse pass, and dividing by the component we do not want, we can get the component we do want.
What that means is if you have the Diffuse pass and 1 other component, albedo or RAW Lighting, we can always generate the remaining missing pass.
x = Albedo
y = RAW Light

Diffuse = ( Albedo * RAW Light )
Diffuse = ( x * y )

( x * y ) ÷ y = x
( x * y ) ÷ x = y

Diffuse ÷ Albedo = RAW Light
Diffuse ÷ RAW Light = Albedo
Division Problems

You can divide 0 by any number and you get the result of 0. But if you try to do the reverse, you run into a classic math problem. You cannot divide by 0, the result is undefined… Not possible.
0 ÷ x = 0
x ÷ 0 = undefined
This can cause serious problems in nuke when dividing, and we need to be careful.
Using Expression node to test math in nuke

If we use an expression node we can enter the following equation:
0/r
0/g
0/b
0/a
The nuke Expression node has some predefined variable for using the channels. So it will carry out this math on a per pixel basis for each channel.
r = red channel
g = green channel
b = green channel
a = alpha channel
we can see that once we start dividing by 0 value pixels, we are getting issues. Nuke’s answer for an undefined result is nan pixels
nan stands for “Not A Number”
inf stands for Infinity
Testing for nan or inf pixels
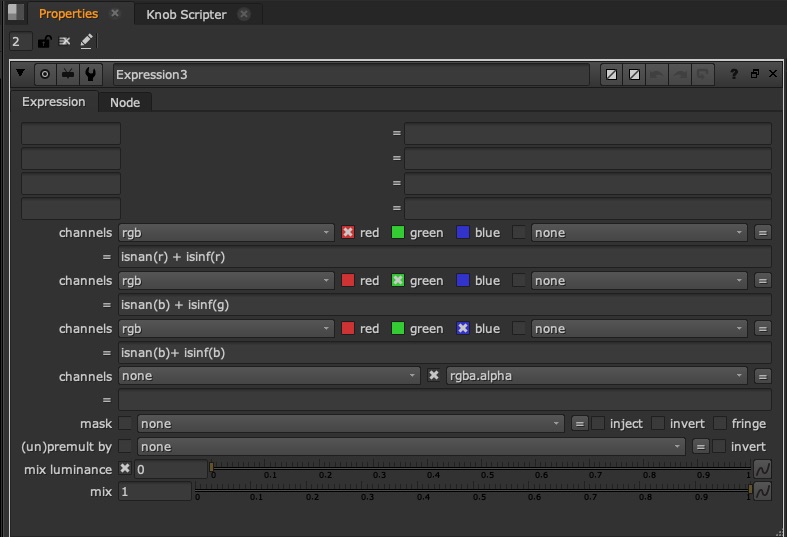
We can use another expression node to write a little tcl expression that will show 1.0 (white) for any illegal value pixels. If it’s a normal number, it will display at 0.0 or black. This can easily and visibly test if we are having “problem pixels” in our image such as nan and inf
isnan() tests for nan (not a number) pixels. You need to enter which channel you want to check inside of the parenthesis, for example isnan(g) and it will display 1.0 for nan values and 0.0 for normal values
isinf() tests for infinity value pixels. You need to enter which channel you want to check inside of the parenthesis, for example isinf(g) and it will display 1.0 for inf values and 0.0 for normal values
We can just add them together to get a full mapping of “illegal values” to warn us
isnan(r) + isinf(r)
isnan(g) + isinf(g)
isnan(b) + isinf(b)
isnan(a) + isinf(a)
So dividing by 0 in nuke can give you illegal values. Luckily, the Merge(divide) operation in the Merge node avoids these issues. It has built in protections so that 0/0 = 0 and any other number divided by 0 is bypassed, or skipped, and it does nothing. it will just show you in the A input value and not do any math at all.
There is a limitation to the Merge node however. There is only 1 operation for divide, and that is A/B
We know that when we disable nodes in nuke, it defaults to the B input. But if we switch the inputs, we do not get the same result. Meaning we are locked in to our inputs based on whatever image we need to divide by the other image.

So there is no B/A operation, we’ll need to recreate it ourselves
MergeExpression Node
We can use a MergeExpression node, which is basically a combination of a Merge node and an Expression no, in fact the properties look identical to an Expression node.

The Merge Expression has access to the same variables at the normal expression, namely the r,g,b,a variables representing the different channels:
r = red channel
g = green channel
b = green channel
a = alpha channel
But the MergeExpression also has 2 inputs, and we can choose what input we are sourcing from in our equations with capital letters A and B
A = A input
B = B input
Because we need to specify which red channel we are grabbing from, A or B red channel, we need to be more specific. Therefore:
Ar = A input red channel
Bg = B input green channel
So we specify which input first and then the channel we want.

So now we can do a simple equation of B input divided by A input:
Br/Ar
Bg/Ag
Bb/Ab
Ba/Aa
Fixing the MergeExpression
Unfortunately, the MergeExpression is pure math, and does not have the built in protections that the normal Merge node does when it comes to dividing. So if we end up dividing by 0 using the MergeExpression, we will end up with nan and inf pixel values. And that is very dangerous, because this will break the image, as you cannot do further math with those values, they get corrupted.
But it’s ok, we can implement the fix ourselves, so that we can have safe values just like the Merge node

The solution is to enter a little tcl expression into the node
Ar == 0 ? Br : Br/Ar
Ag == 0 ? Bg : Bg/Ag
Ab == 0 ? Bb : Bb/Ab
Aa == 0 ? Ba : Ba/Aa
This code basically reads as follows:
First we need to check if the A input has 0 values, since that is what we are dividing with. and if we divide with a 0 then we get a problem.
so the first part is does the A input pixel equal 0 ? if yes, just skip, bypass, and revert to B input pixel. Don’t even do any math. If the A input pixel is not 0, then it will proceed to do the operation B/A and give the result.
This will fix the issue as all the zero pixels will be skipped. This result is identical to the Merge node set to divide
Except now it is B/A and when we disable the node, it will revert to the B stream that we want.

you can just copy/paste the code below into your nuke to get the MergeDivide that I created:
MergeExpression {
 inputs 2
 expr0 "Ar == 0 ? Br : Br/Ar"
 expr1 "Ag == 0 ? Bg : Bg/Ag"
 expr2 "Ab == 0 ? Bb : Bb/Ab"
 expr3 "Aa == 0 ? Ba : Ba/Aa"
 name MergeDivide
 label "( B / A )"
 note_font_color 0xffffffff
 selected true
}
Otherwise you can download the nuke tool here and add it to your toolsets:
Multiply / Divide Concepts

- Think of Multiply like combining, fusing, mixing, linking, joining, locking
- Think of Divide like separating, splitting, unlinking, disjoining, unlocking

- Start with the combined pass
- Separate with division
- Change individual component
- Recombine with multiplication
How can we use Albedo and RAW Lighting as Compositors?
1.) The first reason to separate albedo and RAW lighting would be to make an adjustment to only the texture and not the RAW Lighting or vice versa.
- if you desaturate the diffuse pass, you risk desaturating the lighting and the texture at the same time. but if you wanted to just desaturate the object, but keep the tinting of the lighting, you would need to separate them first
Here is an example of the Blender Room where we one side desarating the entire diffuse pas, and another where we only desaturated the albedo pass. You will notice on the right side, the light is still warmer and maintaining the warmth of the sunlight. This is what a gray object would look in that environment

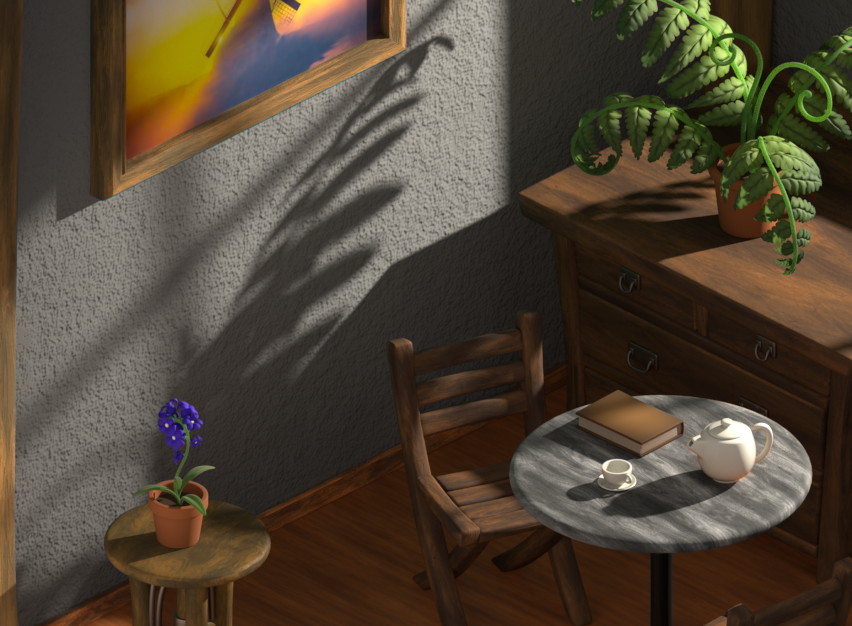
right side: desaturating the albedo only
Here is the same example on the VRAY scene, where you can see the desaturation affecting the bounce lighting:


right side: desaturating the albedo only
2.)There are many non linear Color Corrections or operations that you might also specifically want to do while these passes are separated, to get better or cleaner results.
Whether it is to remove light / shadow from a texture CC, or removing texture info so that you can adjust specific lighting. Operations such as:
- keying
- despilling / desaturating
- gamma
- ColorCorrect nodes
- HueCorrects
- HSV node – to pull color keys
3.) The next big reason would be to alter or change the texture in the scene and not need to go back to the CG department.
In this example we replace the picture on the wall with a checkerboard, but it still maintains the lighting of the scene. So you could add noise or blood textures, change billboard ads, etc, and they would still appear to live inside your shot.

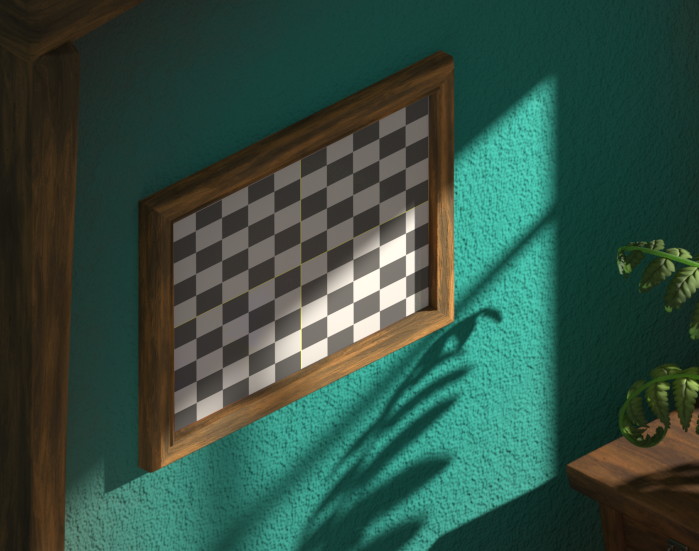
right side: replacing the albedo with another image
Different ways to rebuild AOVs at complex level
Variation 01:
Add the direct, indirect, SSS passes together first, generating your diffuse pass. then do a divide / multiply with the albedo pass afterwards at a second step.

Variation 02
We could do the albedo divide multiply on a per pass basis. so basically we are having the RAW direct and RAW indirect split out first. We could do changes to the albedo and return to normal, and then add the direct and indirect and SSS together as a second step.

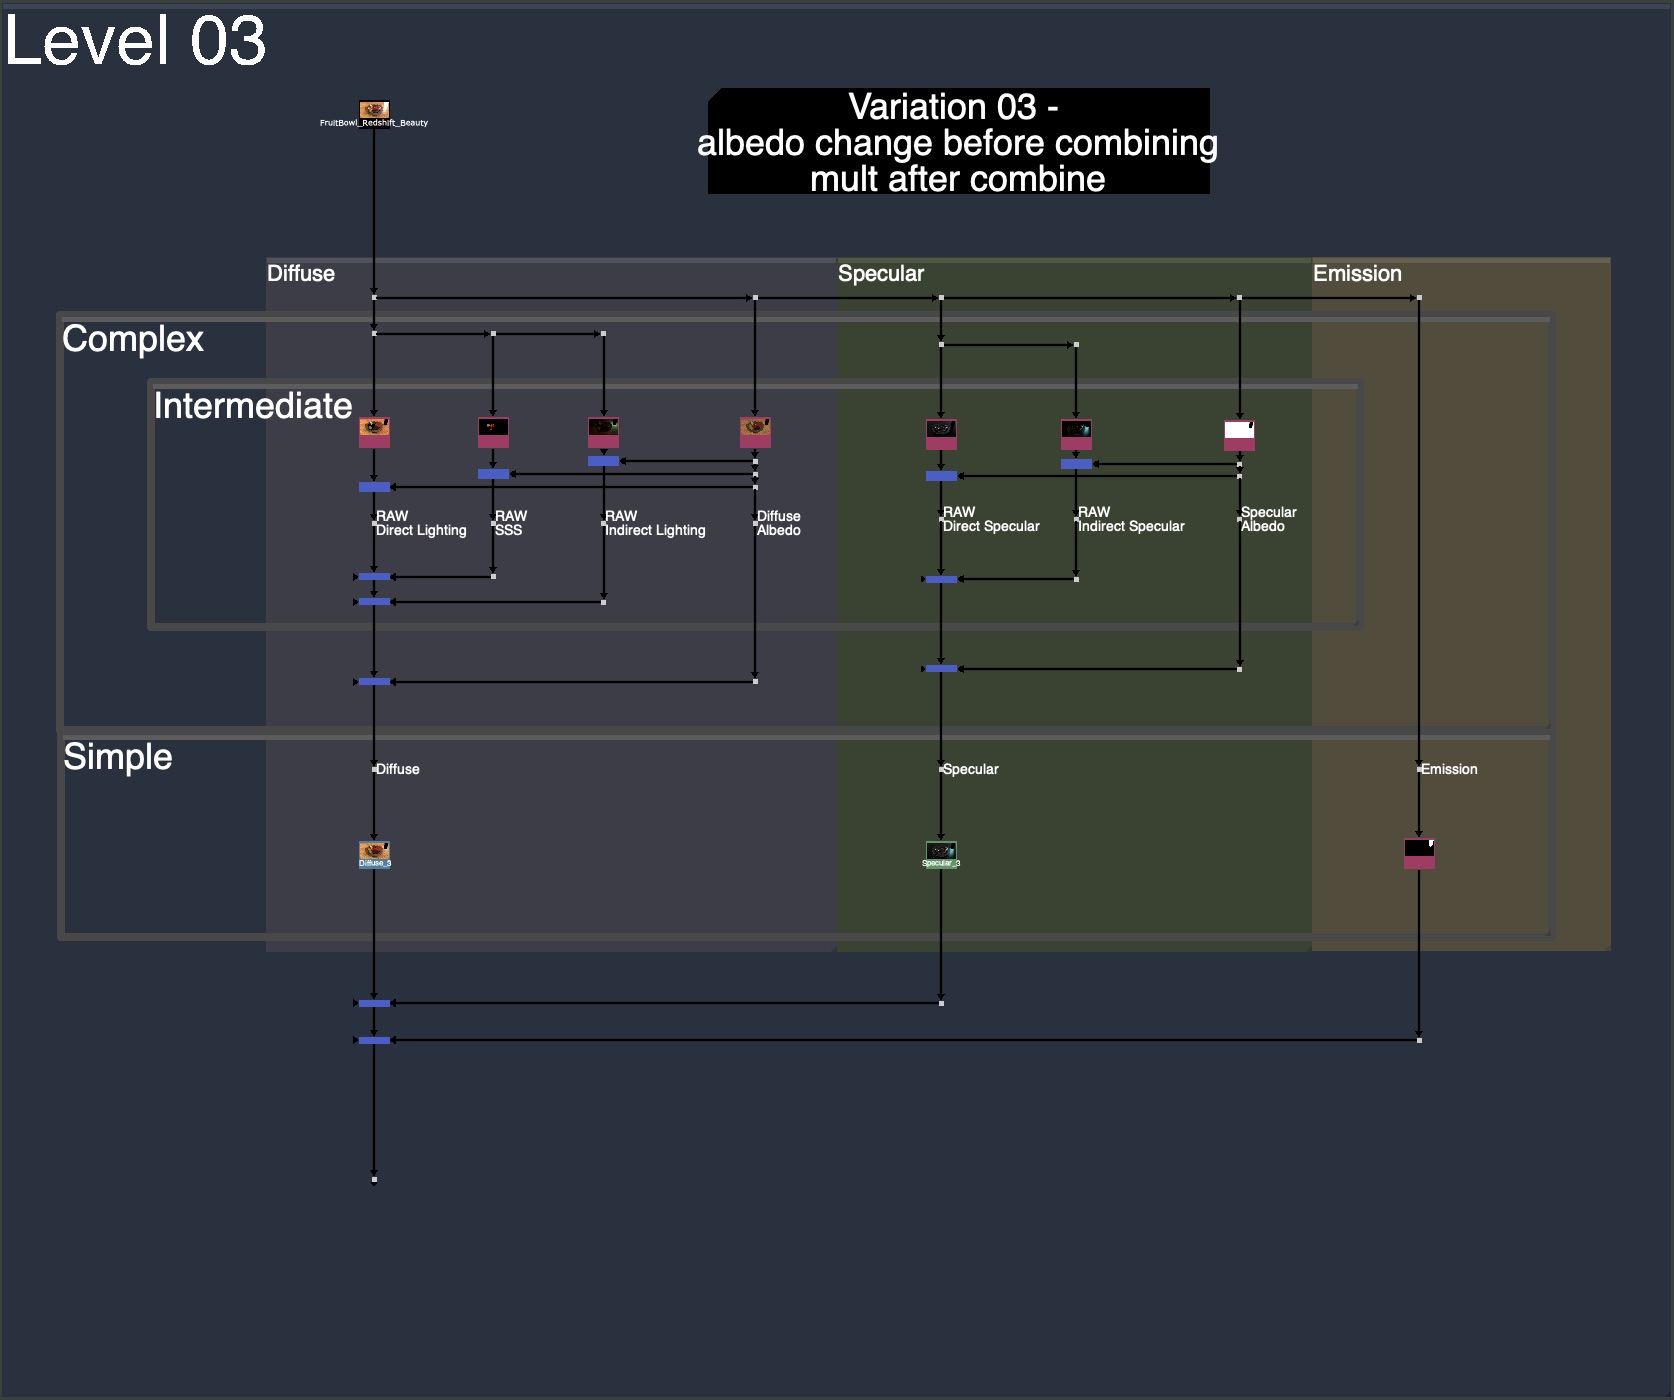
Variation 03
Similar to variation 02, we do the albedo changes on a per pass basis first. but instead of immediately reverting back to normal, and then plussing the direct, indirect and SSS together. We could instead plus them at the RAW level. The final step would just to multiply the albedo back.
Basically, variation 02 was 3 divide, 3 multiply and 2 plus
and variation 03 is 3 divide, 2 plus, and 1 multiply
Realistic Proposal for CG AOV Rebuild
The above setups are more for learning, with labels and backdrops to help break down the workflow and structure.
Below is the setup that I gravitate towards when settings up CG Templates. I try my best to apply logical flow and convenience. Maximizing organization and flexibility, while still being clean and fast. I have space for albedo / RAW Lighting change, but I keep it off by default and allow to turn it on when needed.
We see all levels of complexity being implemented:
Basic : Diffuse, Specular, Emission
Intermediate: Direct, Indirect, SubSurface Scattering
Complex: Albedo and RAW Lighting

You can find these realistic template nuke scripts of these setups for each renderer below in the downloads section. I exported the individual templates for Arnold, Redshift, Octane, and Blender.
I would recommend waiting for future videos where I will keep expanding on the template and making it more robust. But if you are eager to download and try it out, feel free to give it a try and modify it for your needs. More and better additions will come in the future posts.
Downloads:
If you haven’t downloaded the FruitBowl Renders already yet, you can do so now:
You can Choose to either download all 3 FruitBowls at once:
FruitBowl_All_Renders_Redshift_Arnold_Octane.zip (1.61 GB)
Or Each FruitBowl Render Individually for faster downloads:
FruitBowl_Redshift_Render.zip (569.1 MB)
FruitBowl_Arnold_Render.zip (562.8 MB)
FruitBowl_Octane_Render.zip (515.4 MB)
The project files and the Renders are separate downloads, so if you have already downloaded 1.1 What and Why files or the Fruitbowl Renders, there are a couple ways to combine them to work.
- Either add the .nk script to the previous package (in the folder above SourceImages, with the other .nk scripts)
- Or simply drop the Render files into the SourceImages folder of the new 1.2 project folder

Project Files for this Video:
Along with the fruitbowl renders above, here are the nuke script and project files from this video, so you can follow along:
All Nuke Project Files and template scripts:
CG_Compositing_Series_MaterialAOVs_Albedos_RAW_Lighting_nkscripts.zip (155 KB)
Individual Template scripts for specific renderers:
Realistic_AOV_Bebuild_Arnold_Template.nk
Realistic_AOV_Bebuild_Redshift_Template.nk
Realistic_AOV_Bebuild_Octane_Template.nk
Realistic_AOV_Bebuild_Blender_Template.nk
Blender Cube Room Render

Blender Cube Room Diorama zip ( ~ 70MB)
original cube diorama blender files from blender demo file site:
https://www.blender.org/download/demo-files/
VRay Room Render:

Vray Room – Can be downloaded from this website, look for “download example scene” (36.6MB):
https://www.chaos.com/blog/how-to-use-cryptomatte-render-elements-in-v-ray-for-sketchup
Since I am using Stamps in the script, all renders can be swapped out at the top of the script where the “SourceImages” Backdrop is, and the rest of the script will get populated correctly.

Slide show PDF
Here is a PDF version of my slideshow in case you would like to save for future research or review:
References
VNTANA – What Are Texture Maps And Why Do They Matter For 3D Fashion?
A23D – Difference between Albedo and Diffuse map
cgdirector – What is an Albedo Map and How to use it?
Youtube – TorQueMoD - WTF are Albedo textures and how do I make them?
Youtube – Zeracheil – Texture Maps Explained – PBR Workflow
DIGITAL COMPOSITING IN THE VFX PIPELINE – PDF
steakunderwater – FAQ/Combining 3D Passes – VFXPedia
xuan prada – RAW LIGHTING AND ALBEDO AOVS IN ARNOLD
photoshop essentials – The Overlay Blend Mode in Photoshop
Bryan Ray – Blackmagic Fusion: The Texture Node
Youtube – 3DAS – 3ds Max Export Multiple Render Passes (EXR) into Photoshop Extended
Youtube – Hugo’s Desk – How to use the VRay AOVs in Nuke (render passes)
