I’m excited to release Precomp Switcher v1.0, a Nuke plugin that speeds up your precomp workflow.
Features:
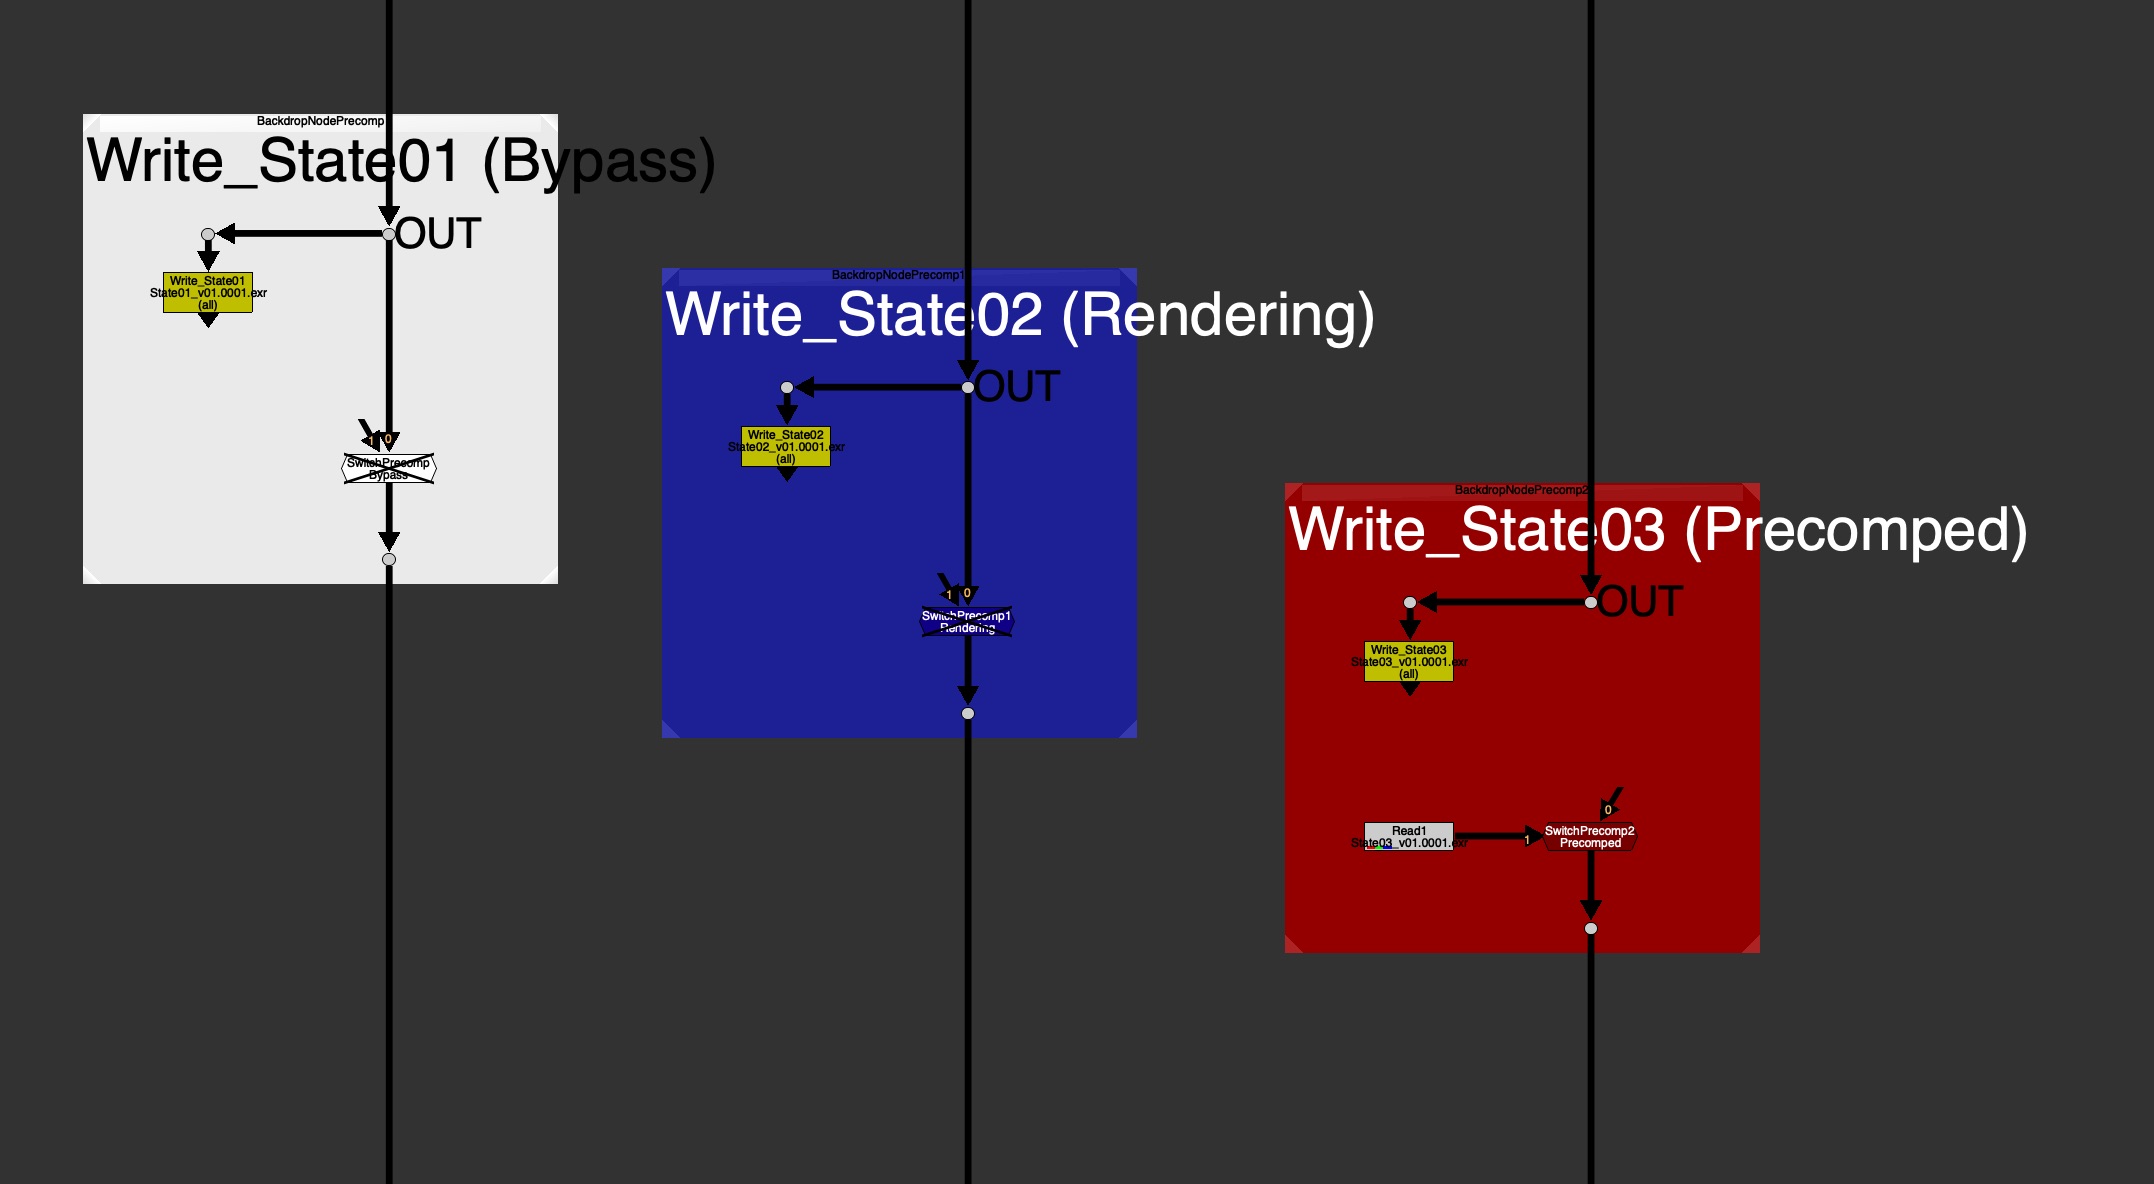
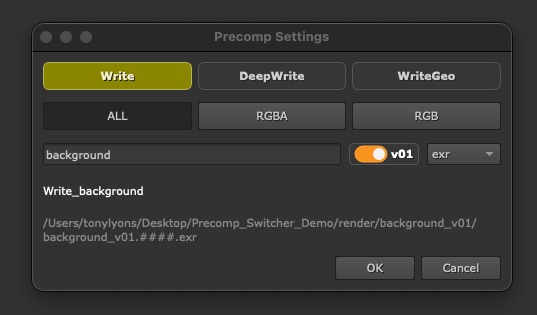
A quick panel to create your precomp setup
A color-coded Backdrop shows the precomp state at a glance:
White – Bypass
Blue – Rendering
Red – Precomped
Toggle between Precomped and Bypass simply by disabling the Switch node.
User Guide for everyday Artists & Developer Guide for how to hook it up with pipeline.
Optional Feature for Localizing your precomps, for folks working with large files over a network.
Why use it?
Consistency. Every precomp in every script looks and behaves the same.
Readability. Tile color and label tell you at a glance whether a precomp is live, mid-render, or rendered.
Speed. One hotkey to build, one to render, one to read back and flip/toggle.
Pipeline-friendly. If your studio has its own render command, custom Write Node, custom Read Node or read-from-write tool, a TD can configure this tool to use those hooks to their own pipeline commands, instead of native Nuke ones.
Hotkeys
Shift+W to create the Write, Switch, and Backdrop precomp setup
Every once in a while, you take on an ambitious project, bite off more than you can chew, and learn a lot along the way… 😅
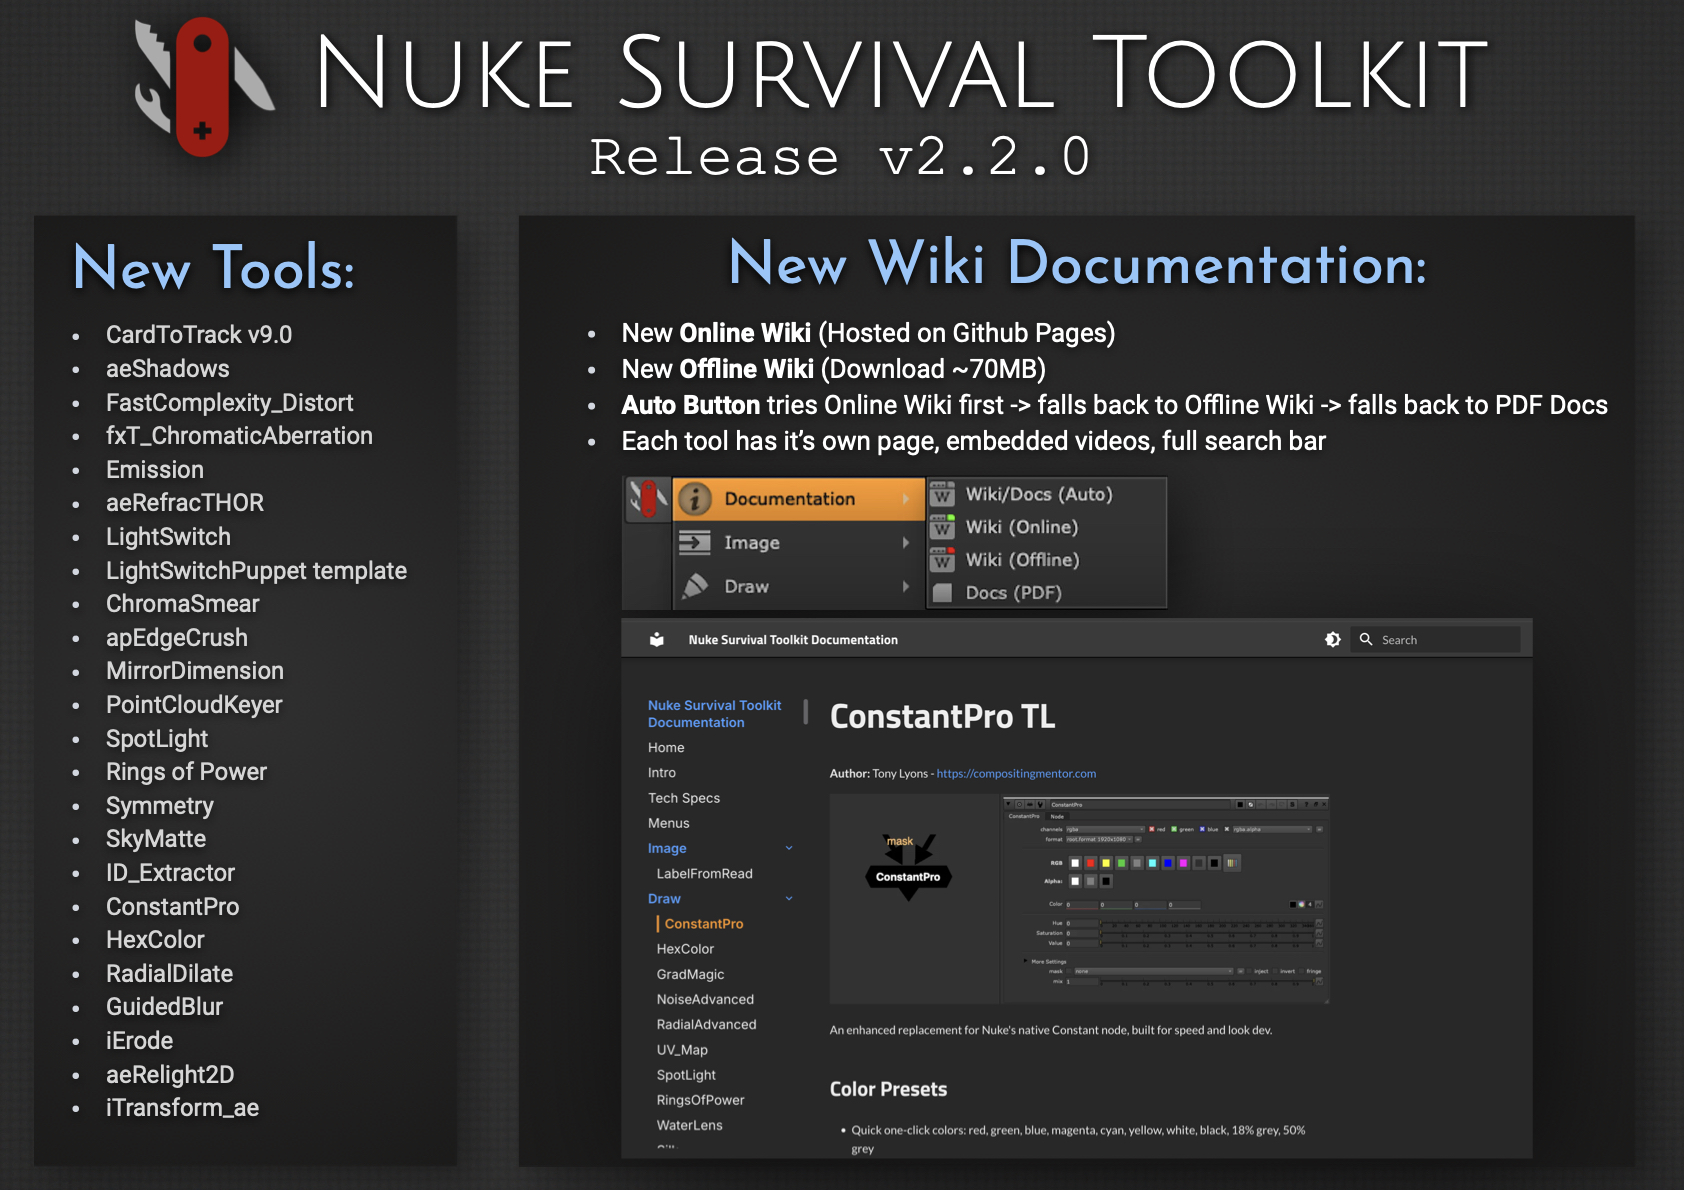
I’m excited to release Nuke Survival Toolkit v2.2.0, now featuring a brand-new Online Wiki, replacing the previous Google Docs setup. Each tool now has its own dedicated page with embedded videos and images, along with a fully functional search bar.
For folks working in internet-restricted environments, there’s also a downloadable Offline Wiki (~70MB). It mirrors the online version (minus video embeds), so you can browse everything locally without internet access. The PDF documentation is now generated directly from the wiki, ensuring it always stays in sync.
Converting the Google Docs to a full wiki, packaging an efficient offline version, and maintaining a dynamic PDF pipeline was… a challenge. But it is now a well oiled system that is easy to update. This process also gave me a deeper appreciation for the effort behind maintaining high-quality documentation, credits, references, and educational resources. Kudos to all you Wiki warriors out there.
Hope the new wiki helps you find tools faster or discover ones you didn’t know were there.
New Documentation System – Live Online Wiki (replacing the previous Google Docs) – Dedicated page for each tool – Embedded videos, GIFs, images, and links – Full search functionality for quickly finding tools – Downloadable Offline Wiki (~70MB) for offline use (no video embeds) – PDF documentation generated directly from the wiki (always in sync) – Updated NST menu documentation launcher – Auto mode: Online Wiki → Offline Wiki → PDF
What else is new since v2.1.0? – 27 new tools added – 44 tool updates, including a Nuke 13+ python2 to python3 sweep – Nuke 16 & PySide 6 compatibility for all tools needing upgrade – New CardToTrack v9 release supported (works on Nuke 16) – 11 targeted issue fixes & cleanup: ie. improved Windows path handling
The Foundry has recently published a video I created for them earlier this year, Gizmo Creation: Tips and Tricks. Let me know if you found them useful, hopefully there will be more parts in the future. Thanks!
I will just grab the great description from the video the Foundry has provided:
Gizmos are user-created super-tools in Nuke, which are an easy way to package up parts of your node graph into a single group – or Gizmo – so that it can be shared across projects, teams, and Nuke Scripts.
In this video, Tony Lyons gives an insight into how he creates Gizmos in Nuke.
He starts with the User Knob Interface and how it’s been revamped, making Gizmo creation more straightforward and faster than ever before.
Tony then looks at how we can elevate the flexibility and versatility of our Gizmos by adding multiple inputs and a switch node so you can switch between inputs easily.
He also touches on how parameters from nodes within your Gizmos can be added to the Gizmo itself, allowing you to adjust things from the node graph without needing to dive into your tools to find a specific knob tweak.
Chapters 0:00 Introduction 0:31 User Knob Editing Toolbar 1:29 Linking Parameters Between Nodes 3:27 Changing Knob Properties 4:28 Speed Up Gizmo Creation 5:13 Customising Input Names 8:01 Changing the Default Input 10:50 Switching Between Multiple Inputs 14:52 Adding Mix and Mask Options 20:13 Adding Channel Options
About Us: We are the creators of industry-standard visual effects, computer graphics and 3D design software for the Digital Design, Media and Entertainment industries. Since 1996, Foundry has strived to bring artists and studios the best tools for their workflows so they can battle industry constraints whilst staying creative. Subscribe to our channel and get the latest news, tutorials, webinars and updates from the Foundry team.
If you already have the package installed, should be as easy swapping out the old folder with the new one. In the future I plan to do a monthly release update, given there is enough material to add, bug fix, change, etc.
Please let me know if there are any tools you think I missed and would make a good addition in the comments, as well as any bugs or unusual behavior. Thanks
I’m happy to bring you a side project I’ve been working on for awhile, The Nuke Survival Toolkit!
The Nuke Survival Toolkit is a portable tool menu for the Foundry’s Nuke with a hand-picked selection of nuke gizmos collected from all over the web, organized into 1 easy-to-install toolbar.
Many thanks to all the tool contributors out there who made this tool menu possible.
Special thanks and shout-out to Adrian Pueyo for the inspiration and guidance to be able to finish this project. This toolkit contains exclusive AP tools from Adrian and myself that have not been release publicly until now! Make sure to check out all tools with an AP or TL tag at the end.
Select the rotation angle and size of the blur. Choose between blur and defocus. Has a perpendicular blur that blurs in the perpendicular direction to the angle chosen.
Binary Alpha is a very simple, yet super convenient expression that I use all the time, and decided to turn into a quick gizmo.
It analyzes a choice of the RGB, RGBA, or Alpha input and outputs an Alpha Channel (or RGBA result) that is Binary, 0 or 1. Any Pixels that are not 0 will be turned into 1 (negative numbers also), and 0 will remain 0.
This is perfect for those “blur, unpremult, set alpha, blur” for tricks extending colors, or if you need a quick matte for finding any rgb color above or below 0, in a CG render passes for example.
The good ol’ blur/unpremult/blur ❤ :
Basic properties:
The literal tcl expression is just:
r!=0 || g!=0 || b!=0 || a! = 0 ? 1 : 0
Which in english, translates to something like: “if red is not 0, or green is not 0, or blue is not 0, or alpha is not 0, then be 1, or else, be 0” So it will include negative pixels as an output as 1 as well.
Super simple but hopefully a time saver if you are like me and hate remembering expressions.
For those who just want to quickly see what the tool does, I’ll include a time-stamped link to that part of the Demo here: https://youtu.be/Kw3bcsmkGuk?t=2145
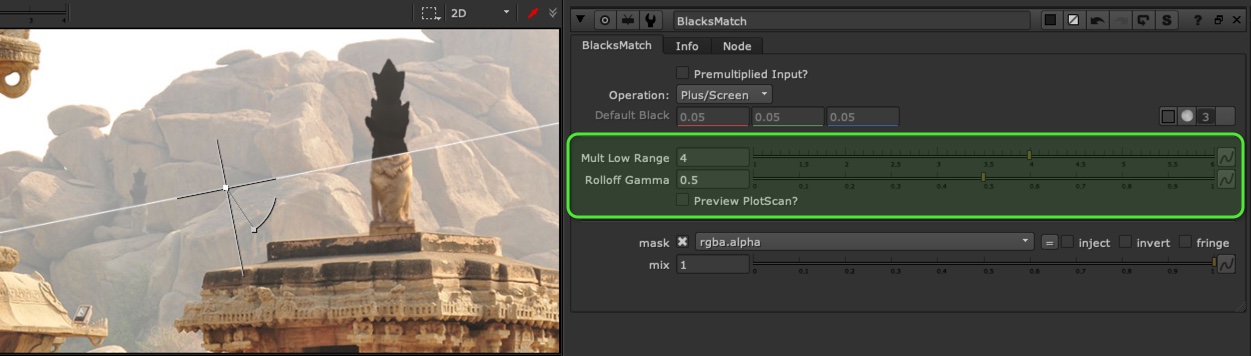
BlacksMatch recreates a Toe operation with merge nodes, meaning you can now plug in an external image are your black color and it will perform the operation taking each pixel’s value into account as the blackpoint.
You can control the Multiply, which is how far above the blackpoint the blacks match with stop affecting your midtones and highlights. For example, if you plugged in 0.15 and had the multiply set to 2, then values above 0.3 remain unaffected.
The “falloff” or Gamma control just controls the falloff of the curve into your blackpoint color. if it’s really high, it will act more like a screen or plus (still ending at the blackpoint color times your multiply control), and if it’s really low, it will act more like a clamp. Your blackpoint will not ever fall below your input color while you manipulate the curves.
There is a preview plotscan button that helps you visualize how your curve is behaving with your settings. Just move the plotscan picker around and it will sample your blackpoint color at that area and give you an overlay of your curve. (Don’t forget to turn it off when you are done)
I personally think this is a tool every comper should have in their toolkit, as it’s by far the most controlable way to match your blacks properly!
The settings of the BlackMatch Tool and a wipe from the tutorial:
There is a full video Tutorial about the BlacksMatch workflow, along with a Tool Demonstration at the end. If you want to know how I made it and whats going on under the hood, please watch the whole video. It might give you some ideas of how to re-think your matching blacks workflow.
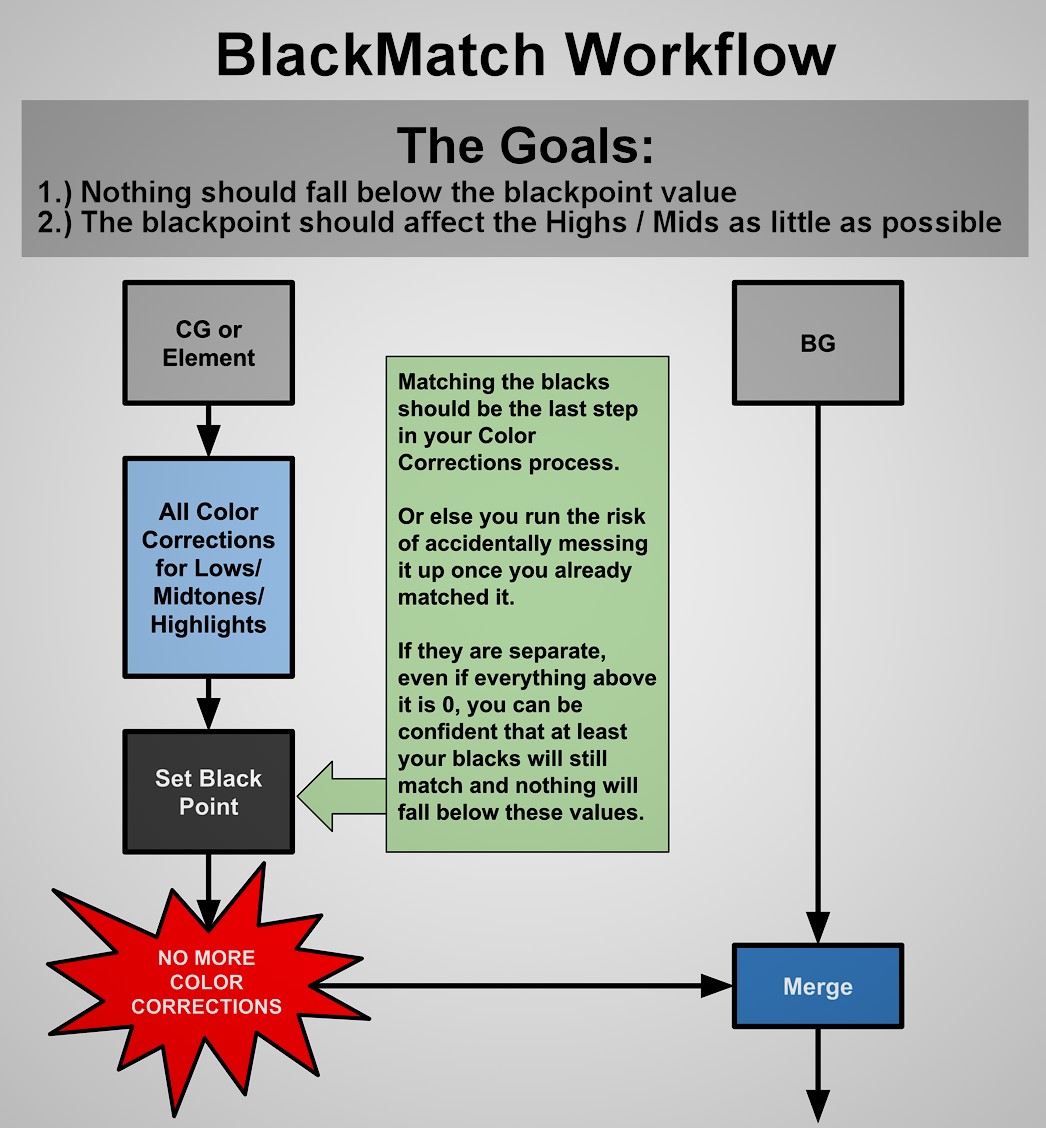
Here is the Flow Chart for the Blacks Match Workflow:
Our goals are:
1.) Nothing should fall below the blackpoint value
2.) The blackpoint should affect the mids/highs as little as possible.
The Most important thing to remember is to try and not adjust any color corrections after you apply your blackpoint.
Here’s a few examples of the importance matching blacks can be to your image:
Here is a picture with just some beauty rendered statues, color corrected and placed into our scene, no blacks match… stands out quite a bit:
Here is a before picture is we just turn off all the color and detail and just place “pure black” statues into our scene:
If we start sampling the colors around the surrounding areas of the statues and applying theses as our blackpoint, still ignore any midtone/highlight color or detail. We can actually see our statues are fitting in quite nicely. You can think of it like “if there were pure black objects in my scene in that area, what would it look like?” and we are getting pretty decent results:
And here is the image with our matched blacks properly combined with our midtones and highlights. But there is a lot of operations used to combine the blackpoint with the midtones and highlights. So let’s take a look at all of them, and study the best way of combining these:
For the second part of our goal, the blacks should affect our midtones and highlights as little as possible. We have to look at different operations of how to apply our blackpoint:
Here’s some graphs comparing the most common operations of how to match the blackpoint and what they are doing to a 0-1 curve.
Here’s a closer look at the curves next to each other:
Here is just an overlay of all the curves on top of each other to compare them to one another:
Here is a close up of a Clamp operation:
Here’s a close up of the plus operation:
Here’s an example of a Screen operation:
A close up of a Hypot operation:
A close up of a Toe operation:
Let’s now talk about the Good, the Bad, and the Ugly… starting with the bad:
A screen and lift do a sililar operation between 0-1, but the screens influence stops at 1, where as a lift is actually using 1 as a pivot point to lift the blacks and lower the highlights above 1. If you set a lift to 1, it will completely decontrast the image, sandwiching every pixel and turning the entire frame to 1.
No matter if you leave a color correct at default range, or start adjusting the range curves, the color correct produces some very strange results because of the S-curve it generates. Because it is sampling the luminance from the bg image, if you enter a black point number higher than the luma key it is calculating, than the curve will first be your black point color, then dip back down to the midtone color and rise back up to your highlights. This creates a really strange image that you’ll want to avoid.
Avoid Lift on a Grade, and avoid ColorCorrect nodes for adjusting your blackpoint.
The Ugly:
Both Clamp and Plus are at the Extremes of our operations, and have the least appealing qualities. You can acheive much more control and better operations using our remains screen, hypot, and toe operations. Here is the gif of the curves compared to one another again so you can see that clamp and plus are at the extremes:
Screen and Hypot are perfectly fine operations, but offer limited control. and Toe… Well we can’t even input an image, and we don’t even know what exactly it is doing. There’s very little documentation on it. Let’s try to reconstruct it:
With a little bit of fiddling around. We can see the top of the toe operation is exactly double the value of the blackpoint… We need to start by re-creating a screen, which is basically an inverted luminance key, used as a mask, that is plusing out blackpoint. From there we can create a screen operation that instead of end at 0-1, ends at 0 to 2x the balckpoint value, and you can see in the example above we have a mini triangle encompassing our toe operation. There it’s a matter of using a gamma of 0.5 on the luma-key mask and we have our toe.
So to reiterate:
A toe is an inverted luma-key, that instead of 0-1 is 0-‘2x the blackpoint color’ and then is gammed by 0.5 and is used as a mask to plus the blackpoint color over the image.
I know… that’s a mouthfull. But what we take away from making this toe for ourselves is that we have controls over 2 things. The multiply of how far above the black color it is affecting our midtones and highlights. And the gamma curve that is controlling our falloff of the curve towards the blackpoint value.
With this knowledge and math, we can create a tool that uses merges to do our math operations, which mean me can plug in an external image as out blackpoint and expose controls for the mult (above the blackpoint) and gamma (falloff) of the curve. And now we have our BlacksMatch tool.
I’ve received a few requests for the script and images I’ve used in the tutorial, so I’ve put together a folder on my dropbox for you guys to download and play around with. This is a preview of the part of the script I am saving for you. It includes the statues over the temple example, a couple of the simple shapes over complex black level images, and the part of the script that I recreated the toe, with the animating graph.
I’m also adding a reference image folder, with some of the cool hazy/foggy complex black point images I found while researching this topic. Maybe they will be good practice for you to bring into nuke and play around.
Finally I am adding in the original statue exr render, with some passes: beauty, depth, position, and normals, in case you want to try and color correct and match the statue render into any of these images or your own backgrounds. Thanks to Ernest Dios for the render.
LabelFromRead is a simple gizmo that displays the end of the file path from the top most read as a text overlay over the top of frame.
Useful for when you want to quickly display the filename when you are overviewing shots or sequences with a contact sheet and want to see what is what.
Basically so you don’t have to remember how to split filepaths in tcl and can easily display the image name.
Full Credit goes to Ben McEwan and his very detailed blog post about powering up your contact sheets.
This one is just for people who want to download the expressioned node and add it to their toolsets and not mess with any menu.py files.
I show this tool in a video explaining my LabelFromRead node, and I didn’t see a downloadable gizmo version on nukepedia, so figured I’d post it.
I made a brief demo of the LabelFromRead tool, along with how I use it with an automatic contactSheet node to review or compare multiple shots in a sequence.
NoiseAdvanced is a noise node with user friendly animation sliders, making it quick and easy to whip up some cool look dev, smoke, clouds, caustics, or whatever you like. No more typing in those expressions everytime you want to make a subtle tweak or test some different speeds.
By default, comes in exactly like a normal noise, and is revealing all the normal noise knobs.
I’ve added an extra ‘Overscan’ slider so you can extend the noise pattern beyond the format edges and not have to mess around if you need extra noise for your image overscan.