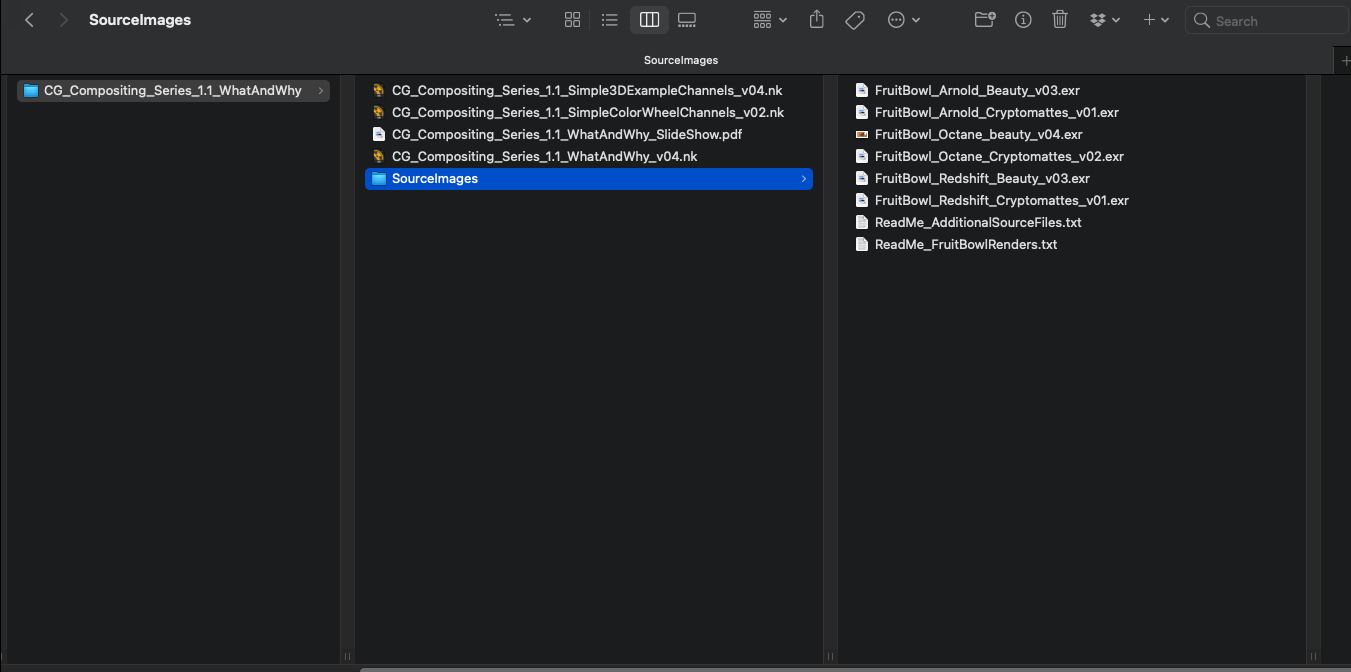
The project files and the Renders are separate downloads, so if you have already downloaded 1.1 What and Why files or the Fruitbowl Renders, there are a couple ways to combine them to work.
Either add the .nk script to the previous package (in the folder above SourceImages, with the other .nk scripts)
Or simply drop the Render files into the SourceImages folder of the new 1.2 project folder
This will help the Read nodes auto-reconnect to the sourceImages for you.
Often there are a lot of renders passes to sort, and it’s useful to divide them into categories based on their functions. We can divide up all the render passes by how they are used.
There are 2 Overarching Types of CG Passes:
Beauty Rebuild Passes – Will recreate the Beauty Render
Data Passes – Helper passes
There are 4 Main Categories of CG Render Passes
Material AOVs
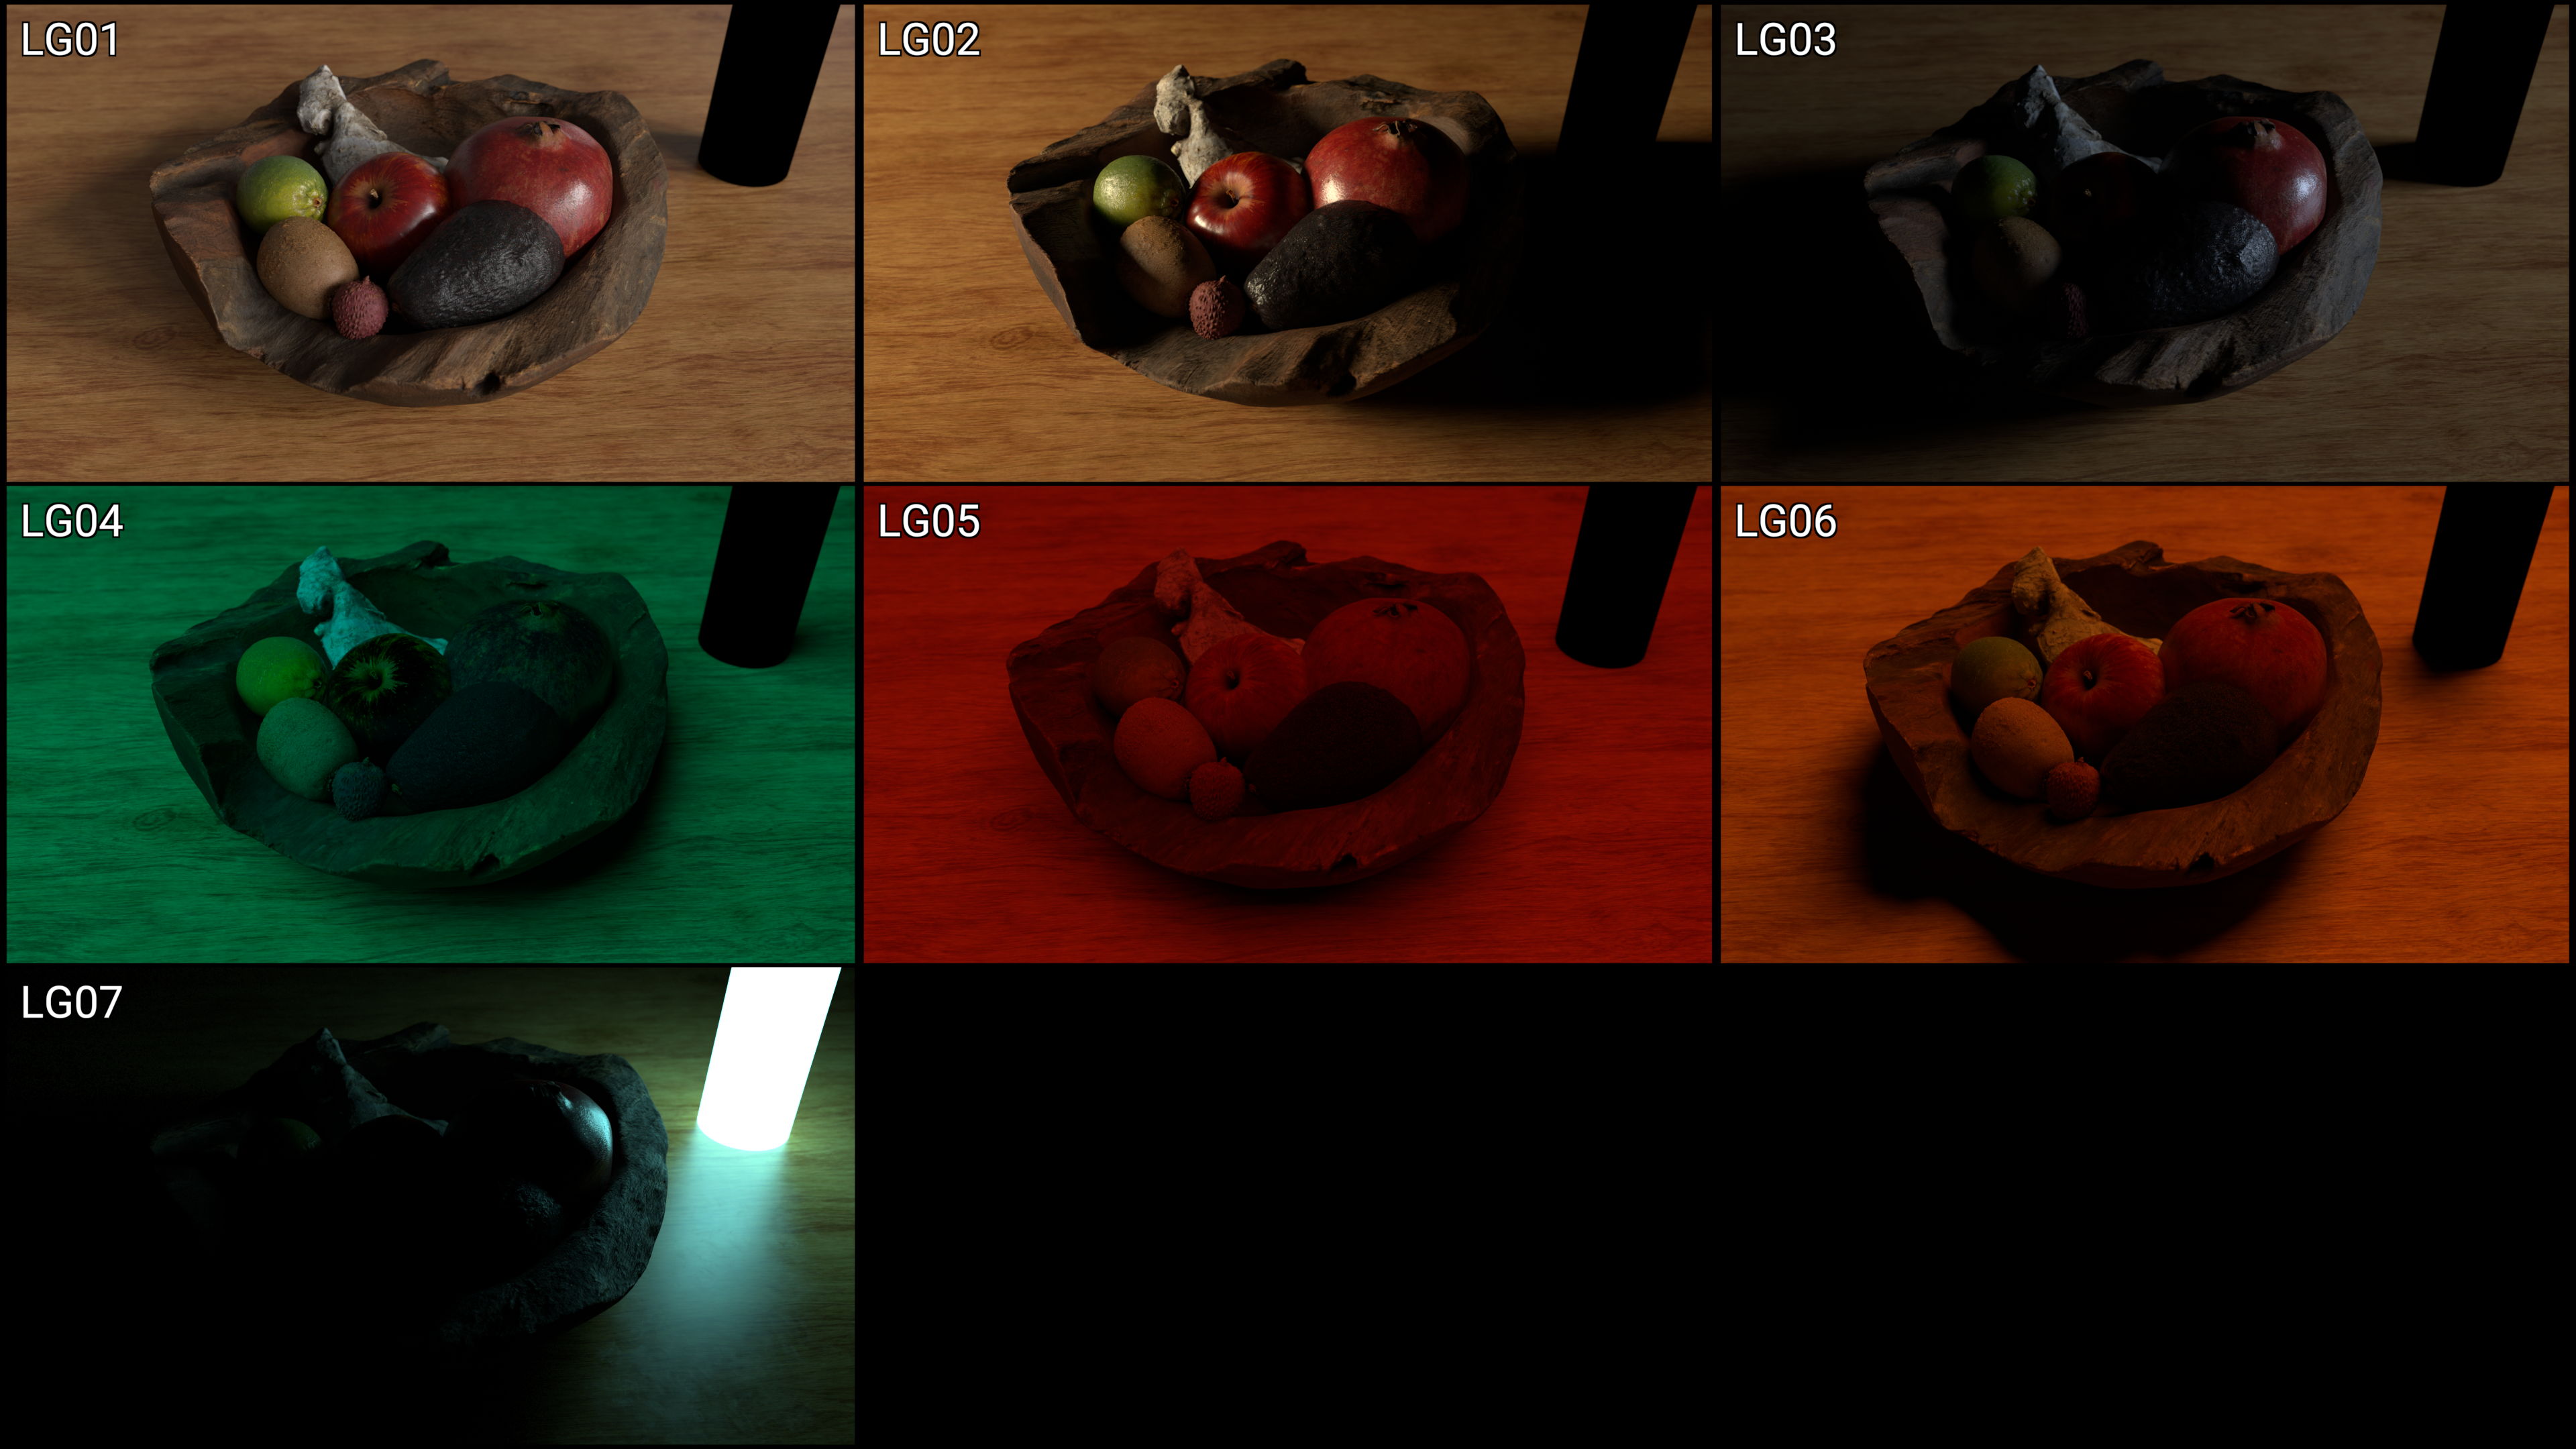
Light Groups
Utilities
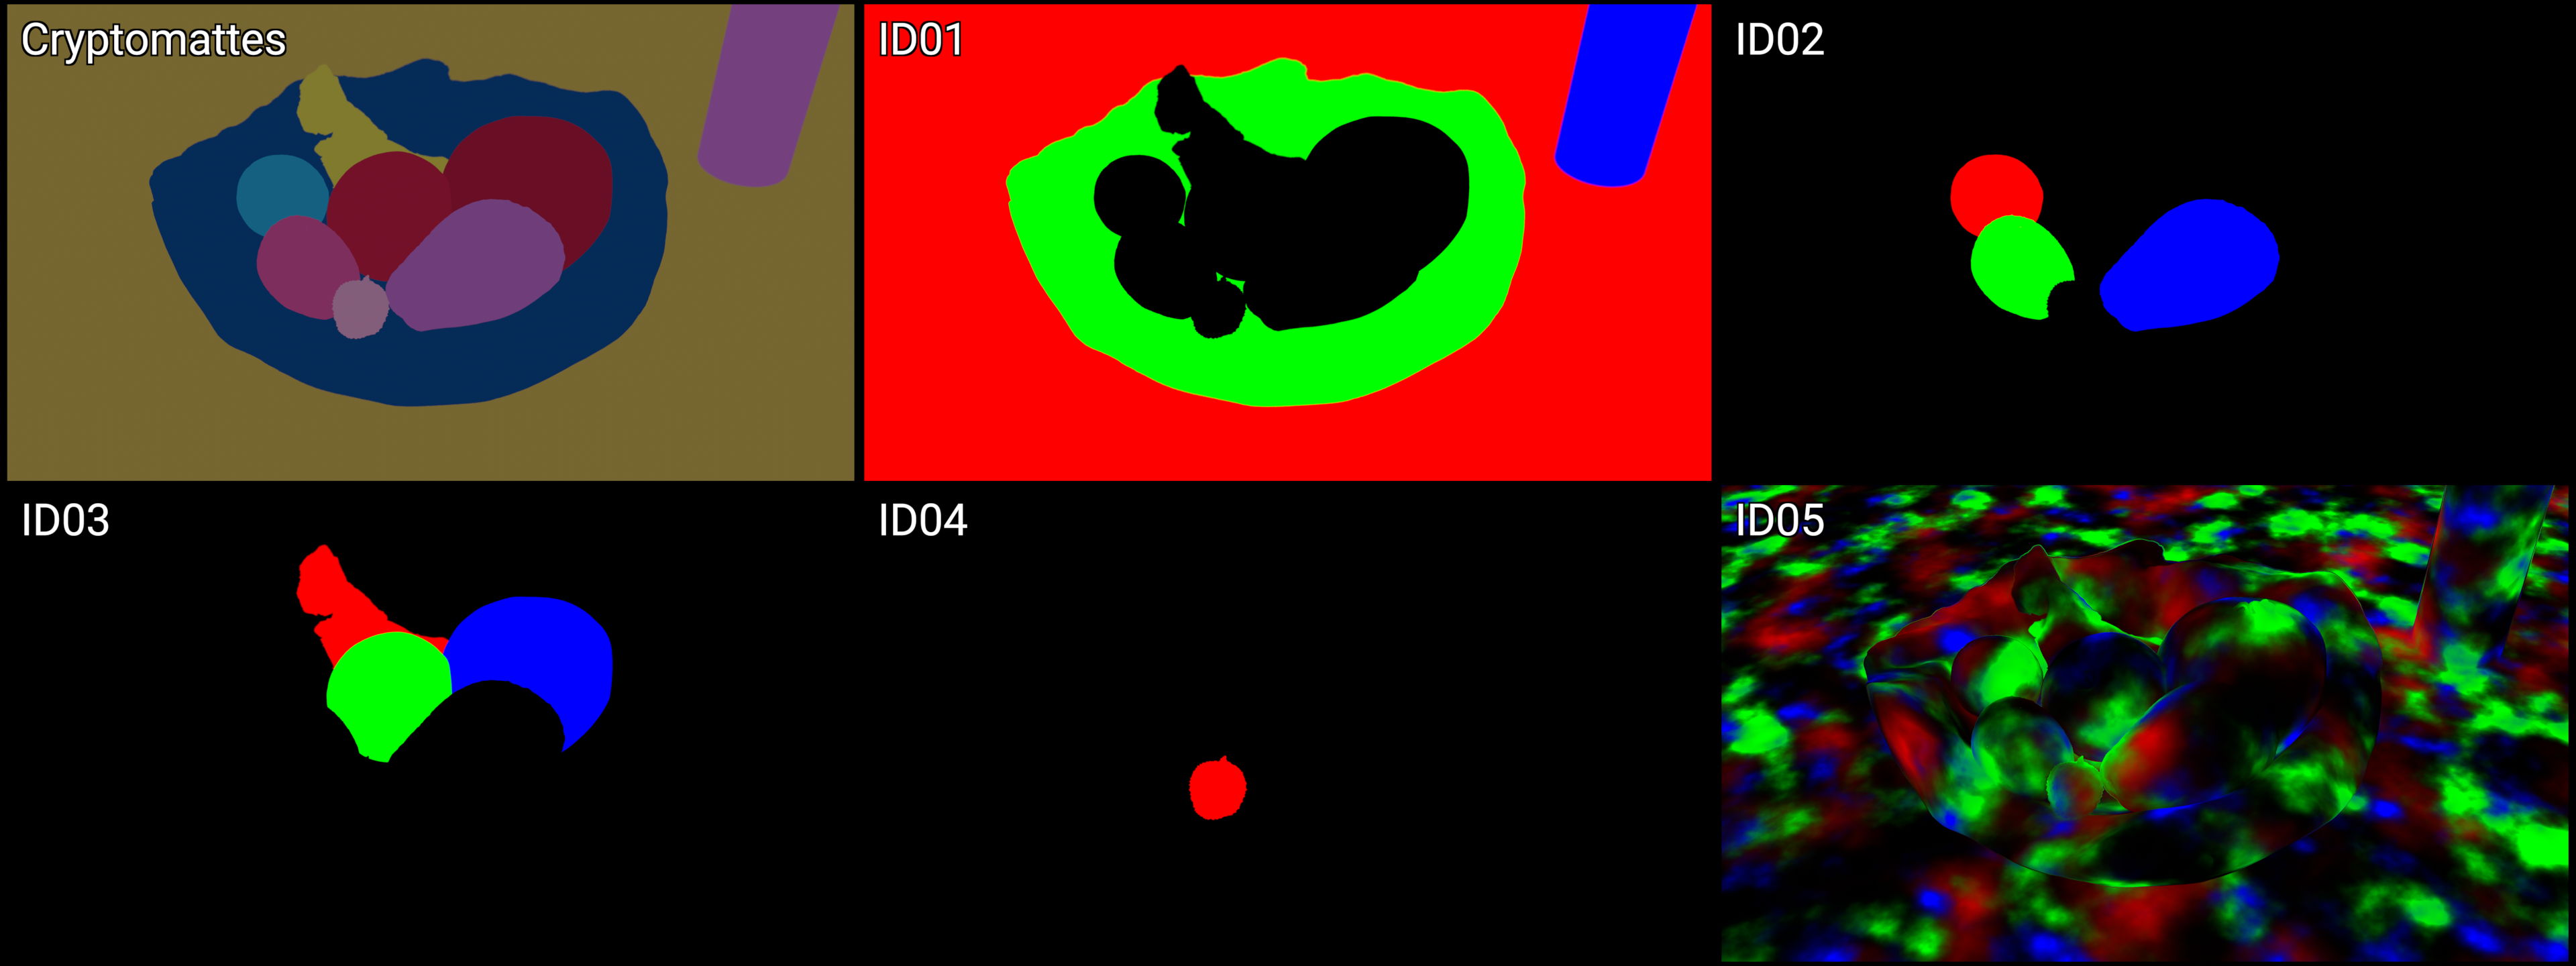
IDs
Material AOVs
Used to adjust the Material Attributes (Shader) of objects in the scene
Examples:
Diffuse, Specular, Reflection, Sub-Surface Scattering, Refraction, Texture/Color, Emission, Raw Lighting, etc.
The passes in this category should add up to recreate the beauty render, as demonstrated in the previous video
From now on in the series, if I only say “AOVs”, I am referring to this category here. I will try my best to say Material AOVs, but I am so used to it being in my terminology and don’t find the AOV “all render pass” definition very useful.
Material AOVs are passes related to the shader or material from the 3D application. When we use these passes, we are wanting to manipulate the material or the shader of the object
Key, Rim, Fill, HDRI, Light-Emitting Objects, etc.
You can separate your lights however you like. Usually you see things like the 3 point lighting set up broken out into different lights. Along with HDRI and light emitting objects separated.
We are usually adjusting light attributes such as temperature and intensity
The ID category could probably live under the Utilities Category, but I do think the separation of these 2 categories is useful.
ID’s sole purpose is to pull out an alpha or matte channel, whereas Utilities can have many use cases beyond just that.
Many times a texture artist working on characters will make custom texture matte passes that can be rendered out as Texture RGB IDs to help isolate those important parts of the texture for adjustment in comp.
These also do not add up to the Beauty Render
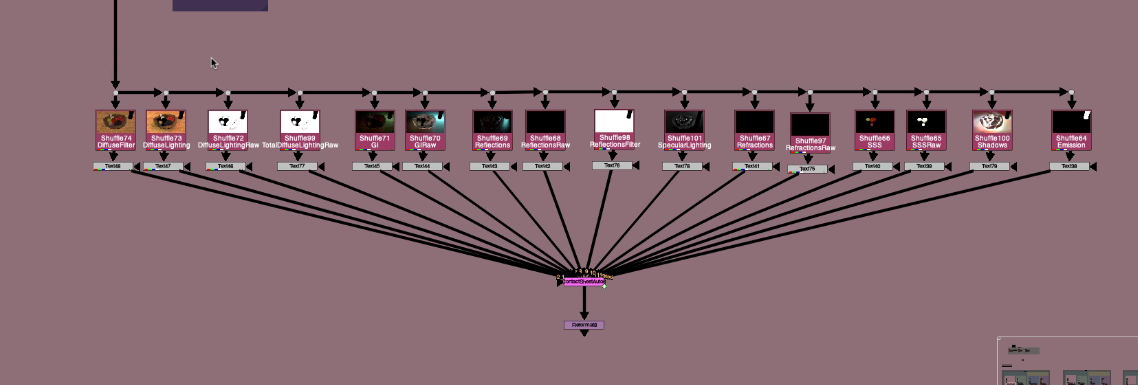
Nuke Script: Breaking out Categories of the Renderers
Nuke script is a node graph representation of the slides table we looked at and I’ve broken out the passes in the categories for each of the 3 render engines.
In order for the LayerContactSheet node to display just the passes for each category, I am removing all layers from the other categories.
I’ve also broken out all of the Category’s Layers into shuffles when a text of the layer name into a contact sheet. The main difference would be that this contact sheet would be renderable, and the UI text on the layerContactSheet is not.
In the Beauty Rebuild Passes Section, underneath we have a Material AOV rebuild and a Light Group Rebuild, showing that these passes add up to equal the Beauty.
Please look through the different categories and different Render Engines to familiarise yourself.
Tips and Tricks for making contact sheets
Split Layers
Here are some links to some various Split out layers / shuffle layers python scripts found on nukepedia:
Place the FruitBowl renders files into the /SourceImages/ folder of the project files and nuke will reconnect the read nodes.
What is a CG multi-pass Render?
A CG Render with multiple extra layers or passes that are to be used to recreate the Beauty Render and to aid in further manipulation while Compositing.
Why do we need it?
Renders are Expensive, and Changes are often necessary. It can take too long to make tweaks and hit notes if you have to re-render the image.
Sometimes it’s faster to find the “look” you are going for in Comp, rather than waiting for the Render results.
Some effects are better achieved in Comp and need additional passes to help achieve the effect in Compositing.
Terms and Definitions
Here are some useful Terms and Definitions that I will be using in this series. They are commonly used in the industry, but sometimes they can be confusing or interchangeable, so I will try and define them for us to help while discussing CG Compositing
Render – The output image or final result of the export calculation from the CG software.
Renderer – The Render Engine or algorithm used to produce the render.
Render Passes – A general term for additional layers exported by the CG renderer meant to be used alongside the main render. These might come contained within a multi-pass EXR or be rendered as separate images.
SourceImages and Stamps
All of the read nodes and source images in the nuke scripts will be located at the top of each nuke script under a “Source Images” Backdrop
You will need to re-link the files in this area if you are following along
We will be using Adrian Pueyo’s “Stamps” add-on to nuke in order to populate our nuke script with the files in the source image folder.
LayerContactSheet is the easiest, fastest, and most convenient way to get a visual overview of all the passes contained in your render.
Turn on Show Layer Names to get UI labels of each pass name. This is only a GUI overlay, so you cannot render it out, it’s just for viewing purposes, but it’s great for identifying the pass names we are looking at
The Viewer
The Viewer shows an alphabetical dropdown list of channels of the stream where the viewer is plugged into.
Remember to set the viewer back to RBGA when you are done viewing that layer
You can use the PageUp PageDown hotkeys to cycle through layers in the Viewer
Along the bottom left of the viewer, it also lists all the channels separated by commas. It’s good to occasionally look at this part of the viewer to keep track of if you’ve lost your layers from the stream, or you are accidentally carrying layers that you do not need anymore in the stream.
Shuffle node
The Old Shuffle node will show a list of all layers in the stream which it is plugged into if you use the “in 1” dropdown
Good way to quickly check what layers are in your stream, but not as visual as layerContactSheet
ShuffleCycleLayers python script:
I wrote a tool called “ShuffleCycleLayers” which you can use hotkeys like Page Up, Page Down or + , – to cycle through the layers of the selected shuffle node, just like the viewer layer cycler. Maybe some people will find this handy if they don’t like to changed the viewer channel dropdown and would prefer to cycle through Shuffle node layers
Old shuffle only displays list of layers within the stream the input is plugged into
New shuffle displays list of every layer in the nuke script
If you’d like to exclusively use the old shuffle node instead of the new shuffle node, you can add this line of code to your menu.py in your User/.nuke/ folder
Split Layers is a python script that shuffles out all available layers from a selected node
This will make 1 shuffle per layer all connected to the source.
You can then just view and toggle between all the layers in the nodegraph
selecting all and hitting the hotkey alt + p will toggle on the postage stamp feature in all the shuffles, and if you visual thumbnails for all the passes. This can be useful for grouping and organising the passes.
Here are some links to some various Split out layers / shuffle layers python scripts found on nukepedia:
Channels are the individual pieces that make up a Layer, or Channel Set. The most common example is red, green, blue and alpha, channels that make up the rgba layer
A layer must contain at least 1 channel, but often has multiple channels.
Nuke prefers layers to have a maximum of 4 Channels per layer, any more and it has difficulty displaying them in the GUI interface
It becomes significantly more difficult to see the channels beyond 4 that are in 1 layer. Nuke’s interface is built around displaying 4 channels.
An individual channel in nuke is written as LayerName.ChannelName, to let you know what layer it belongs to
Depth.Z for example, in which Depth is the LayerName, and Z is the ChannelName
Whenever there is only 1 Channel, this displays in the viewer as the red channel, since it’s the first channel visible in rgba
There are also many cases where someone will just refer to it as “The Depth Channel”, where they are recalling referring to the Layer, but since it commonly has only 1 Channel, they are talking about the same thing.
Some nodes in nuke deal with layers and channel differently, or prefer to deal with one vs the other
A shuffle dropdown displays LayerNames for example whereas a Copy node displays Channels, and therefore the list is much bigger since it is displaying the individual pieces of the layer
Blur node “channels” dropdown actually lists layers, and then you can toggle the channels of that layer on/off
Basically any node with a mask input is dealing with channels since it only needs 1 channel to function
The first 4 channels of a layer are mapped to, and will display as Red, Green, Blue, and Alpha in the viewer, regardless the actual name of the layer. Any more than 4 channels in a layer and nuke has a hard time displaying them
A motion pass for example, is describing motion in XY directions. Left-Right and Up-Down. So only 2 channels are needed in the Layer and they display as Red and Green
A position pass, for example, is usually describing XYZ – 3D space coordinates, and sometimes the channels are actually named x, y, and z. So Position.x, Position.y, Position.z
Since X, Y, and Z are taking up the first 3 channels in this layer, they will display as red, green, blue
AOVs
AOVs stand for Arbitrary Output Variables
Arbitrary output variables (AOVs) allow data from a shader or renderer to be output during render calculations to provide additional options during compositing. This is usually data that is being calculated as part of the beauty pass, so comes with very little extra processing cost.
They can be considered ”checkpoints” or “steps” in the rendering process. The render engine splits up many calculations while making the final image (Beauty) and is exporting these smaller steps out to disk so we can combine them and manipulate them in Comp.
The important thing to take away is the renderer takes these “pieces, these AOVs, and combines them together to form the final Beauty render. We are essentially trying to recreate this process with our CG rebuild, while retaining control over the individual pieces.
One of the best things about AOVs is we get them “for free” since the renderer was going to calculate them anyway.
AOVs can sometimes be just a “catch all term” for all layers/passes you will render out
“What AOVs are you exporting” is a common question, and many 3D applications will use the term AOVs to define any render passes (even though some of them require extra work to get, like ID’s or custom passes)
Differences in the Render AOVs
All the renderers are essentially doing the same thing. They are crunching the numbers, using different algorithms, and coming up with the math needed to produce the final renders.
Since all the renders are basically doing the same steps / calculations, you just have to get used to what that renderer chooses to name these AOVs or lighting passes. All the passes will combine together and add up to the final Beauty output.
There are certain similarities or patterns between all the renderers.
Sometimes we’ll be looking at 1 renderer while explaining concepts, but they often translate over to the other renderers in some way. So keep an eye out for the patterns described and apply what is being taught to your renderer’s output.
Our renders have differences in amount of AOVs exported and differences in naming conventions for the AOVs
For a long time I wanted to release a CG compositing series. Many things stopped me in the past:
Time constraints
Access to good Render examples to work with
Not thinking I had too much to contribute to the subject matter
This series will be focused on answering the following question
How do I best rebuild my CG passes, for the most flexibility as a Compositor?
Download the FruitBowl Renders for the Series
My Friend and fellow artist, Chase Bickel, has kindly provided us with some high quality renders of a FruitBowl to download for free and play around with.
Download the FruitBowl renders now, or I will always post the links at the top of each video and blog post for you to download later:
You can place the FruitBowl renders files into the /SourceImages/ folder of the project files folder accompanying each video and nuke will reconnect the read nodes.
For Example:
These Renders are full of common passes you would find in production, including:
AOVs
Lightgroups
IDs
Utility
Gameplan
Start with the Basics –> Build our way to more advanced topics –> End with a proposed template for your CG Rebuild
I will go through different types of AOV passes you would typically find at a studio, what they are, how they are used, and how should think about them in relationship to one another. We will categorise and group different AOVs in order to define them better, and help us find the commonality and patterns between renderers.
This series aims to be useful no matter what renderer your CG comes from, as the principles are the same.
Topics Covered
Differences between Additive and Subtractive Workflows, and the pros and cons of both
Explaining the difference between Material AOVs and LightGroups and how to work with them together seamlessly
This includes an elegant solution to the infamous AOV – Lightgroup paradox
I will cover the importance of making Mattes and alphas, to help us isolate, and automate our CG manipulation. We will go over common utility passes and IDs and show how to do some cool things with them
Using Full CG Render
Will not cover how to integrate CG renders into a live-action plate
Will focus on the CG rebuild and various methods of manipulation to get the most out of your CG renders
Something for everyone
Juniors, Mids, Seniors, TDs, Comp Supervisors
There will be knowledge to be learned across all levels
Perhaps this will one day be a pre-requisite for a full CG Compositing into live-action plate course
This series will take some time to release all episodes, so please have patience
I was recently on VFXforFilmmakers channel doing a keying demo using my advanced keying template. Matt has kindly filmed some 4K ACES blackmagic footage for all of you to practice on, and we’ve included this nuke script, original footage, pre-renders and final render in the work files for you to play around and dive into.
It’s a great resource and practical case of how I would use the techniques and templates that I developed in the series. By no means the only way to keep, but hopefully you will find many parts interesting and valuable.
The FREE working files can be downloaded from Matt’s website VFXforFilm.com
If you already have the package installed, should be as easy swapping out the old folder with the new one. In the future I plan to do a monthly release update, given there is enough material to add, bug fix, change, etc.
Please let me know if there are any tools you think I missed and would make a good addition in the comments, as well as any bugs or unusual behavior. Thanks
I’m happy to bring you a side project I’ve been working on for awhile, The Nuke Survival Toolkit!
The Nuke Survival Toolkit is a portable tool menu for the Foundry’s Nuke with a hand-picked selection of nuke gizmos collected from all over the web, organized into 1 easy-to-install toolbar.
Many thanks to all the tool contributors out there who made this tool menu possible.
Special thanks and shout-out to Adrian Pueyo for the inspiration and guidance to be able to finish this project. This toolkit contains exclusive AP tools from Adrian and myself that have not been release publicly until now! Make sure to check out all tools with an AP or TL tag at the end.
GradMagic is an interactive 4 point gradient tool, which can link to cornerpin nodes, and can toggle between live sampling from the plate or baking the color values of the corners.
Can be used for various tasks in prep and DMP,or if you just need a quick 4 point gradient map.
Quick Overview of the properties:
It’s pretty straight forward, heres some basic written steps:
1.) Set your cornerpoints manually or by pressing one of the ‘snap to’ buttons. Or alternatively you can link or bake your cornerpoints to an existing cornerpin node (or any node with 4 “to” knobs).
2.) If you need to adjust the points once they are baked/linked/ in place, then show the adjust knobs, set the reference frame to snap the adjust points near the main points, and you can then move each cornerpoint while it still retains its animation path.
3.) You can either keep the node live, bake the corner colors on a single frame, or bake the colors over a framerange. once baked you can adjust the cornerpoints further if you need to cover up more area. You can adjust the ‘sample size’ at the top if you want to average more colors under each corner point.
4.) Finally you can apply a blur to the edges to help with transition, and you can select the output at the top, whether to show the gradient over the BG input, or just the gradient itself.
0:00 – Introduction 4:30 – CC and transform after key 6:49 – CC and transform before key 12:03 – Advanced Keying Template flowchart 15:25 – Advanced Keying Template 40:10 – Advanced Keying Template Compressed 40:55 – Advanced Keying walkthrough script 41:59 – outro
Hey guys,
Sorry for the long overdue tutorial wrapping up this keying series. Here is the advanced keying template video, along with a flowchart and download link to the template scripts, which you can save to your toolsets for your own use in your nuke scripts.
Here is the Template Flow Chart from the video for you to download and review:
Here is the download to the Advanced Keying Template Package:
http://www.thefoundry.co.uk/products/nuke/learn1/ – scroll down to 2d compositing | Compositing Basics. Click on the link that says Download Assets for Basic Workflows (535 MB). Here you will find the girl and desert BG found in this tutorial.
https://mango.blender.org/ – Tears of steal open source project. Free 4K footage for people to download and practice. Highly recommended. scroll down to the blog post called ALL4K FRAMES – NOW AVAILABLE ON XIPH.ORG.
Finally, I want to thank everyone for your continued support, views, shares, comments, and emails. It all means a lot to me and you’ve certainly motivated me to keep going. Thank you.
As always, if there are any questions, just leave a comment or shoot me an email and I will try my best to respond. Hopefully with this series of tutorials, and now this template, you guys will be fully equipped to handle even the toughest of keys.
Here is the first part in the advanced keying series. I’ve started with the ALPHA section, and made a custom slide for just ALPHA, where you can see the many topics I plan on covering in future videos, but for now I am just covering 1.1 Pre-processing the Green Screen. Here is the slide for ALPHA:
It’s a long video, but it’s full of useful tips and techniques. I recommend watching the whole thing if you get a chance, but if you’re in a rush and want to skip to certain sections here are the Timecodes for you:
Please guys, I know I covered a lot but if you have any questions, or if you would like me to do a written recap on all the sections here in this blog post, please just let me know and I’d be happy to write it up for you. Leave a comment with any questions, or if you think I messed something up, or if you’d like to contribute to the conversation and have anything to add to this tutorial. I enjoyed putting this together and look forward to the rest of the keying tutorials I plan on putting together. Please share if you learned something =)
So I knew I wanted to do a keying tutorial awhile back, but I didn’t want it to be the same old crappy keying tutorial that you always see online. The teacher always talks about how to use the tools, and not about the main concepts or techniques behind them, the end result, what we are actually after.
I have put together this introduction video, and a part 1 video “ALPHA 1.1 Pre-Processing Greenscreen”, as a push to get this stuff out to you guys. Here is the Slide in the video for you guys to save for your own use:
The 3 main parts are ALPHA, DESPILL, and MERGE OPERATION.
Here are some time codes to skip to in the video if you so please:
I will go into all of these in far more details, this video is just me talking and doing a rundown of what to expect in upcoming videos.
I recommend you guys browse through the following videos on Nukestation (a GREAT website and central location for nuke tutorials) if you are new to keying or compositing. The video I am doing is quite advanced, and you’re probably going to want to get a firm grip on the keying tools in nuke before watching. http://nukestation.com/category/keying/