STMap_BBox
Today I’m releasing STMap_BBox, a C++ plugin for Foundry Nuke. It does the same thing as Nuke’s native STMap node, but with one additional calculation for also warping the Bounding box.
Download the plugin from my Github:
https://github.com/CreativeLyons/STMap_BBox-public/releases/latest
Instructions on installation are in the README.md file in the download, and are also briefly mentioned in the video.
Lens Distortion Workflow
This plugin is mainly to help make the STMap node more useful in the STMap Lens Distortion workflow.
All plates have lens distortion, and it’s essential in compositing to undistort the plate, and to redistort any element to match the plate distortion. We are constantly jumping between undistorted and redisorted states depending on the task: paint outs, roto, CG, 2D elements, tracking, projections, etc.
It’s fair to say that lens distortion is one of the most common things we do in our nuke scripts.
Most Tracking software, like 3D Equalizer, Syntheyes, even Nuke itself, can export a Lens distortion plugin or node to do the actual lens distortion. They also have the ability to export a Lens Distortion UV map.
A UV map is just a utility image with data that tells Nuke where to warp the image to on each pixel. Using a UV map with the STMap node yields an identical result to using the actual lens distortion node itself. You’d need to save 2 images to disk, an Undistort map, and a Redistort map. In most cases these are static, but sometimes there is an animated lens distortion map needed (full-framerange) because of lens breathing or rack focus.
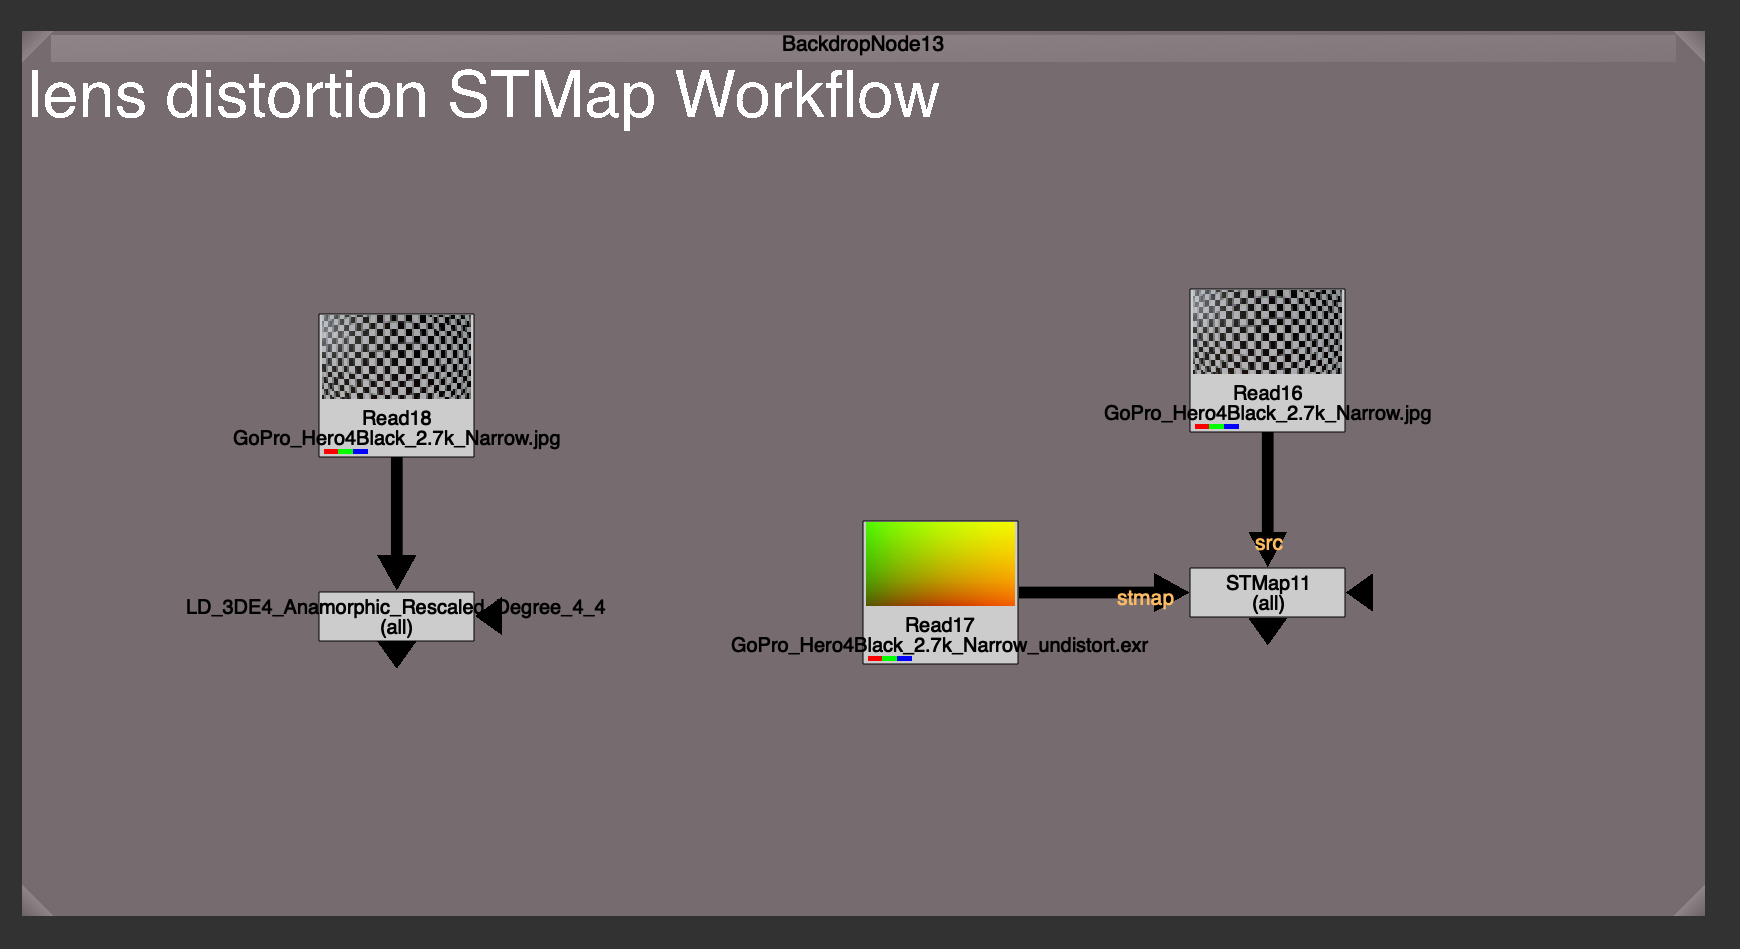
Why use an STMap workflow over just using the actual lens distortion node?
There could be a few reasons:
- You might not have the lens distortion plugin installed. These Tracking softwares ship with their own plugins, specially designed to work with the data that the software is exporting. If you don’t have the plugin installed, you won’t be able to reproduce the distortion. But with the exported UV map / STMap workflow, you can.
- Easy to share. This UV map is an image format, usually 32 bit exr for uncompressed data storage. This makes a UV map more universal than say a .nk file, or a plugin file, specific to any software. In fact it’s a software agnostic way of reproducing the same distortion, with the same UV map, anywhere.
- Easy to swap out. It can be much easier to swap out or update one single source of true, rather than finding and swapping all the Lens Distortion nodes everywhere in your nuke script.
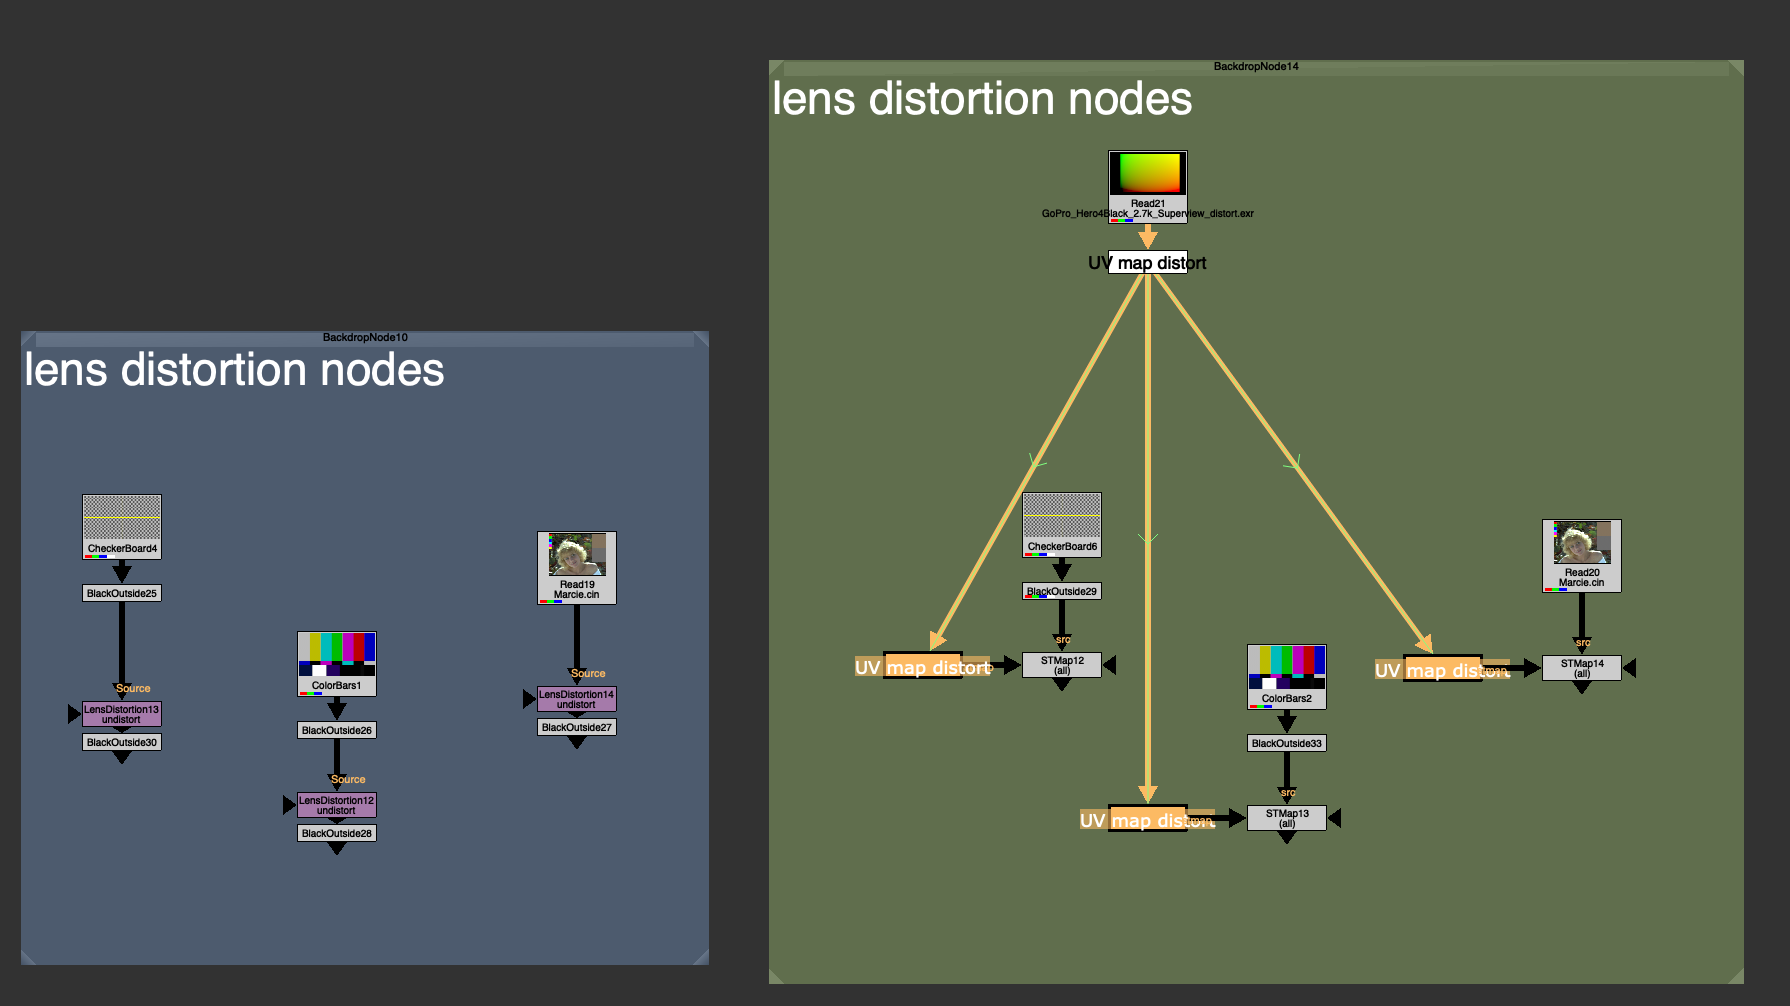
I’d like to focus on the last point, because this really is what makes this STMap Lens Distortion powerful, especially when paired with a tool like Adrian Pueyo’s Stamps, a hidden input system for Nuke.
When using a template, or just using another shot’s nuke script as a base, you need to swap out all the lens distortions for the correct distortion for that unique shot. Instead of manually needing find and replace each Lens Distortion node everywhere in your script. Hoping and praying that you didn’t miss any (we’ve all had it happen).
The UV map / STMap workflow allows use to have 1 source of truth for our lens distortion, and makes swapping out the old Lens Distortion for a new Lens Distortion as easy as swapping out that map. Every lens distortion is updated instantly.
Pairing this with a template workflow, and checking on “auto-reconnect” on the stamp children. You can actually save a template that will automatically sync and connect to your redistort or undistort maps in your nuke script when the template is brought in. This saves precious time and always ensures you didn’t forget to lens distort, and that you are using the shot’s very own distortion maps.
What’s the catch?
Unfortunately, Nuke’s native STMap node only distorts the Image channels, not the Bounding Box of the image. In fact, because warping the image while keeping the original bounding box would probably make it go out of bounds (stretchy pixels) nuke defaults to just using whatever the `stmap` input BBox is. This is a safe bet, because the image will never warp outside of the UV map image (because that image is telling it where to warp to) so there is no risk of the BBox being too small, and it also eliminates the need to do any extra bounding box calculation.
Because all redistort and undistort maps on plate distortion are the roughly size of the full plate format, or bigger in the case of large undistort with overscan, it means that even if your src input BBox is small, it will replace the BBox with the full format after the distortion warp.
Have a look at the difference in Bounding Box size after using the Lens Distortion node (left) and after using the equivalent STMap workflow (right).
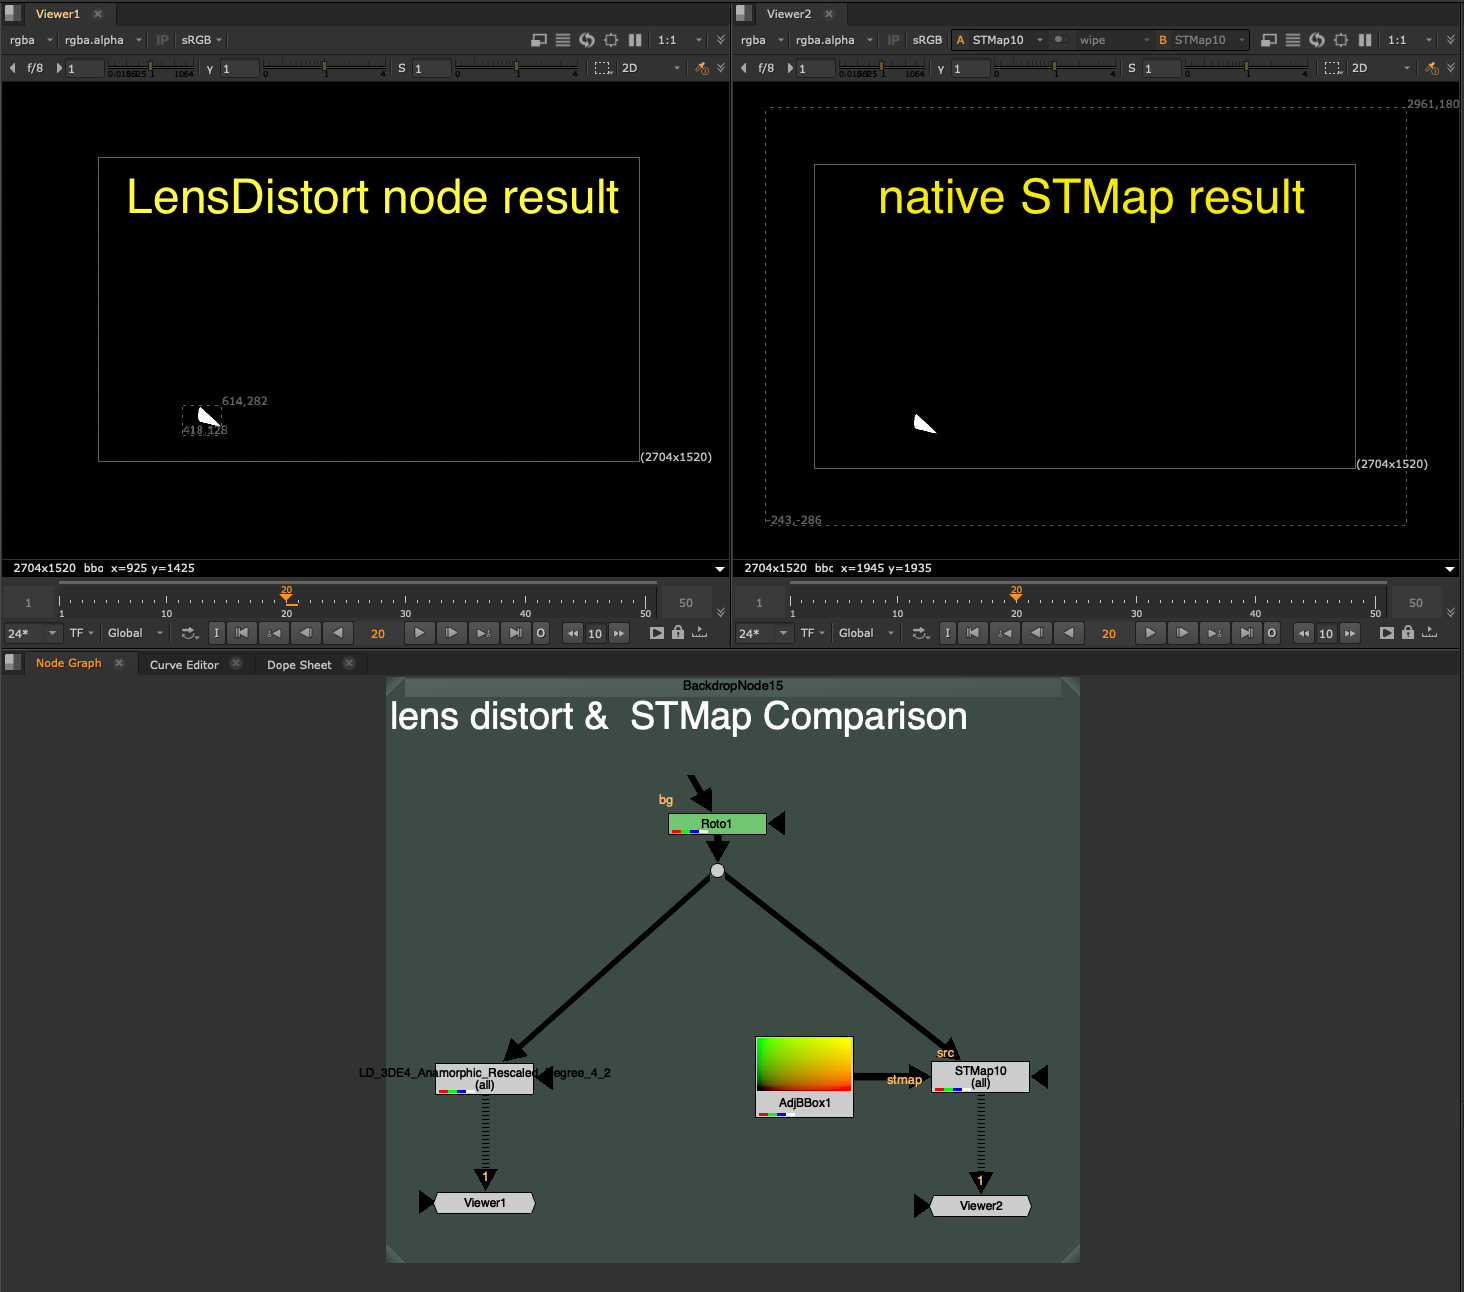
The problem with discarding the input Bounding Box and making it the full frame format is that this creates a compounding effect on later calculations. One of the things nuke does best is optimize for only calculating what it needs to inside of that Bounding Box. If the BBox is 400×400 pixels, then nuke is only computing those 400×400 pixels on your heavy node. If you replace that with a 4k full format bounding box, even though the input area needed is really only 400×400, Nuke now has to calculate the full 3840×2160 worth of pixels.
That specific scenario would be 52x more pixels to calculate, a whopping 5,000% increase… yikes.
Since undistorting and redistorting is happening dozens of times in nuke scripts, you can imagine the effect that tossing away a small bounding box for the full format can have on the entire nuke script.
If we put a Defocus node with a very large value, 400 for example, you will see the Viewer scanline crawling to calculate the full format, every single pixel. Whereas with that same Defocus node, on a smaller area BBox input, it can calculate nearly instantly.
STMap_BBox
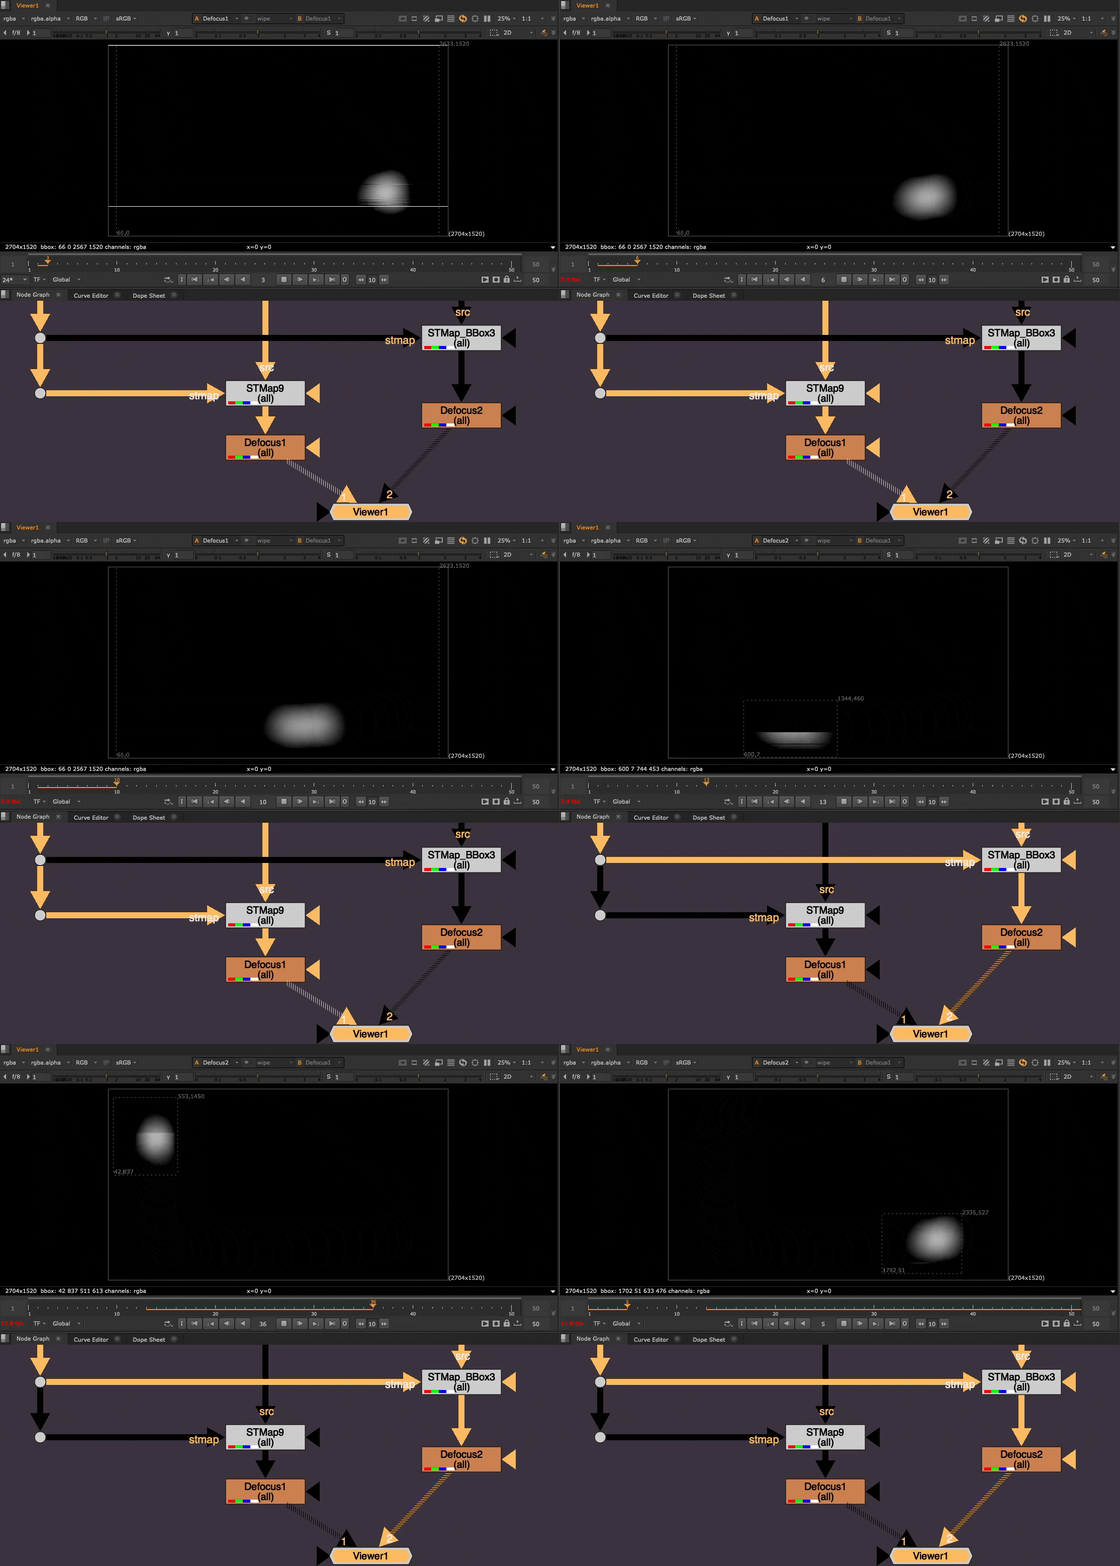
Preserving the tight Bounding Box after the distortion is exactly what STMap_BBox was made to solve.
I could not use a blinkscript node because Blinkscript nodes do not touch the BBox, instead I needed to Recreate the STMap node, and add in the additional BBox calculation.
How it works:
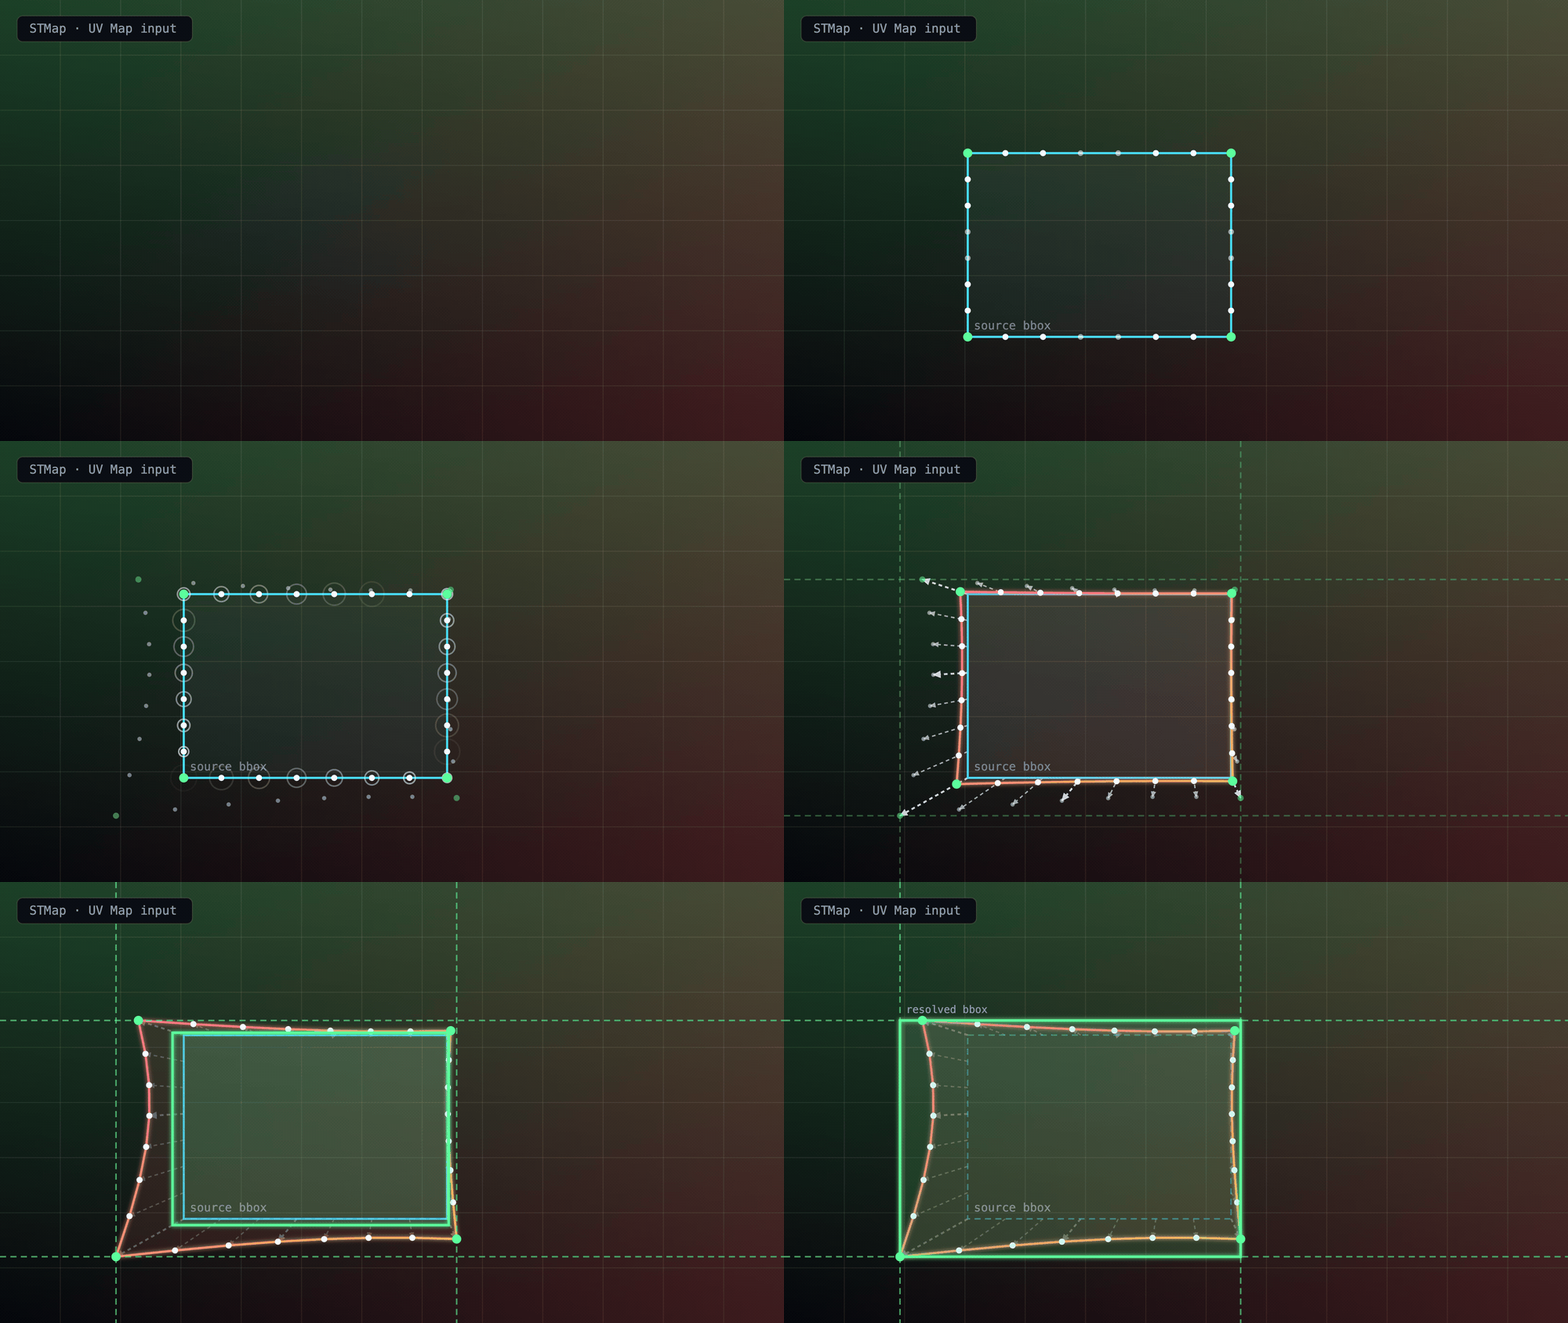
The STMap_BBox node samples samples the 4 corners of the source BBox, as well as several points along the edges for irregular shaped warps where bowing of the center of the edge may go wider than the corners.
It then uses the UV Map input to calculate where those points end up after the warp. It then adjusts the BBox to cover the max warp along each edge and draws a final resolved BBox, encompassing the entire warp area. There is also a padding of +2 pixels for safety.
Additional Knobs to know
The STMap BBox has the identical settings to Nuke’s native STMap node, but with a few extra settings for BBox control.

- Adjust BBox – Adds additional padding to the BBox if needed
- Intersect Checkbox – Enables the additional BBox calculation. Disabling will skip the BBox calculation, essentially making this Node back into the native STMap node in nuke.
- Limit BBox to – Allows you to choose the maximum size the BBox is allowed to grow until.
Here is a visualization of the different options for Limiting the Max BBox size to (click to view full size):
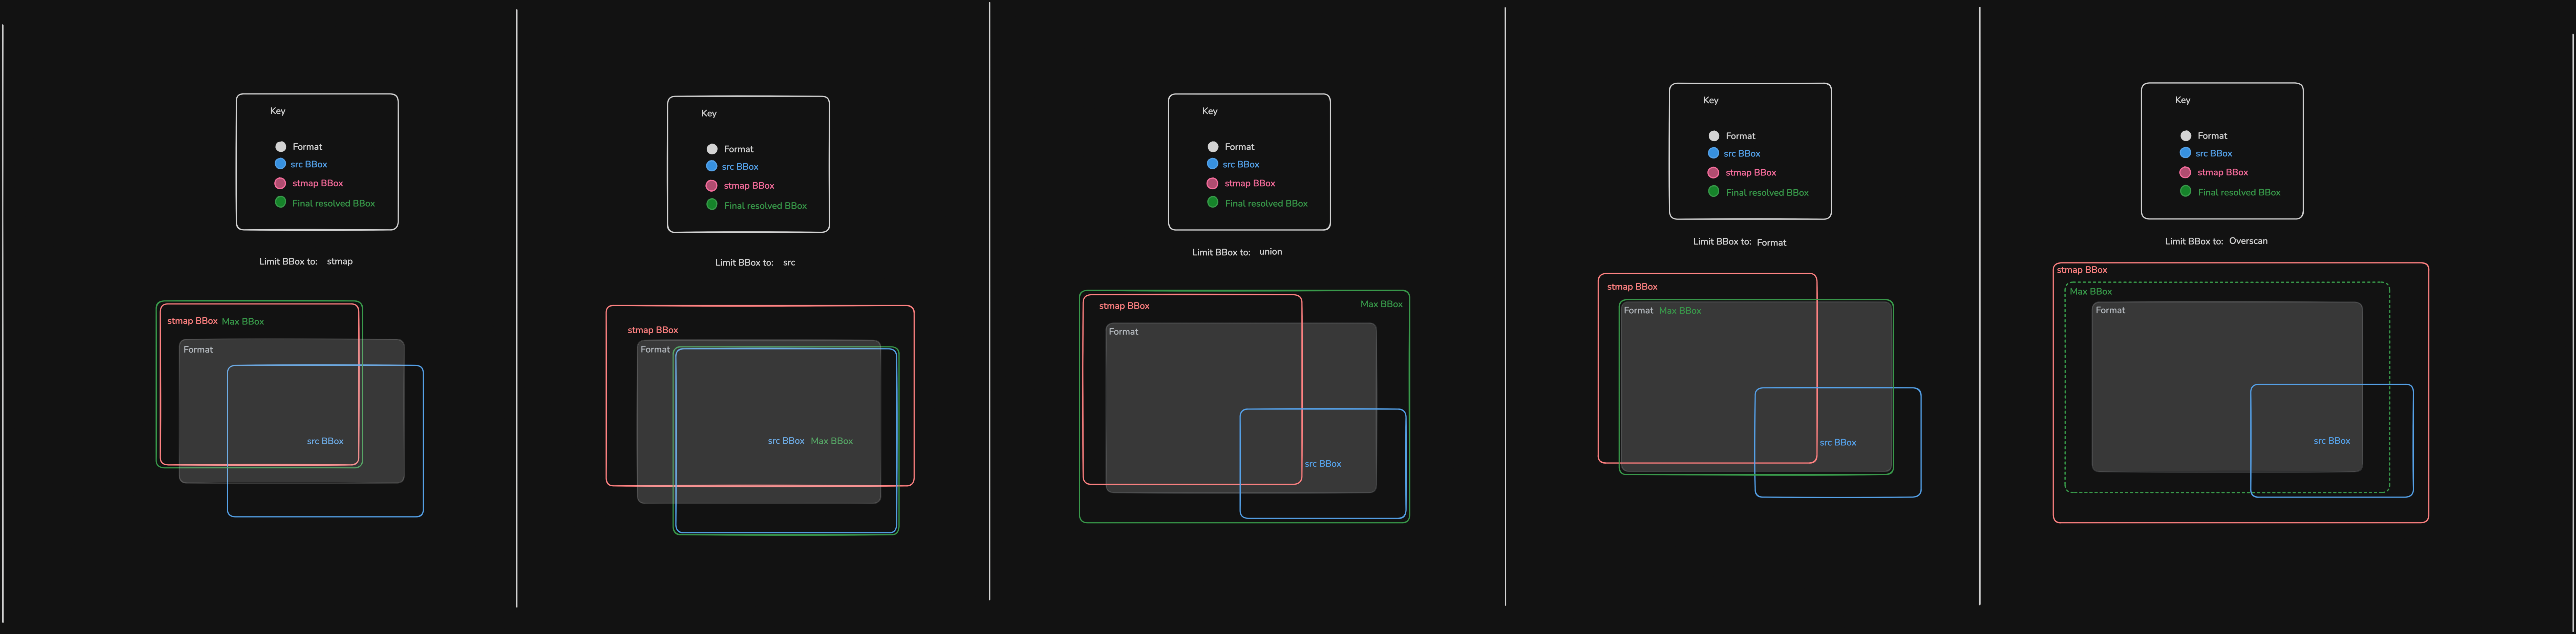

- Union BBox – (Default) Combined maximum of src and stmap input BBoxes
- STMap BBox – stmap input BBox
- Src BBox – src input BBox
- Format – the format
- Overscan – the format + an Overscan Scale amount, controlled by the Overscan Scale slider
The Overscan Scale knob is default to 1.2, which is the same as if you were to take a Transform node and scale the image up by 1.2 from it’s center. This is useful for undistort.
The Overscan setting is most useful if you have a massive rotoshape, whole bounding box is way bigger than the format or stmap input and you wish to limit it to the format + some overscan padding relative to the format size.
Limitations
The best use-case for the STMap_BBox is static lens distortion warping.
Nuke is able to cache the static frame UVMap and use that to calculate the warp of the input BBox on each frame. It is fast, efficient, and stable.
Where the node runs into trouble is actively changing, high frequency, large distance warps, that are changing every frame.
For my tests, I used an animating noise pattern to heavily distort the image on each frame.
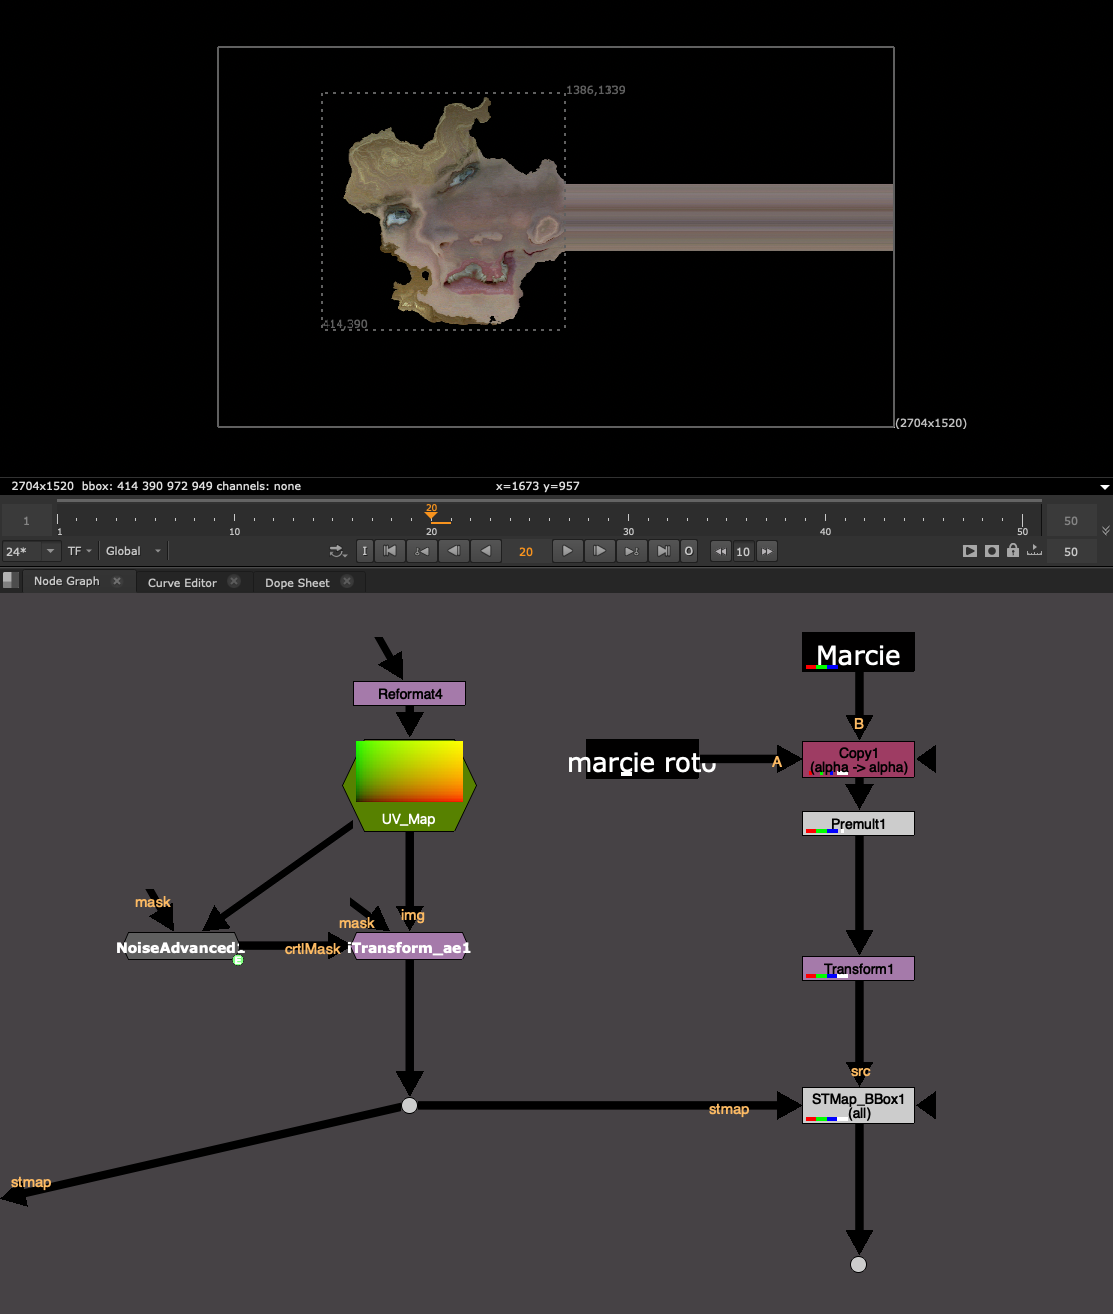
The node runs into trouble because Nuke has to “find” the points on along the BBox each frame, and the larger the distance of the warp, the more time it takes to search and find where the points have gone. This can eat up Nuke’s memory and even cause a crash.
If you need to do a warp like this, I would use the native STMap node that never bothers with this calculation or simply uncheck the “intersect” option in the STMap_BBox to skip the BBox calculation.
I would stick to Lens Distortion scenarios. Animated lens distortion maps (full framerange) should also be fine to use.
It’s more about the large-distance warping and changing every frame that seems to eat up RAM. Lens Distortion warps usually have a pretty limited warp radius and thus the node is easily able to find where the point has warped to by looking at a smaller radius instead of searching the entire format.
Difference between C++ Plugins and Gizmos or Groups
Please remember, this is a C++ Plugin Node, not a Gizmo, and not a Group. In order to use this tool, you need to have this plugin installed.
This makes it fundamentally different from a Group, or a Gizmo, which you could always export to Group if sharing with someone who does not have the Gizmo installed. You cannot export this to a Group, because it is an actual Node in nuke.
If another colleague, or the render farm, does not have this tool installed, then it will error, the same as a missing gizmo.

Luckily, the Image result of the STMap_BBox is identical to that of the native STMap node. So in a worst case scenario, you can always swap it out for a regular STMap and still get the same result, or write a python script to replace all STMap_BBox nodes with STMap nodes.
OS and Nuke Version dependencies
Nuke C++ plugins are compiled plugins. Meaning it turned readable human code into machine code. Compilers convert the code into the C++ plugin file.
However, each OS (Mac, Linux, Windows) converts C++ into a different filetype.
And every Nuke Minor version, Nuke 16.0 vs Nuke 16.1 for example, is slightly different and requires a new compile. Internal modules and commands may have moved or been renamed between Nuke versions, and the compiler bakes those paths into the plugin. Meaning using the plugin compiled for Nuke15.v1 with Nuke 16.0 will not work and will error out if the wrong plugin is loaded.
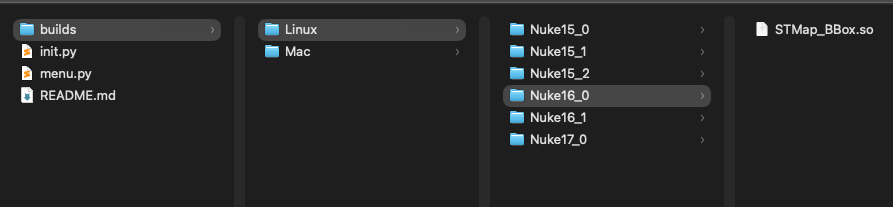
As a result, I created some auto-loader python code, which will correctly identify which plugin to load based on OS and Nuke version. If it cannot find the right OS or Nuke version, then the auto-loader will skip the load, ensuring that Nuke still starts safely.
You do not need to do anything, this is happening under the hood on Nuke start and ensures that the same package can be used anywhere and that the install is minimum, just pointing Nuke to the STMap_BBox folder.
I am currently supporting Mac and Linux, every Nuke Minor version from 15.0+ and will continue to update with each Nuke Minor version.
I am hoping to get my hands on a windows setup to compile on Windows machines as well. If there is enough demand, please reach out to me or create an issue on Github with Windows request and I can try and support it ASAP.
Download
Head to the latest Release page:
https://github.com/CreativeLyons/STMap_BBox-public/releases/latest
Download the STMap_BBox .zip in the Assets:

Install
Have a look at the README.md file that comes in the .zip for install instructions, but I’ll list the same steps below:
The easiest way to install would be to:
1. Download and unzip the .zip folder from the Release page
2. Drag and Drop the STMap_BBox folder into your ~/.nuke/ folder
3. Mac Users will need to unlock permissions so Mac can allows use of the C++ plugin. It’s a classic Mac permissions block since this is some C++ code from Github. Once the STMap_BBox folder is in your .nuke folder, open a terminal window and run this command:
xattr -cr ~/.nuke/STMap_BBox
If you installed it somewhere else, you can replace that last path with where ever you have put the folder. You can also simply drag a folder into the terminal window and it will enter the folder path for you.
4. Add this line to ~/.nuke/init.py (create the file if missing):
nuke.pluginAddPath("./STMap_BBox")
Alternatively, point to wherever on the server you placed the STMap_BBox folder:
nuke.pluginAddPath("/Replace/With/Path/To/Your/STMap_BBox")
5. Restart Nuke. Find the node under Nodes → Transform → STMap_BBox, or type STMap_BBox in the Tab search.
Thanks for trying the tool, I hope that it optimizes your lens distortion workflows.
If you have any issues or requests, you can create a github issue here: