CG Compositing Series – 2.1 Material AOVs – Diffuse, Specular, Emission
Material AOVs
In this post we are going to be focusing in on the Material AOVs Category.
Levels of Complexity
There are different levels of complexity to rebuilding Material AOVs into the beauty, and it all depends on how much flexibility and control you want with the cost of complexity and speed.

Simple
- Diffuse
- Specular
- Emission
- Other – Refraction / True Reflection
Intermediate
- Diffuse
- Direct Diffuse
- Indirect Diffuse
- Sub Surface Scattering
- Specular
- Direct Specular
- Indirect Specular
- Reflection
- Coat
- Sheen
- Emission
- Other – Refraction / True Reflection
Complex
- Diffuse
- Direct Diffuse
- Indirect Diffuse
- Sub Surface Scattering
- Raw Diffuse
- Albedo / Color / Texture
- Specular
- Direct Specular
- Indirect Specular
- Reflection
- Coat
- Sheen
- Raw Specular
- Albedo / Filter / Texture
- Emission
- Other – Refraction / True Reflection
Diffuse, Specular, and Emission are the Foundational Categories, and the complexities are subdivisions of the Diffuse and Specular Categories

So let’s first focus on the Simple category of Diffuse, Specular, and Emission and really break those down and understand them fully. This will make the future subdivisions easier, familiarise us with terms and concepts, and help us have a grounded foundation of knowledge for what we are adjusting when using these passes.
The full presentation from the video can be downloaded here in pdf format, for those who want to keep or study it offline:
Adjectives of Specular, Diffuse, and Emission
Specular

- Reflection
- Mirror
- Shiny
- Glossy
- Wet
- Metallic
- Highlights
- Pings
- Crisp
- Sharp
- Polished
Diffuse

- Soft
- Flat
- Ambient
- Natural
- Rough
- Earthy
- Organic
- Matte
- Weathered
- Dull
Emission

- Bright
- Radiant
- Luminescent
- Glowing
- Self-Illuminating
- Incandescent
- Electric
- Beaming
- Shining
- Luminous
- Illuminated
Emission

- Emission is any object, material, or texture that is actively emitting light into the scene
- This includes any Lights, Super-heated metals, or Elemental FX like fire/ sparks / lightning / magic etc
- Neon Lights, Screens, Monitors are all examples of real life Emission objects
Diffuse vs Specular

Specular – Surface Level Reflections
Diffuse – Light passes through surface and interacts with the material at a molecular level, Scattering and Absorption allow certain colors to re-exit and scatter into scene
Let’s talk about Specular first andSurface level Reflections
Specular
Law of Reflection
- The angles of incidence is equal to the angle of reflection


Smooth Surface – Specular Reflections
- Light Beam = a bundle of parallel light rays
- Light Beam remains parallel on incidence and parallel on reflection

Planar Mirror and Virtual Image


- An Image created by planar specular reflection that does not actually exist as a physical object is referred to as a Virtual Image.
- The Virtual Image appears to be located “behind” the mirror
- Virtual Image distance = Object to Mirror + Mirror to Observer.
- Speculum is the Latin word for “mirror”, which is where “Specular” derives from
The people are witnessing a virtual image of themselves looking back, that is double the distance from them to the mirror. The light travels from them -> to the mirror, and then from the mirror -> back to their eye


Notice the reflected virtual image of the chess piece is in focus, even though the real piece (in the foreground) is out of focus. The camera lens is respecting the mirror’s virtual image distance, even though the mirror itself is out of focus.


Here you can see a ground plane mirror appearing to invert the tree in it’s virtual image

Rough Surface – Diffused Reflection
- The uneven surface causes the Incidence Rays to hit at different angles
- The outgoing reflection rays scatter in different directions

Here you see some examples of different CG materials along the Roughness / Glossiness spectrum


Wet Surface Reflections
When a surface is wet, the water fills the gaps and flattens the surface and causes more a specular reflection


Microscopic Surface Details
In these slides and examples we are discussing surfaces at a microscopic level. You might think a piece of paper looks smooth, but under a microscope it has quite a bit of roughness to it, which is what makes it so evenly lit and diffuse.


Metallic vs Dielectric Surfaces
The diffuse and specular terms describe two distinct effects going on. The Light interacts with materials differently depending on if the material is a metal, or a non-metal (Dielectric)
Dielectric – Absorbs and Scatters light
Metallic – Does not Absorb light. Only Reflects
Dielectric (Non-Metal)
- Light penetrates the surface level and the molecules of the material absorb and scatter the light within
- The light photons excite the atoms they hit below the surface. Some of the light is absorbed, and this energy is converted to heat. Then new light rays (photons) are emitted from the excited atoms. Those might excite nearby atoms or exit the surface as new photons. These new photons are same color as our material.
- The Base Color Texture (Albedo Map) – determines the color of the diffusely scattered photons from excited atoms. It’s the color that is scattered back out and not absorbed by the material


Metallic
- Does not Allow light to penetrate the surface and does not Absorb light. They only Reflect light on the surface
- Metals can be thought of as positively charged ions suspended in a “sea of electrons” or “electron gas”. Attractions hold electrons near the ions, but not so tightly as to impede the electrons flow. This explains many of the properties of metals, like conductivity of heat and electricity
- The incoming photon does not excite the atoms, but bounces directly off the electron gas
- The Base Color (Albedo) is used to describe the color tint of the specular reflection


Notice the Specular Reflections are tinted a certain color depending on the metal type:


On Dielectric Plastic balls, the material color changes, but notice the specular highlights are the same color, maintaining the color of the light or surrounding environment.

Comparison of a Metallic vs Dielectric Material in CG


Chrome Sphere and Diffuse Ball
Used as a reference to see what something 100% Smooth and Metal (Specular) and 100% Rough and Dielectric (Diffuse) looks like in the scene.


Resources:
DAIWTONG824@OUTLOOK.COM
10" 50/50 Chrome and Grey VFX Ball
Diffuse
The diffuse component includes light that penetrates the surface and interacts with the materials molecules. This happens in different ways in the real world

Transmission
- Light passing through the material / surface
- Can be thought of as “transparency”

Refraction
- when light changes angles as it goes through different materials or mediums

Absorption
- When certain wavelength colors of light get absorbed by the material

Scattering
- when light is dispersed in many directions when it comes into contact with small particles or structures in the material

Simplified Diffuse Calculation
When the distance that light travels beneath the surface is insignificant and negligible, the calculation can be simplified by the renderer and just calculated at the surface point where the light hits. It uses the Base Color Texture (Albedo) as the Diffuse Color that will scatter.

Sub Surface Scattering
When the distance the light travels beneath the surface of the material is significant, the interior scattering must be calculated. This is referred to as Sub Surface Scattering (SSS)


Physically Based Rendering Terminology
Albedo
- Base Color Texture Map
- On Dielectrics (non-metal) refers to color of material
- On Metals, refers to the color tint of the specular reflection
- Texture map is without highlights, shadows, or ambient occlusion


Metalness Map
- What area is metallic or not. (will use Albedo Color differently). Usually Black or White
Roughness (Glossiness) Map
- How blurry or how sharp the reflection will be


Real life objects often have a diffuse and a specular component
Diffuse describes the color of the billard balls, but the specular highlights are all the same color (reflecting the color of the light above the table)

Iridescence
- There is also Iridescent materials that change specular color depending on viewing angle.
- Iridescence is a kind of structural coloration due to wave interference of light in microstructures or thin films.


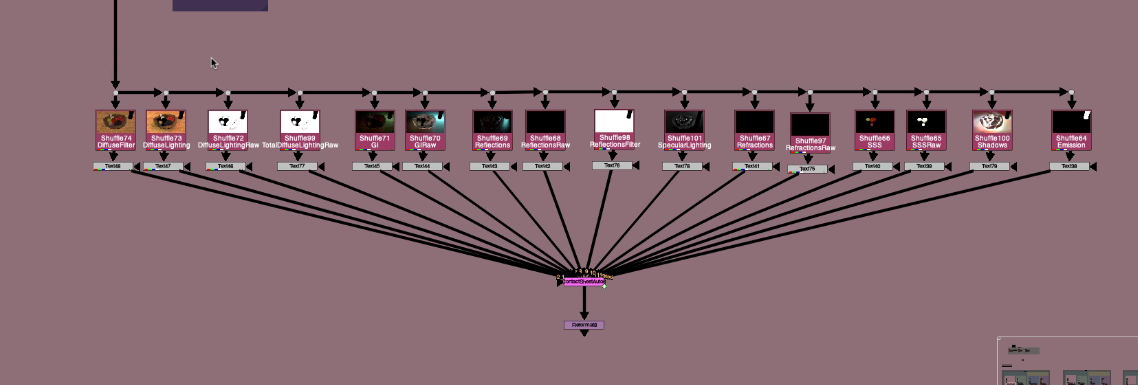
Nuke – Simple Material AOV setup
We can break our fruit bowl render into the 3 simple components, Diffuse, Specular, and Emission. They layers look like this:

You can download the nuke script shown in the Tutorial. I created the mini setups for the 3 different types of renderers, Arnold, RedShift, and Octane. Dividing the Beauty render up into their 3 Diffuse, Specular, Emission Components, and Recombining them.
Download nuke script project file

If you haven’t downloaded the FruitBowl Renders already yet, you can do so now:
You can Choose to either download all 3 FruitBowls at once:
FruitBowl_All_Renders_Redshift_Arnold_Octane.zip (1.61 GB)
Or Each FruitBowl Render Individually for faster downloads:
FruitBowl_Redshift_Render.zip (569.1 MB)
FruitBowl_Arnold_Render.zip (562.8 MB)
FruitBowl_Octane_Render.zip (515.4 MB)
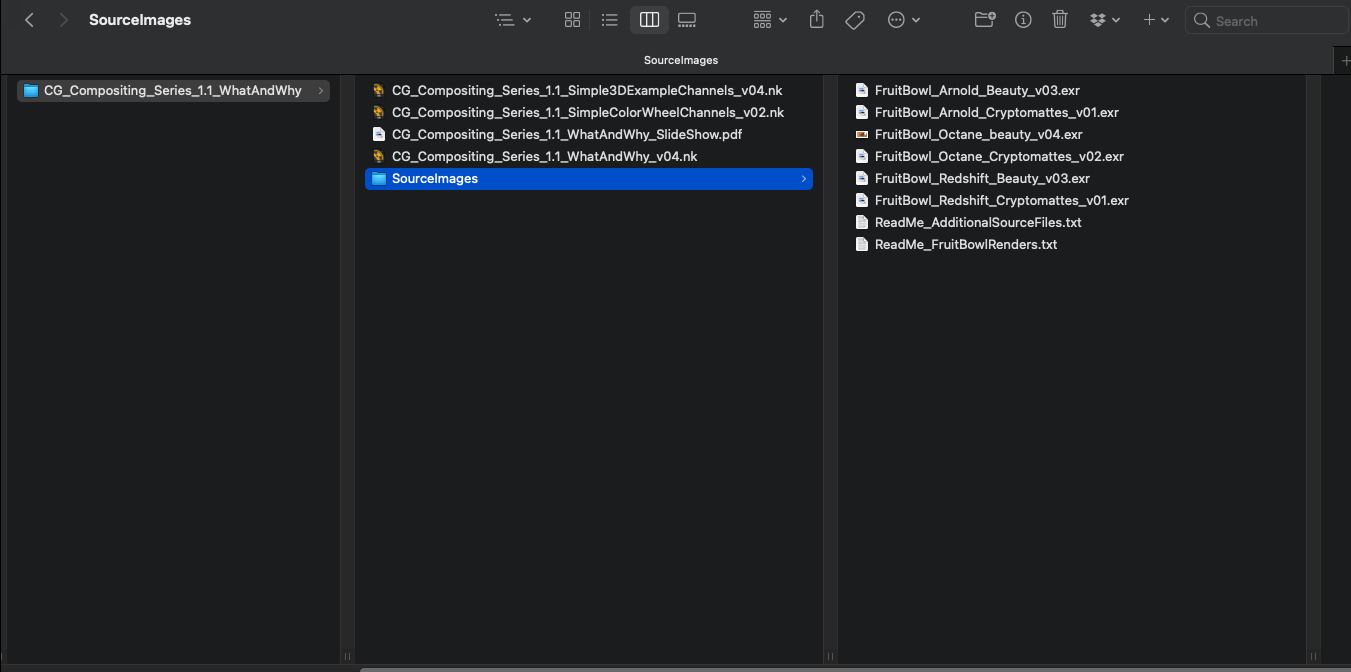
The project files and the Renders are separate downloads, so if you have already downloaded 1.1 What and Why files or the Fruitbowl Renders, there are a couple ways to combine them to work.
- Either add the .nk script to the previous package (in the folder above SourceImages, with the other .nk scripts)
- Or simply drop the Render files into the SourceImages folder of the new 1.2 project folder

This will help the Read nodes auto-reconnect to the sourceImages for you.
Recap
- Emission / Illumination materials emit light
- Specular and Diffuse can be separated by Surface Level Reflections and below surface Material Interactions
- Each individual light ray follows the Law of Reflection.
- The smoother a surface is, the more mirror-like the specular reflection will be.
- The roughness of a surface will cause the reflected rays to scatter, and reflection to be blurred.
- Metallic materials do not allow light to enter the surface. They only reflect light
- Dielectric materials allow light to enter the surface. Light rays are refracted, absorbed, scattered by the materials molecules. Certain color wavelengths re-exit the surface in random directions, which is what we perceive as the materials color
- Albedo – Base Color Texture. On Dielectrics – color of material | On Metals – color tint of the specular reflection.
- Sub Surface Scattering is when light below the surface travels a significant distance before re-exiting
- Iridescent materials tint the color of the specular reflection depending on viewing angle.

References, Resources, Credits
Firstly, Thanks to Pexels for providing such a good resource for stock reference images
I did a hell of a lot of research on this topic before creating the video, I really encourage you to dig a little further and explore the topics more using these great resources:
Naty Hoffman
Youtube – 2015 Siggraph Presentation – Naty Hoffman – Physics and Math of Shading | SIGGRAPH Courses
2015 Siggraph Presentation – Naty Hoffman PDF Paper:
Khan Academy
Video – Specular and diffuse reflection
Video – Specular and diffuse reflection 2
Video – Virtual Mirror
Scientific websites:
Website – The Physics Classroom – Specular vs Diffuse Reflection
Youtube – The Physics Classroom – Specular vs Diffuse Reflection
Website – Olympus LS – Interactive Explanation of Diffuse and Specular
Youtube – Specular vs. Diffuse Reflection, Incident and Reflected Angles | Geometric Optics | Doc Physics
Website – Erika Jame Site – Reflection of Light
Youtube – Specular vs Diffuse Reflection | Physics with Professor Matt Anderson | M27-05
Youtube – Physics with Professor Matt Anderson | Physics with Professor Matt Anderson
Youtube – Reflection of Light Explained Clearly – MooMooMath and Science
CGI Blog Posts
Master of Light – Vector Perez Mindmap
Website – CG Learn – Physically Based Shading
Website – PBR Texture Conversion – Marmoset
Website – Basic Theory of Physically-Based Rendering – Marmoset
Website – JORGEN HDRI Explained
Website – THE PBR GUIDE – PART 1 – Adobe Substance 3D
Website – Material physics in context of PBR texturing – HandlesPixels
Website – PHYSICALLY BASED RENDERING ENCYCLOPEDIA
Website – Tutorial: Blender – Quixel/Substance – Sketchfab: A Proper PBR Workflow
Website – Omniverse MDL Materials
Website – What is an Albedo Map and How to use it ? by Alex Glawion
Website – to buy chrome sphere and diffuse balls – VFX Super Store
Wesbite – Physics Stack Exchange – Why don’t dielectric materials have coloured reflections like conductors?
As always thank you for watching, hope you learned something. More videos to come.