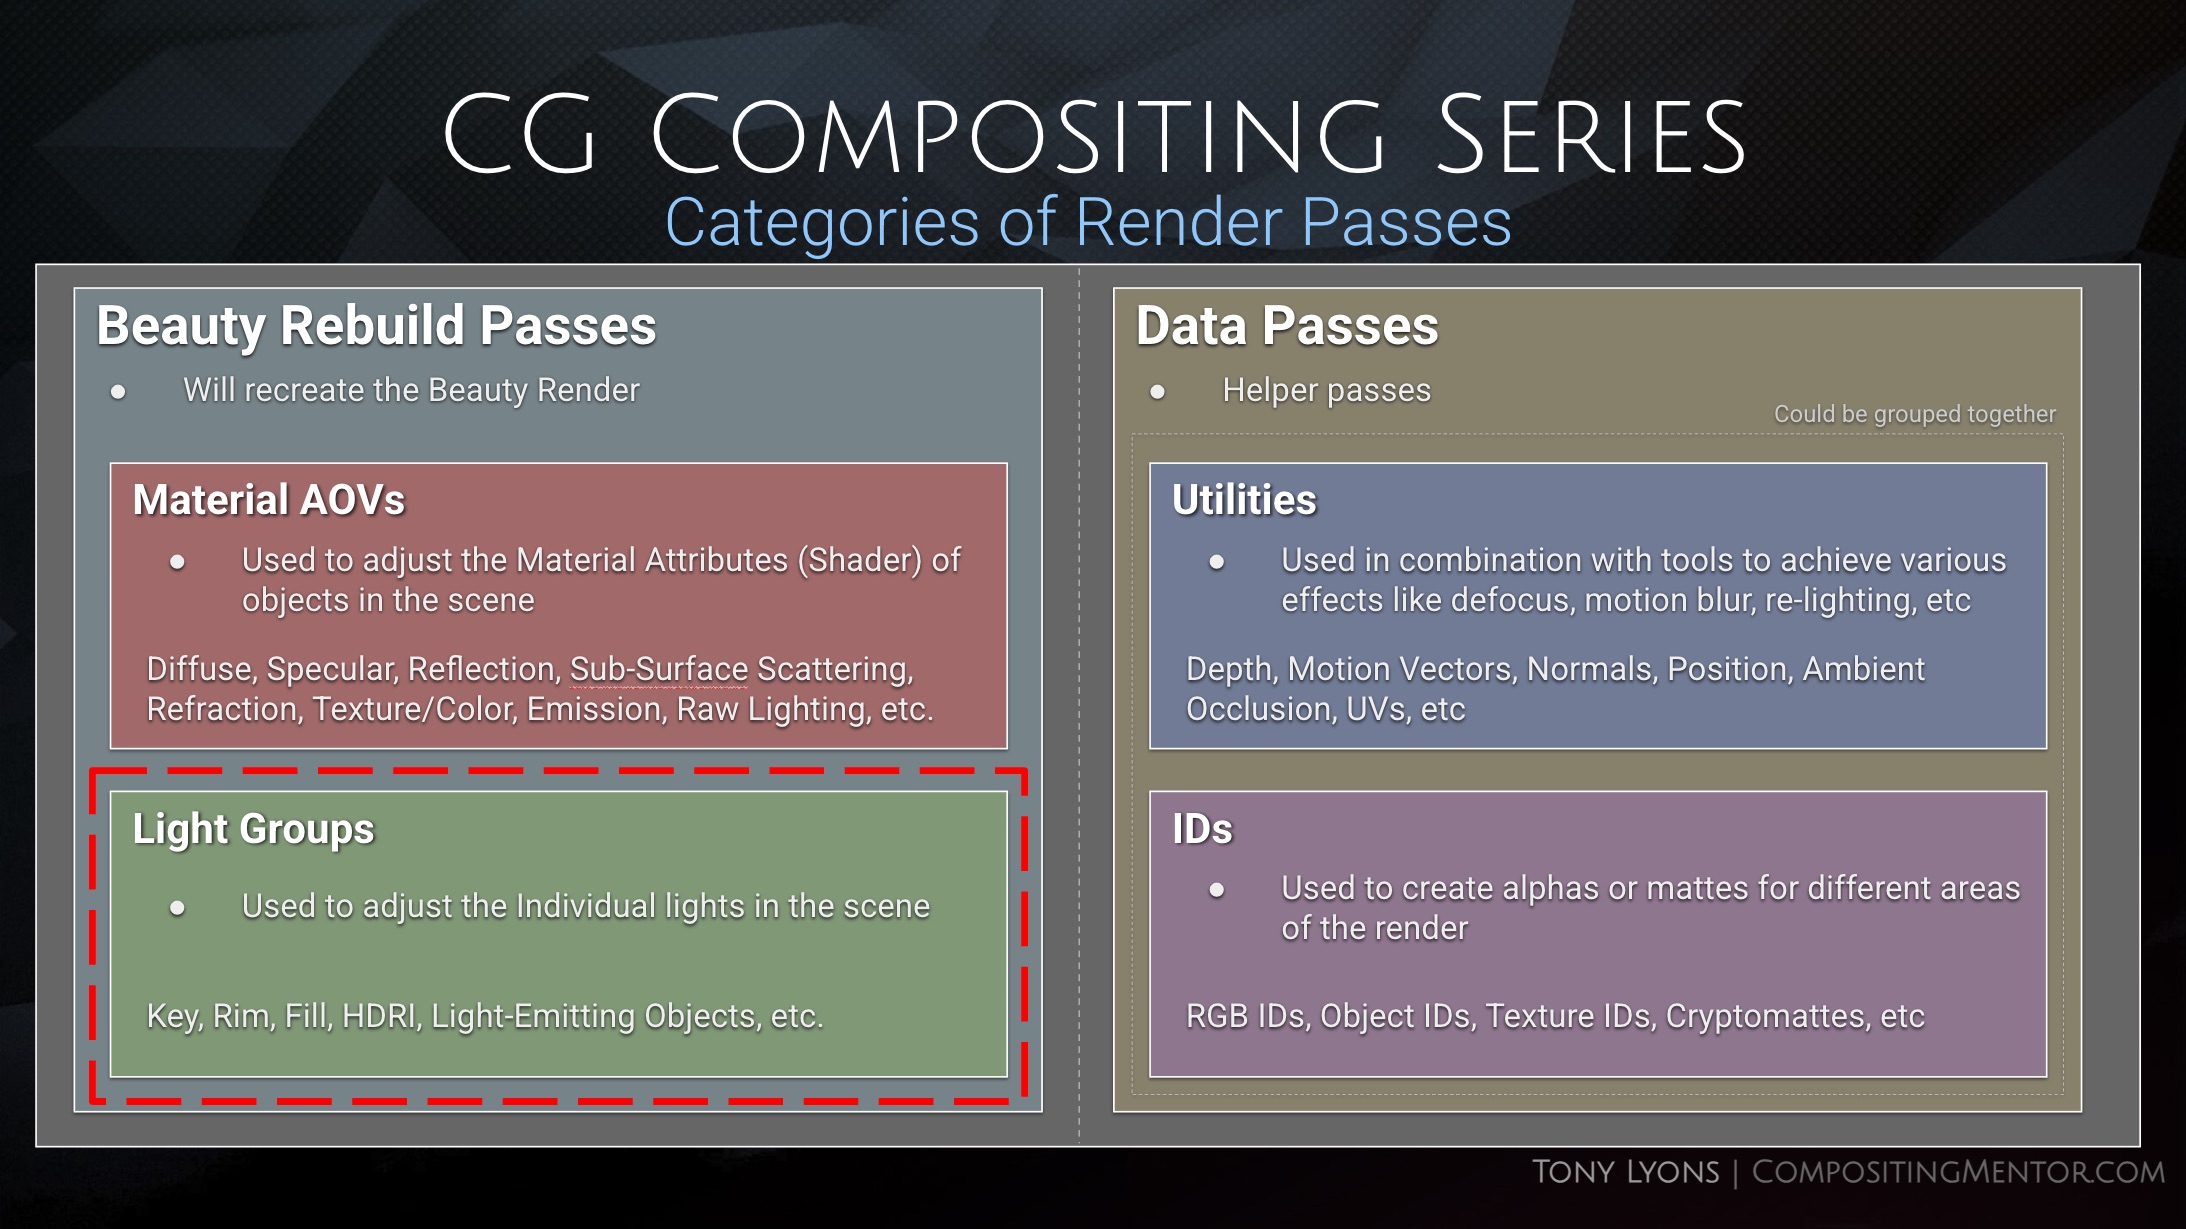
In this video we move away from the Material AOVs and cover an equally important Beauty Rebuild using Light Group renders. This is another set of passes you can render to adjust the lights in your render, that all add up to the Beauty Render.
SlideShow PDF Download here:
What are Light Groups?
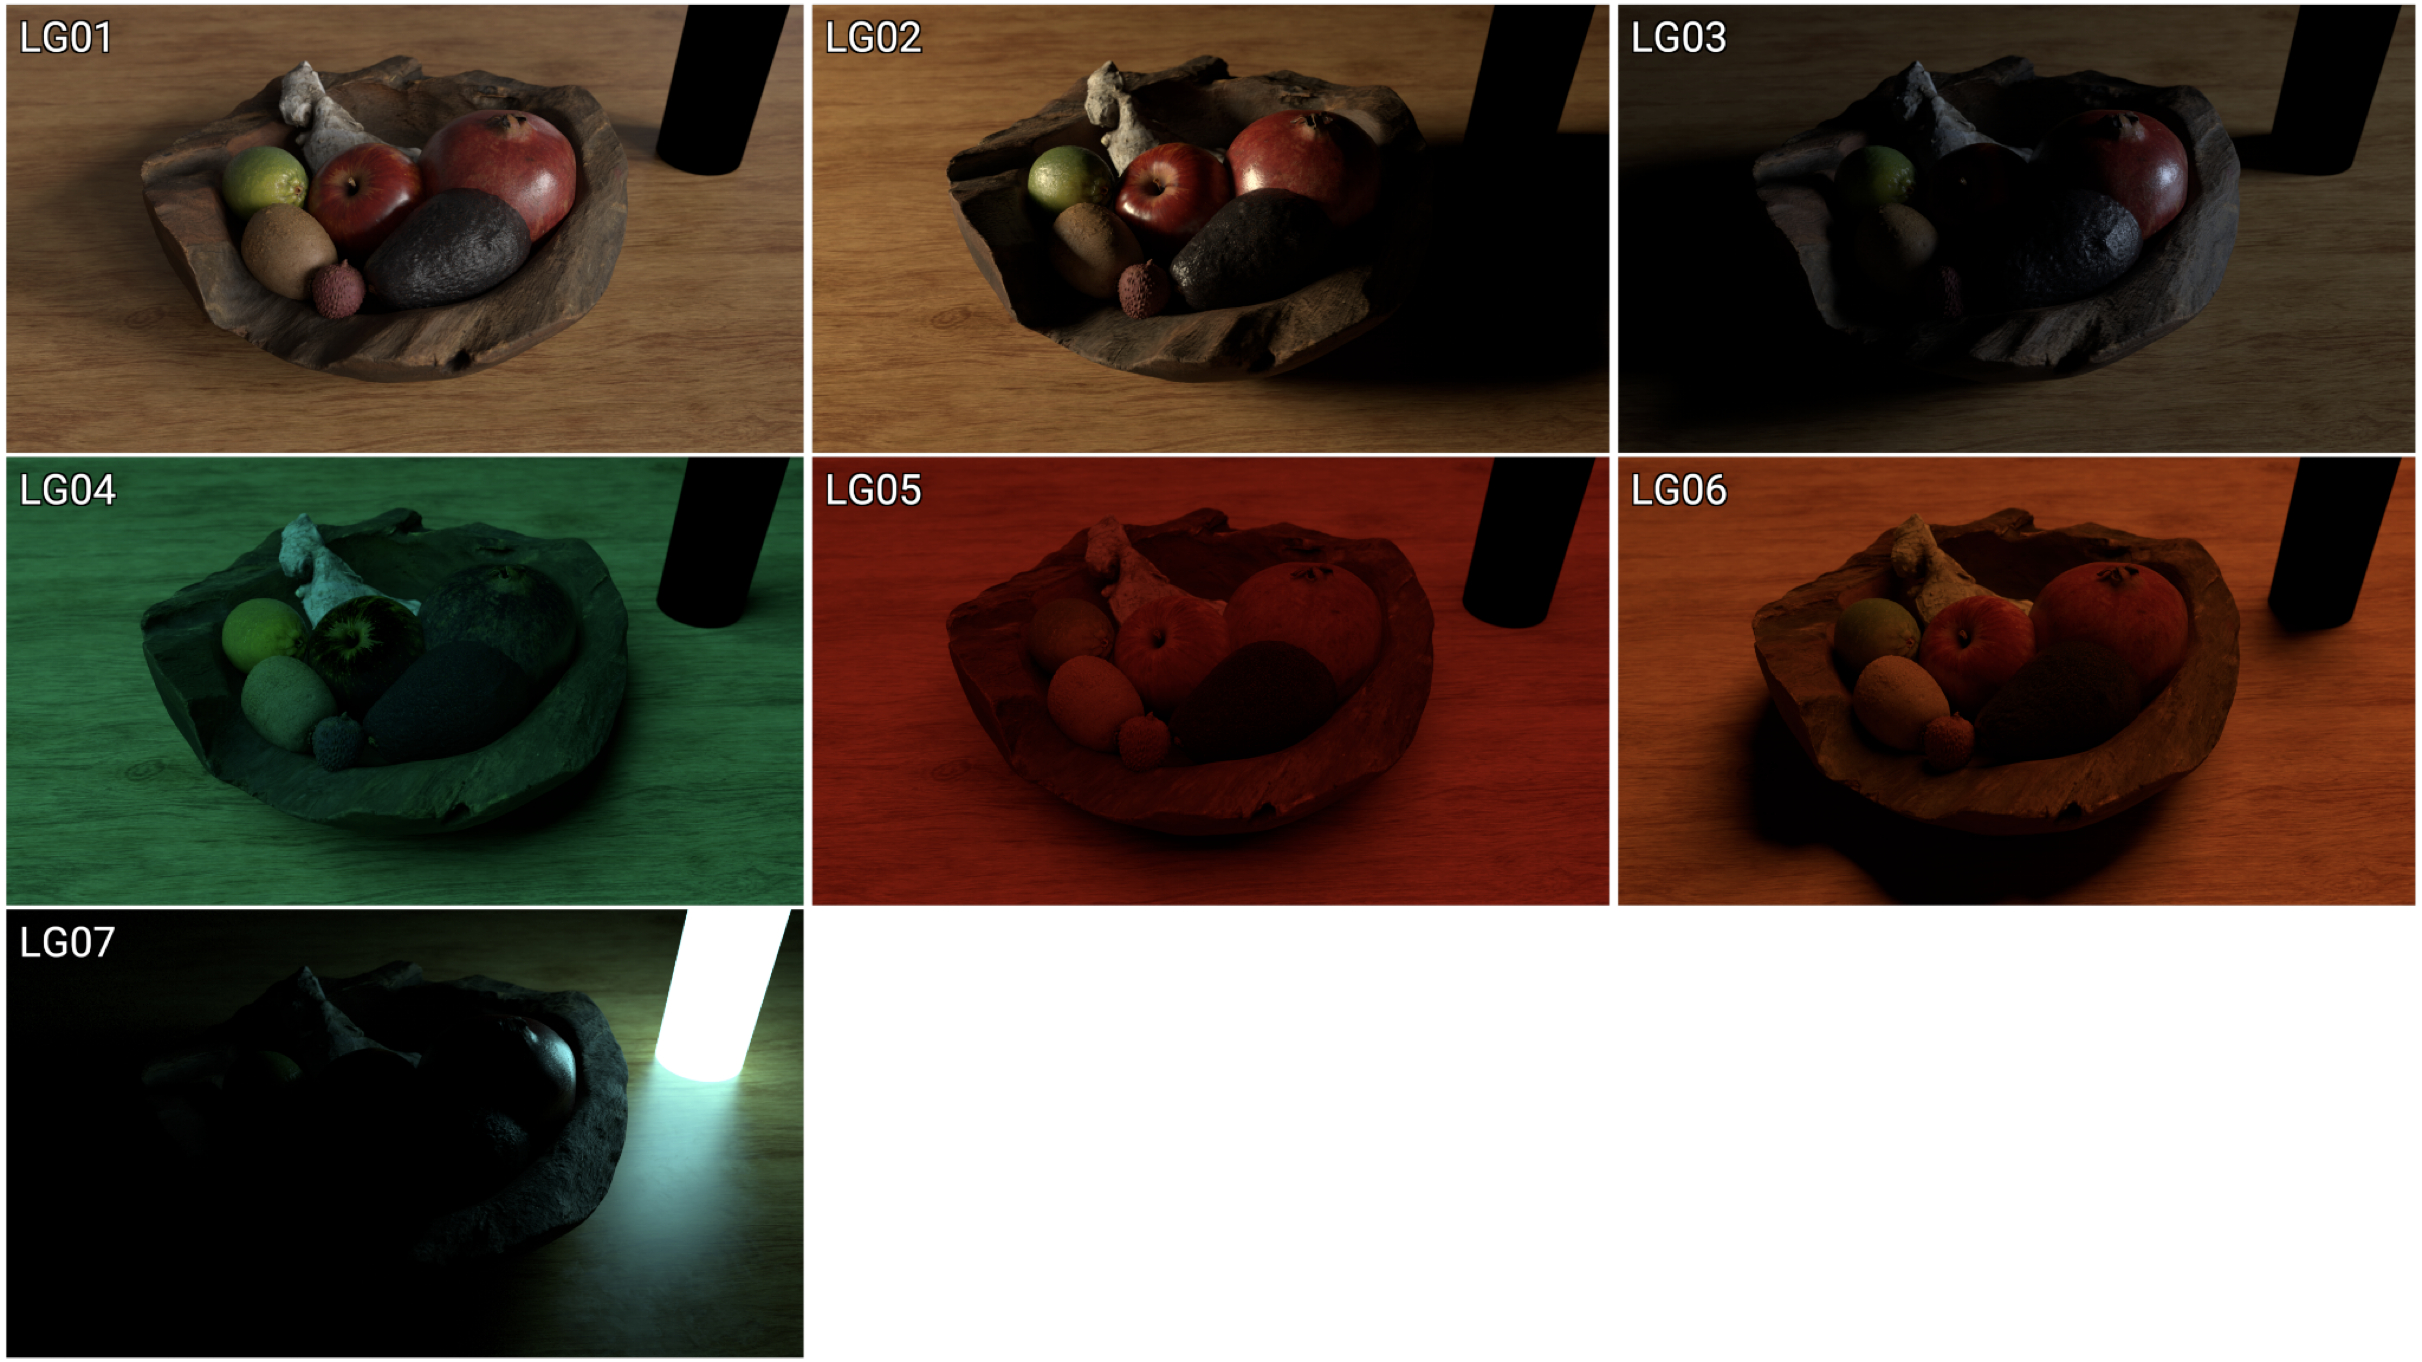
- A Light Group is a render pass of a light (or a set of lights) in the scene, that is rendered in isolation from the rest of the scene’s lighting.
- All other lights are “off” and only the Light Group’s light is “on” and affecting the scene.
- All the Light Groups should add together to produce the full Lighting in the Scene; They all plus and build back the beauty render.
Importance of Light Groups
- Creating good looking CG is not just about the materials of the objects, but also the Lights in the scene, that interact with those materials, and tell a story.
- Different Light types can drive the aesthetic, style, realism, or story of your CG render.
- Understanding lighting basics is important for being an effective CG compositor.
Types of Light Groups
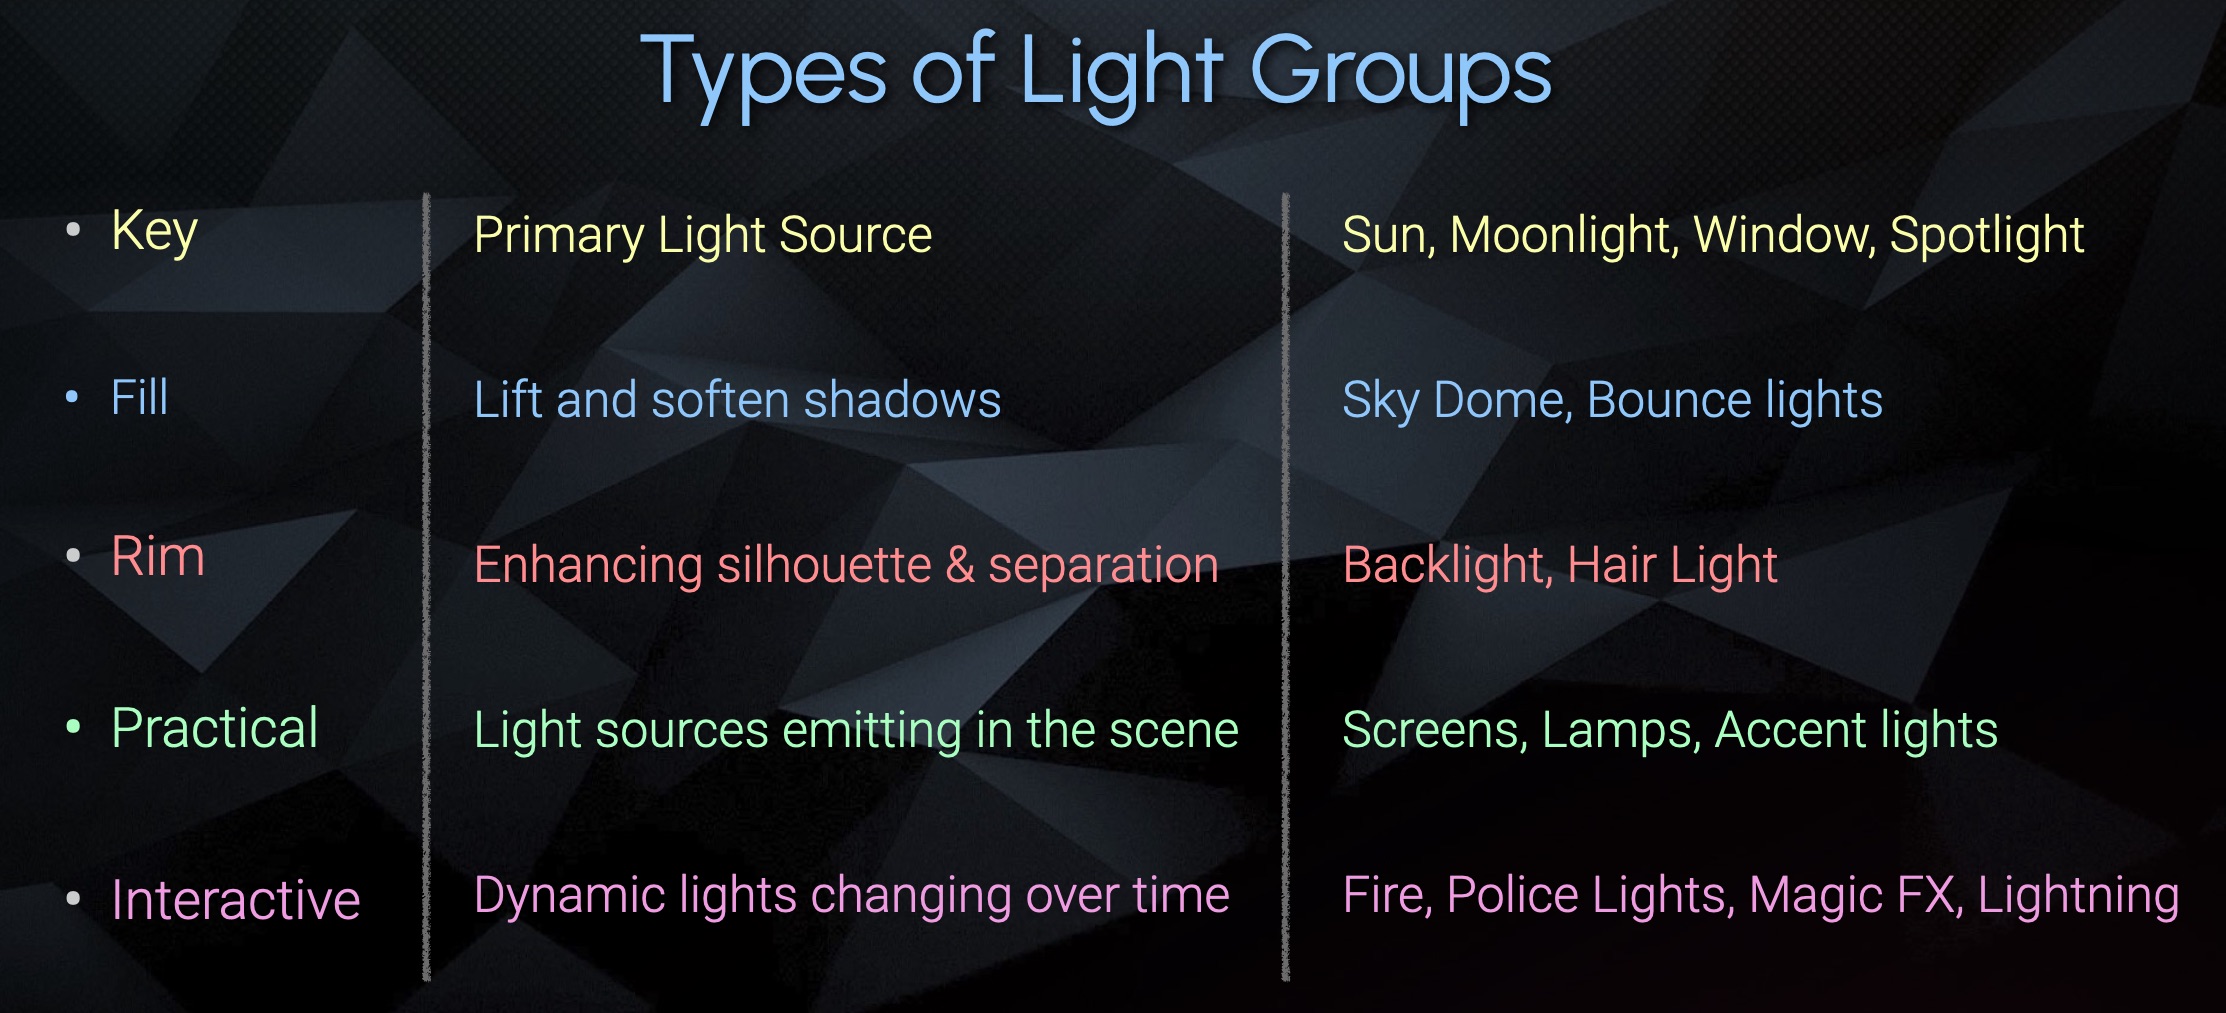
Key – Primary Light Source
Fill – Lift and soften Shadows
Rim – Enhancing silhouette & Separation

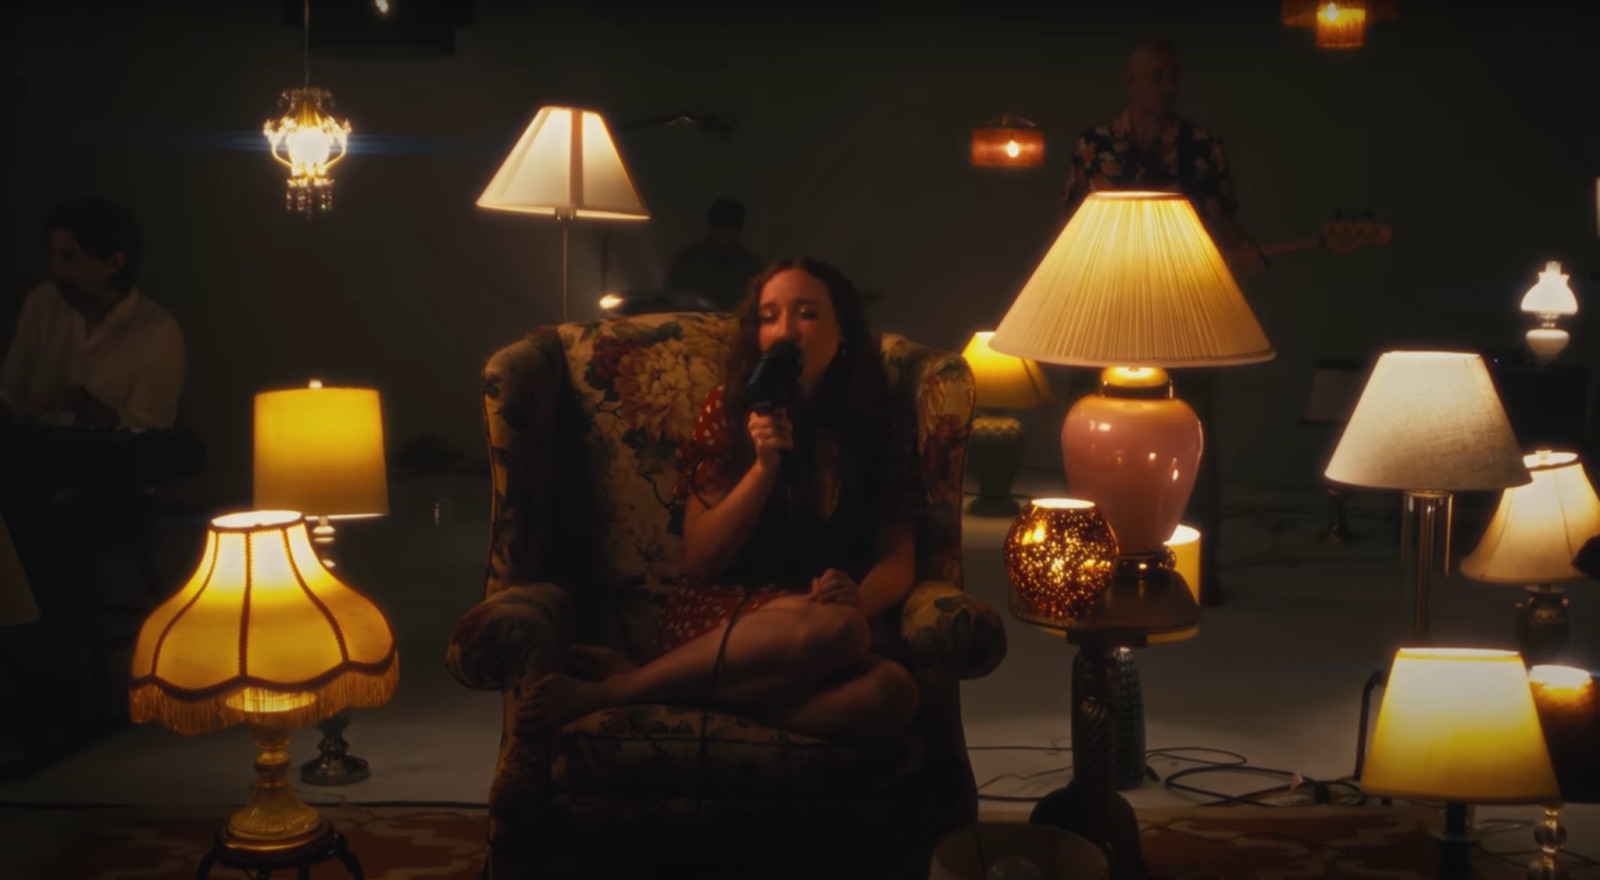
Practical – Light Sources serving a purpose and illuminating the scene (they are part of the environment)

Interactive – Dynamic Lights Changing over time


Light Groups for Compositors
A Compositor is usually focused on 2 main aspects of the Lights using Light Groups:
- Exposure – How Bright the Lights are
- Color Temperature – What Color (Hue) the Lights are
Exposure
- Exposure is referring to how bright the image is.
- Exposure is usually measured in “stops” of light.
- Stops are relative, meaning they are based on the current image you are looking at.
- +1 stop higher is 2x as bright. Doubled
- -1 stop lower is 1/2 as bright. Halved


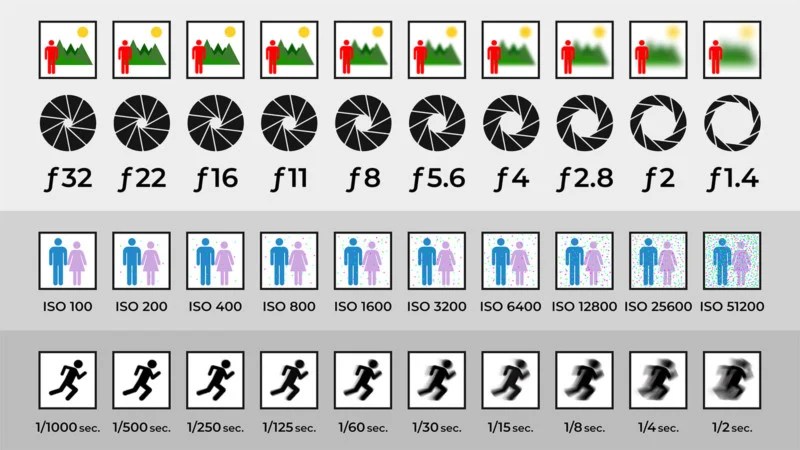
Exposure Triangle in Photography
The Exposure Triangle refers to 3 settings on a camera that help balance the Exposure / Brightness of the Image. If you increase the brightness of 1 of the 3 sides by 1 stop (double the brightness), then you need to choose 1 of the other 2 sides to lower the brightness by 1 stop (half the brightness) in order to maintain the same exposure level of the photo.
Only Aperture and Shutter Speed are referring to the amount of physical light reaching the sensor through the lens. ISO refers to the amplification (multiplication) of the analog signal before it gets converted digitally.


Check out this AMAZING website that lets you play around with the settings and balance the image brightness in a very interactive way. I loved playing around with the sliders, it is such a cool idea.
http://www.andersenimages.com/tutorials/exposure-simulator/

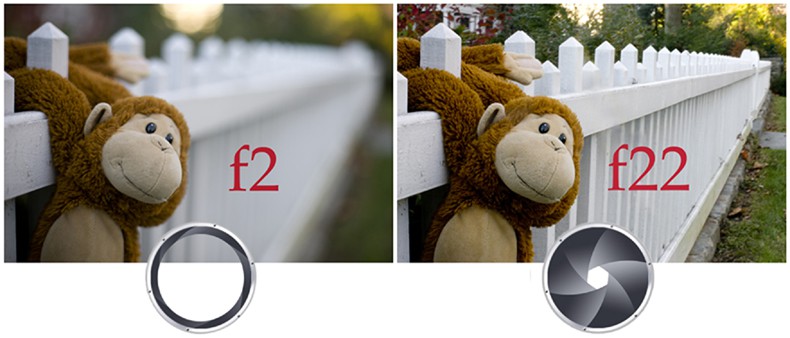
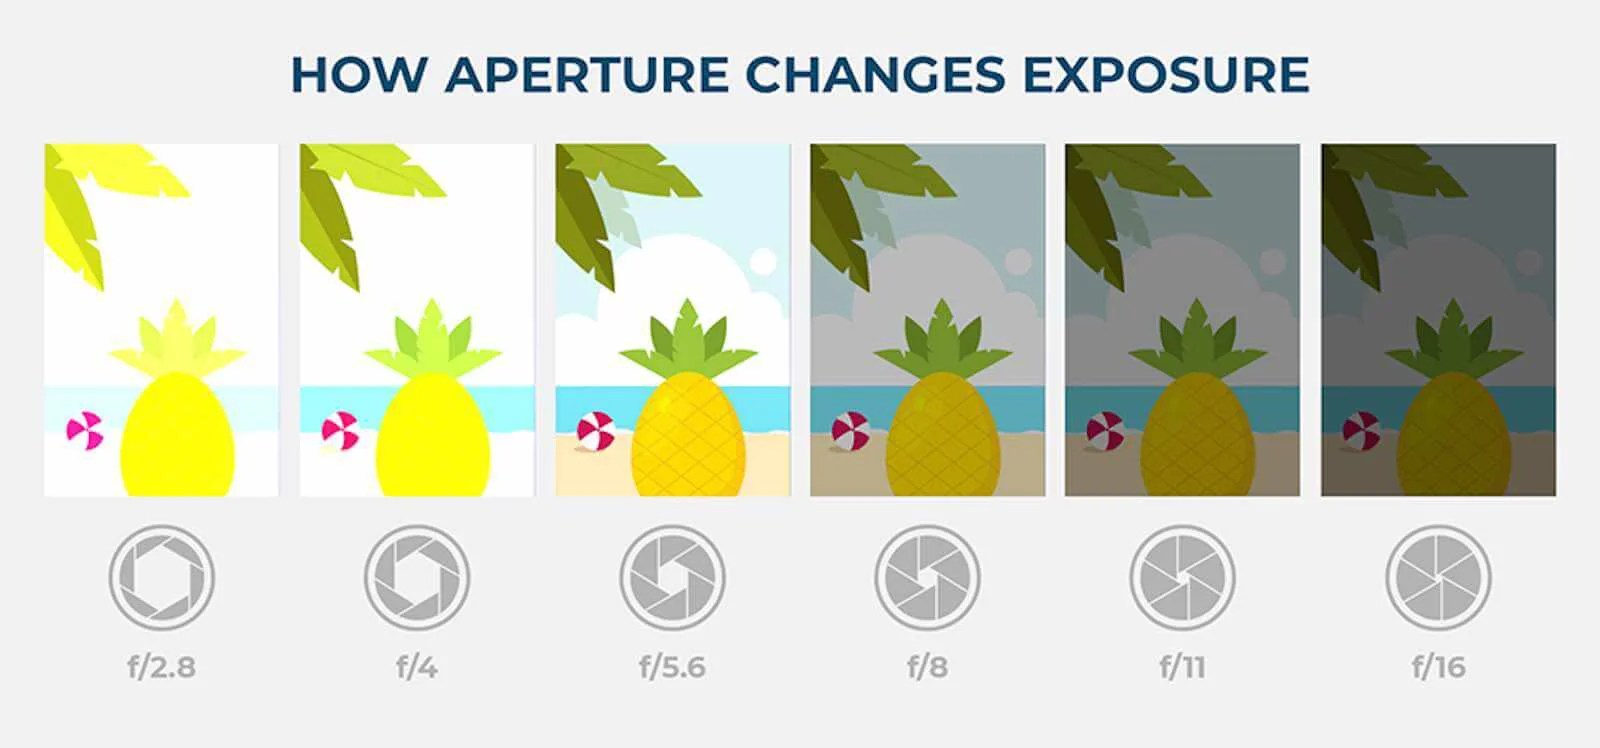
Aperture


- How big the opening of the lens is.
- The larger the lens opening, the more light gets through, the brighter the image.
- Also the bigger opening results in a shallower Depth of Field, or smaller zone of focus. This results in larger Bokeh and separation of foreground and background.
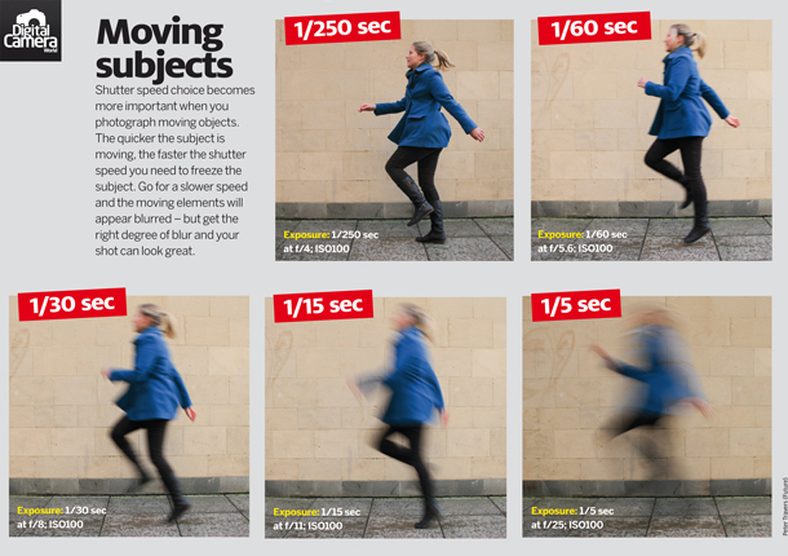
Shutter Speed
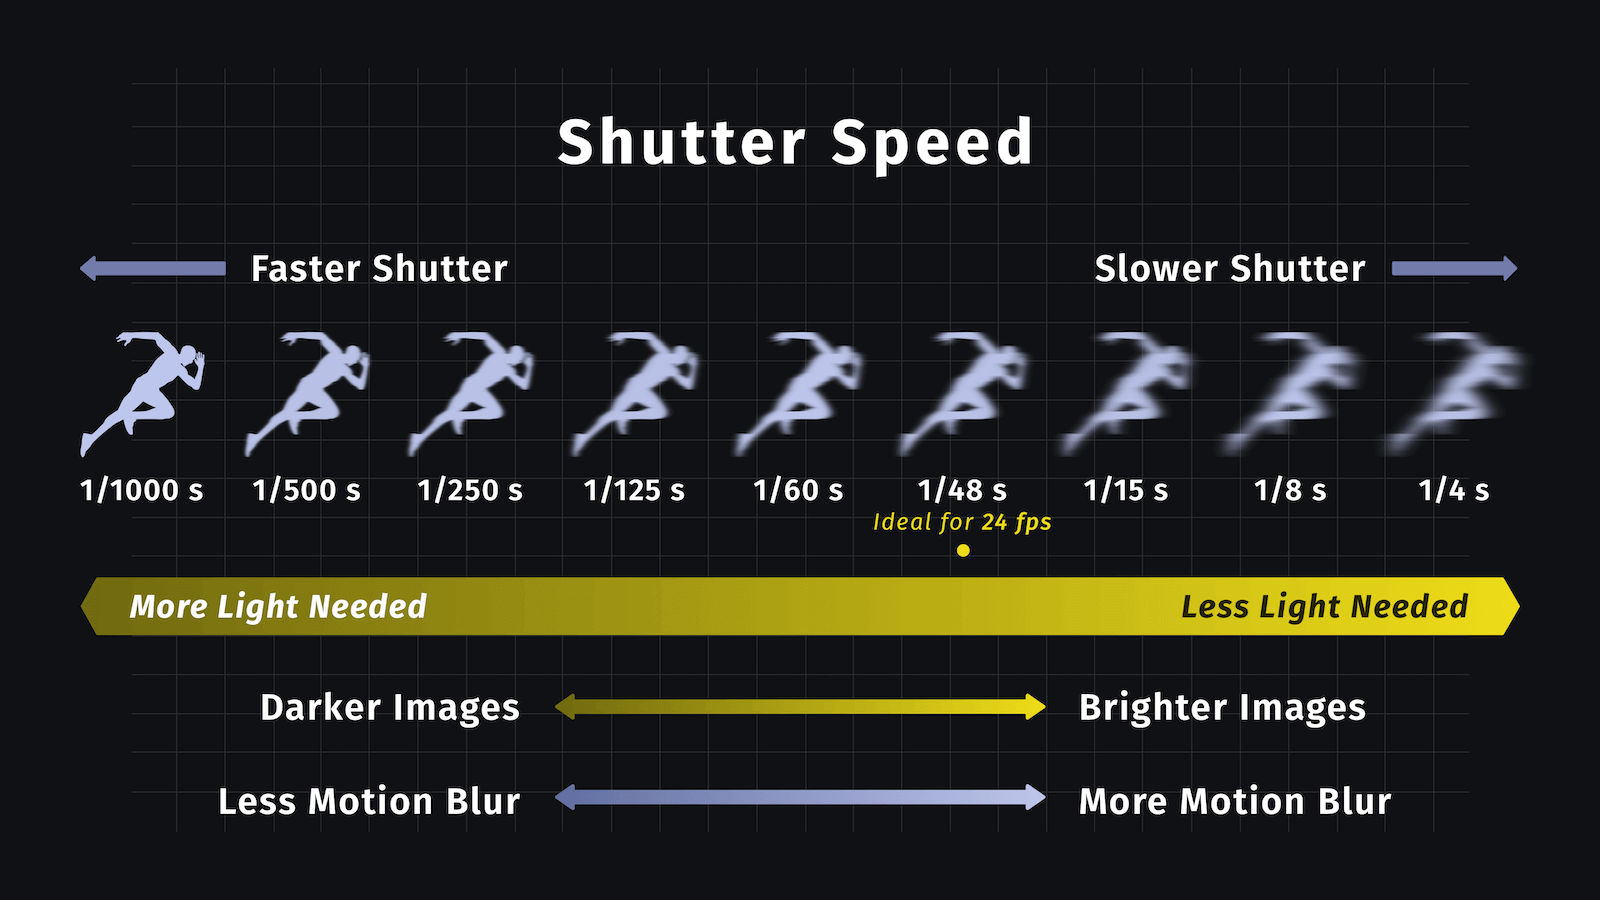
- How much time the opening of the lens remains open for, measured in fractions of a second.
- Leaving the lens open for longer, lets in more light and brightens the image.
- Longer exposure times will result in more motion blur, depending on the shutter speed and speed of the object being shot.


ISO
- ISO used to refer to the sensitivity level of film stock in film cameras.
- ISO stands for International Organization of Standards
- The higher the film stock ISO, the grainier the image appeared, due the to the materials being used for the lower intensity film stock.
- With digital cameras, sensors have only one sensitivity level.
- Digital ISO refers to the Amplification (intensity multiplier) of the analog signal before it gets converted to digital data.


Digital ISO is a lot like a volume knob on a radio. If the signal is weak (aka there is not much light making it to the sensor) then increasing the volume will make the sound louder (make the image brighter) but will also increase the static, or digital noise (sometimes referred to as grain).


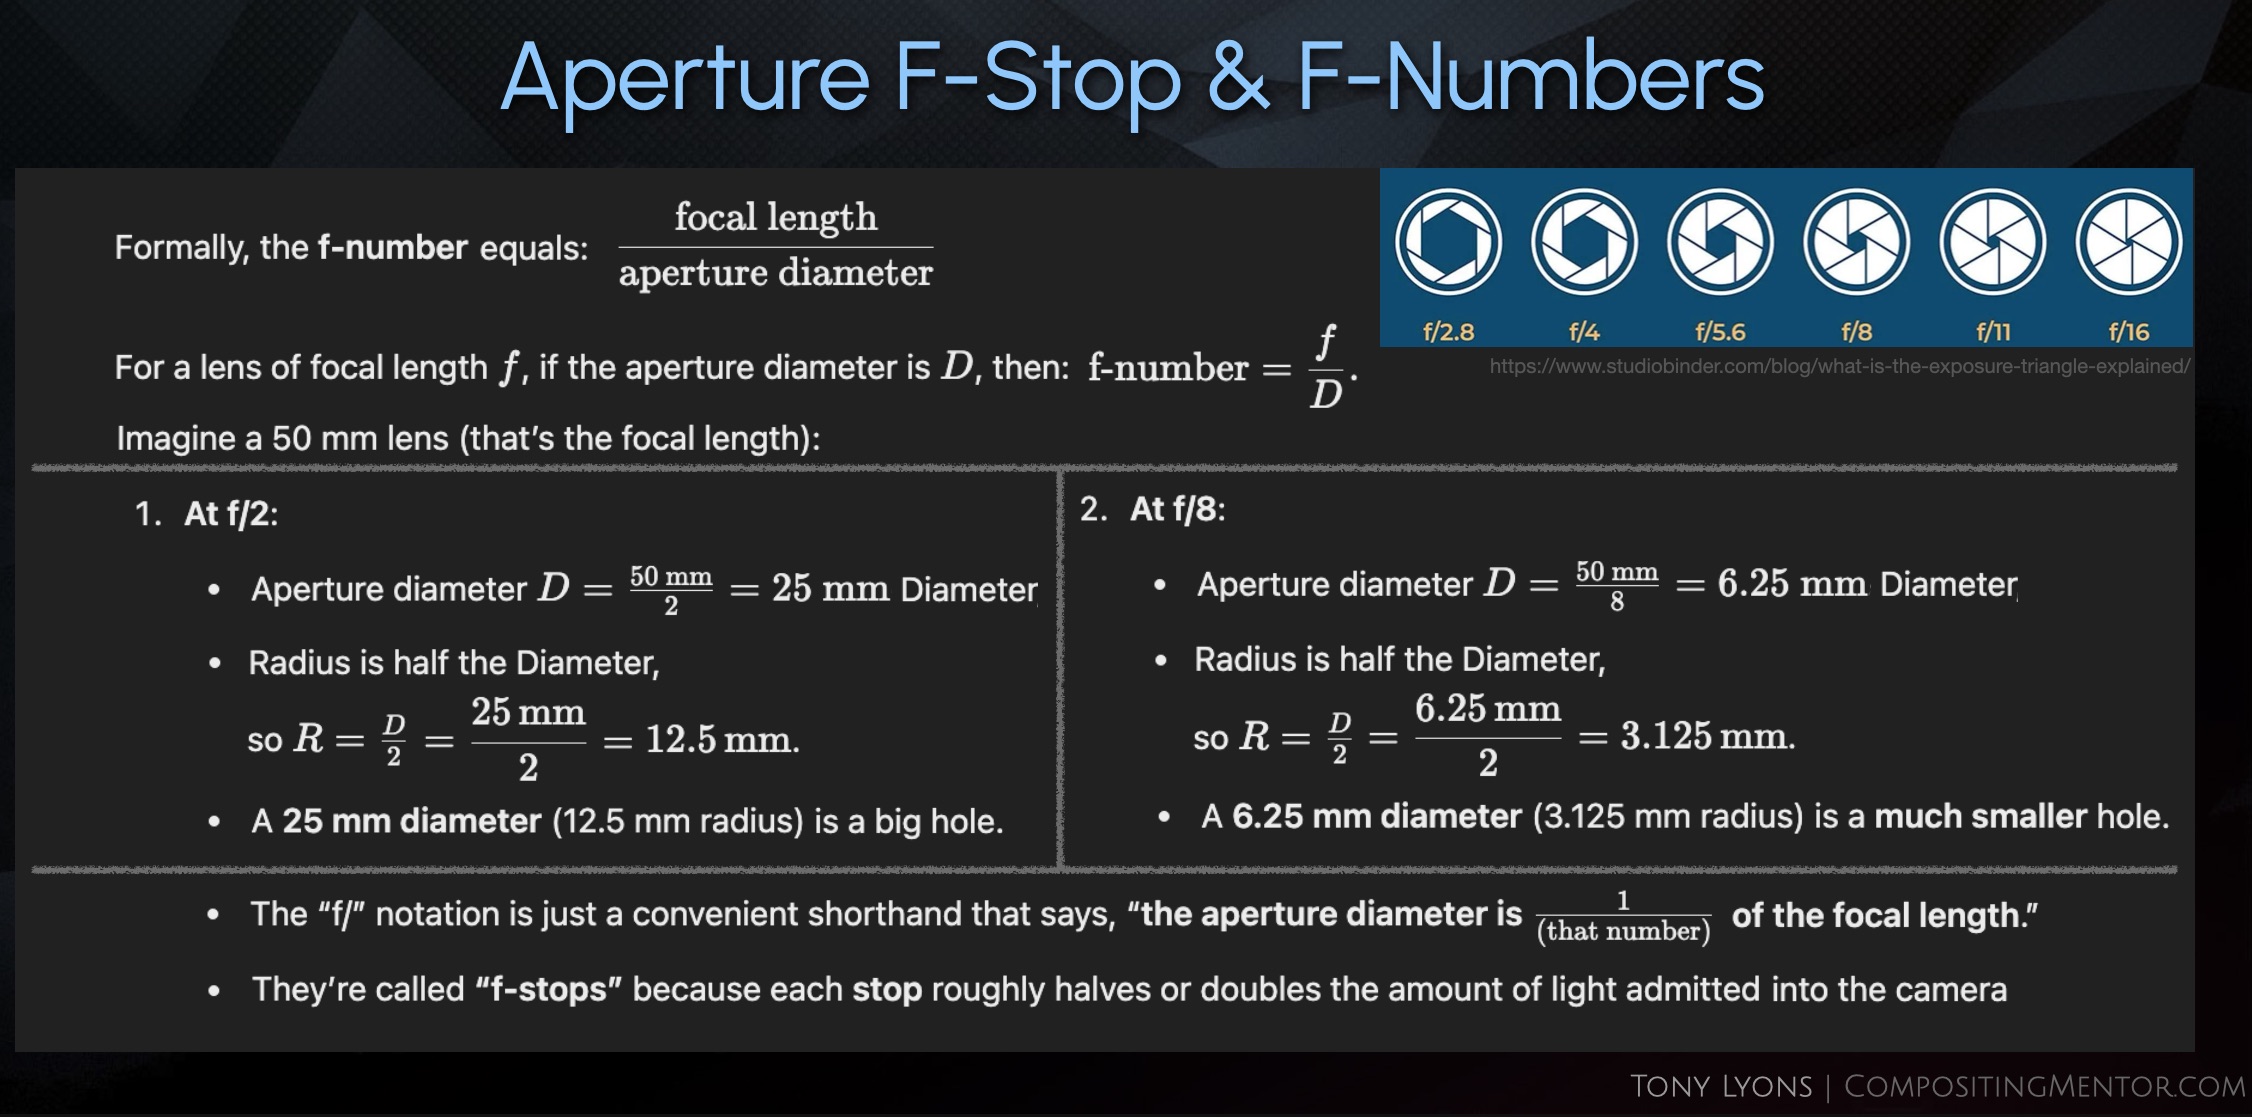
F-Number Meaning
- F-number is focal length divided by the aperture diameter (size of the opening of the hole).
- The “f/” notation is a convenient way to say “some fraction of the focal length”
- They are called f-stops because each stop, or notch in the settings, halves or doubles the light admitted into the camera.

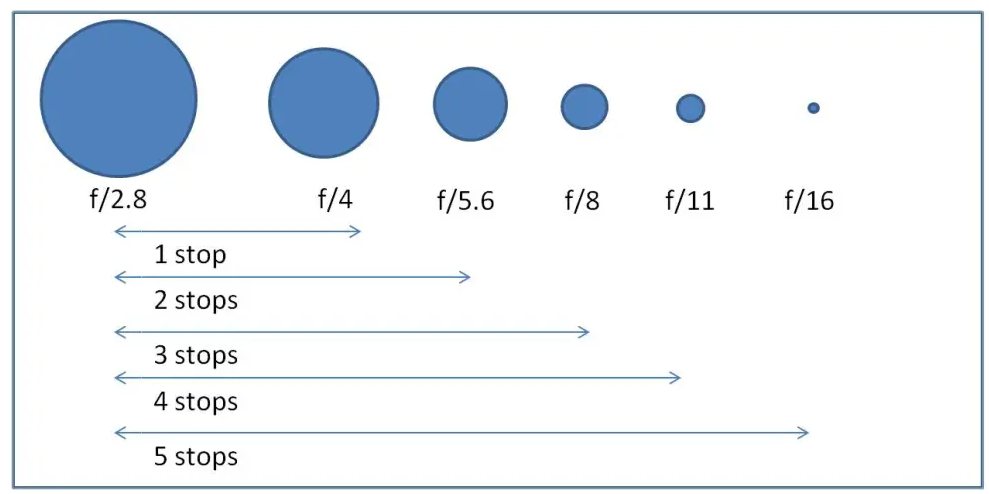
Doubling the Area of a Circle

- Doubling the Amount of Light requires doubling the Area of the Circle (lens opening)
- Doubling the Radius does not double the Area, it actually quadruples it. 22 = 4 , but (2 x 2)2 = 42= 16
- What do we need to multiply the Radius by to get double the Area?

The Square Root of 2 roughly equals ≈ 1.4142
Doubling the Area of the circle requires us to multiply it by roughly 1.4, which is why the numbers on the stops are written as they are

Exposure in nuke
For dealing with Exposure in nuke, I would recommend using either the Exposure Node, the Multiply Node, or the Grade node’s Gain or Multiply knobs

In the Exposure node you could change the stops directly by changing the mode to stops
You can also just multiply by 2, 4, 8, or enter 1/2, 1/4, 1/8 in the Multiply slider of a Multiply or Grade node.
With a normal Multiply, we can use an expression to be able to enter our stop numberpow(2, x) where x is the stop number, the same as the Exposure node is using.
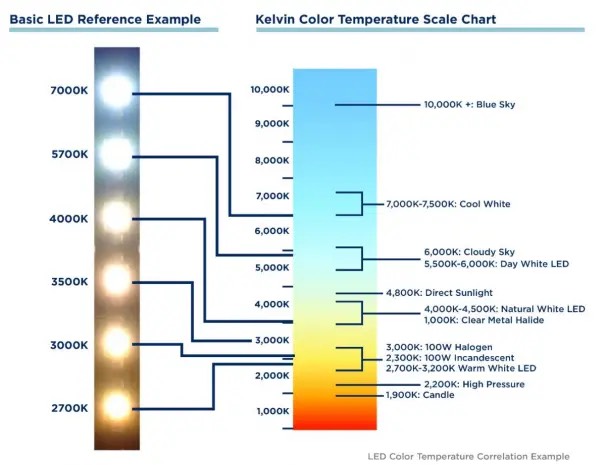
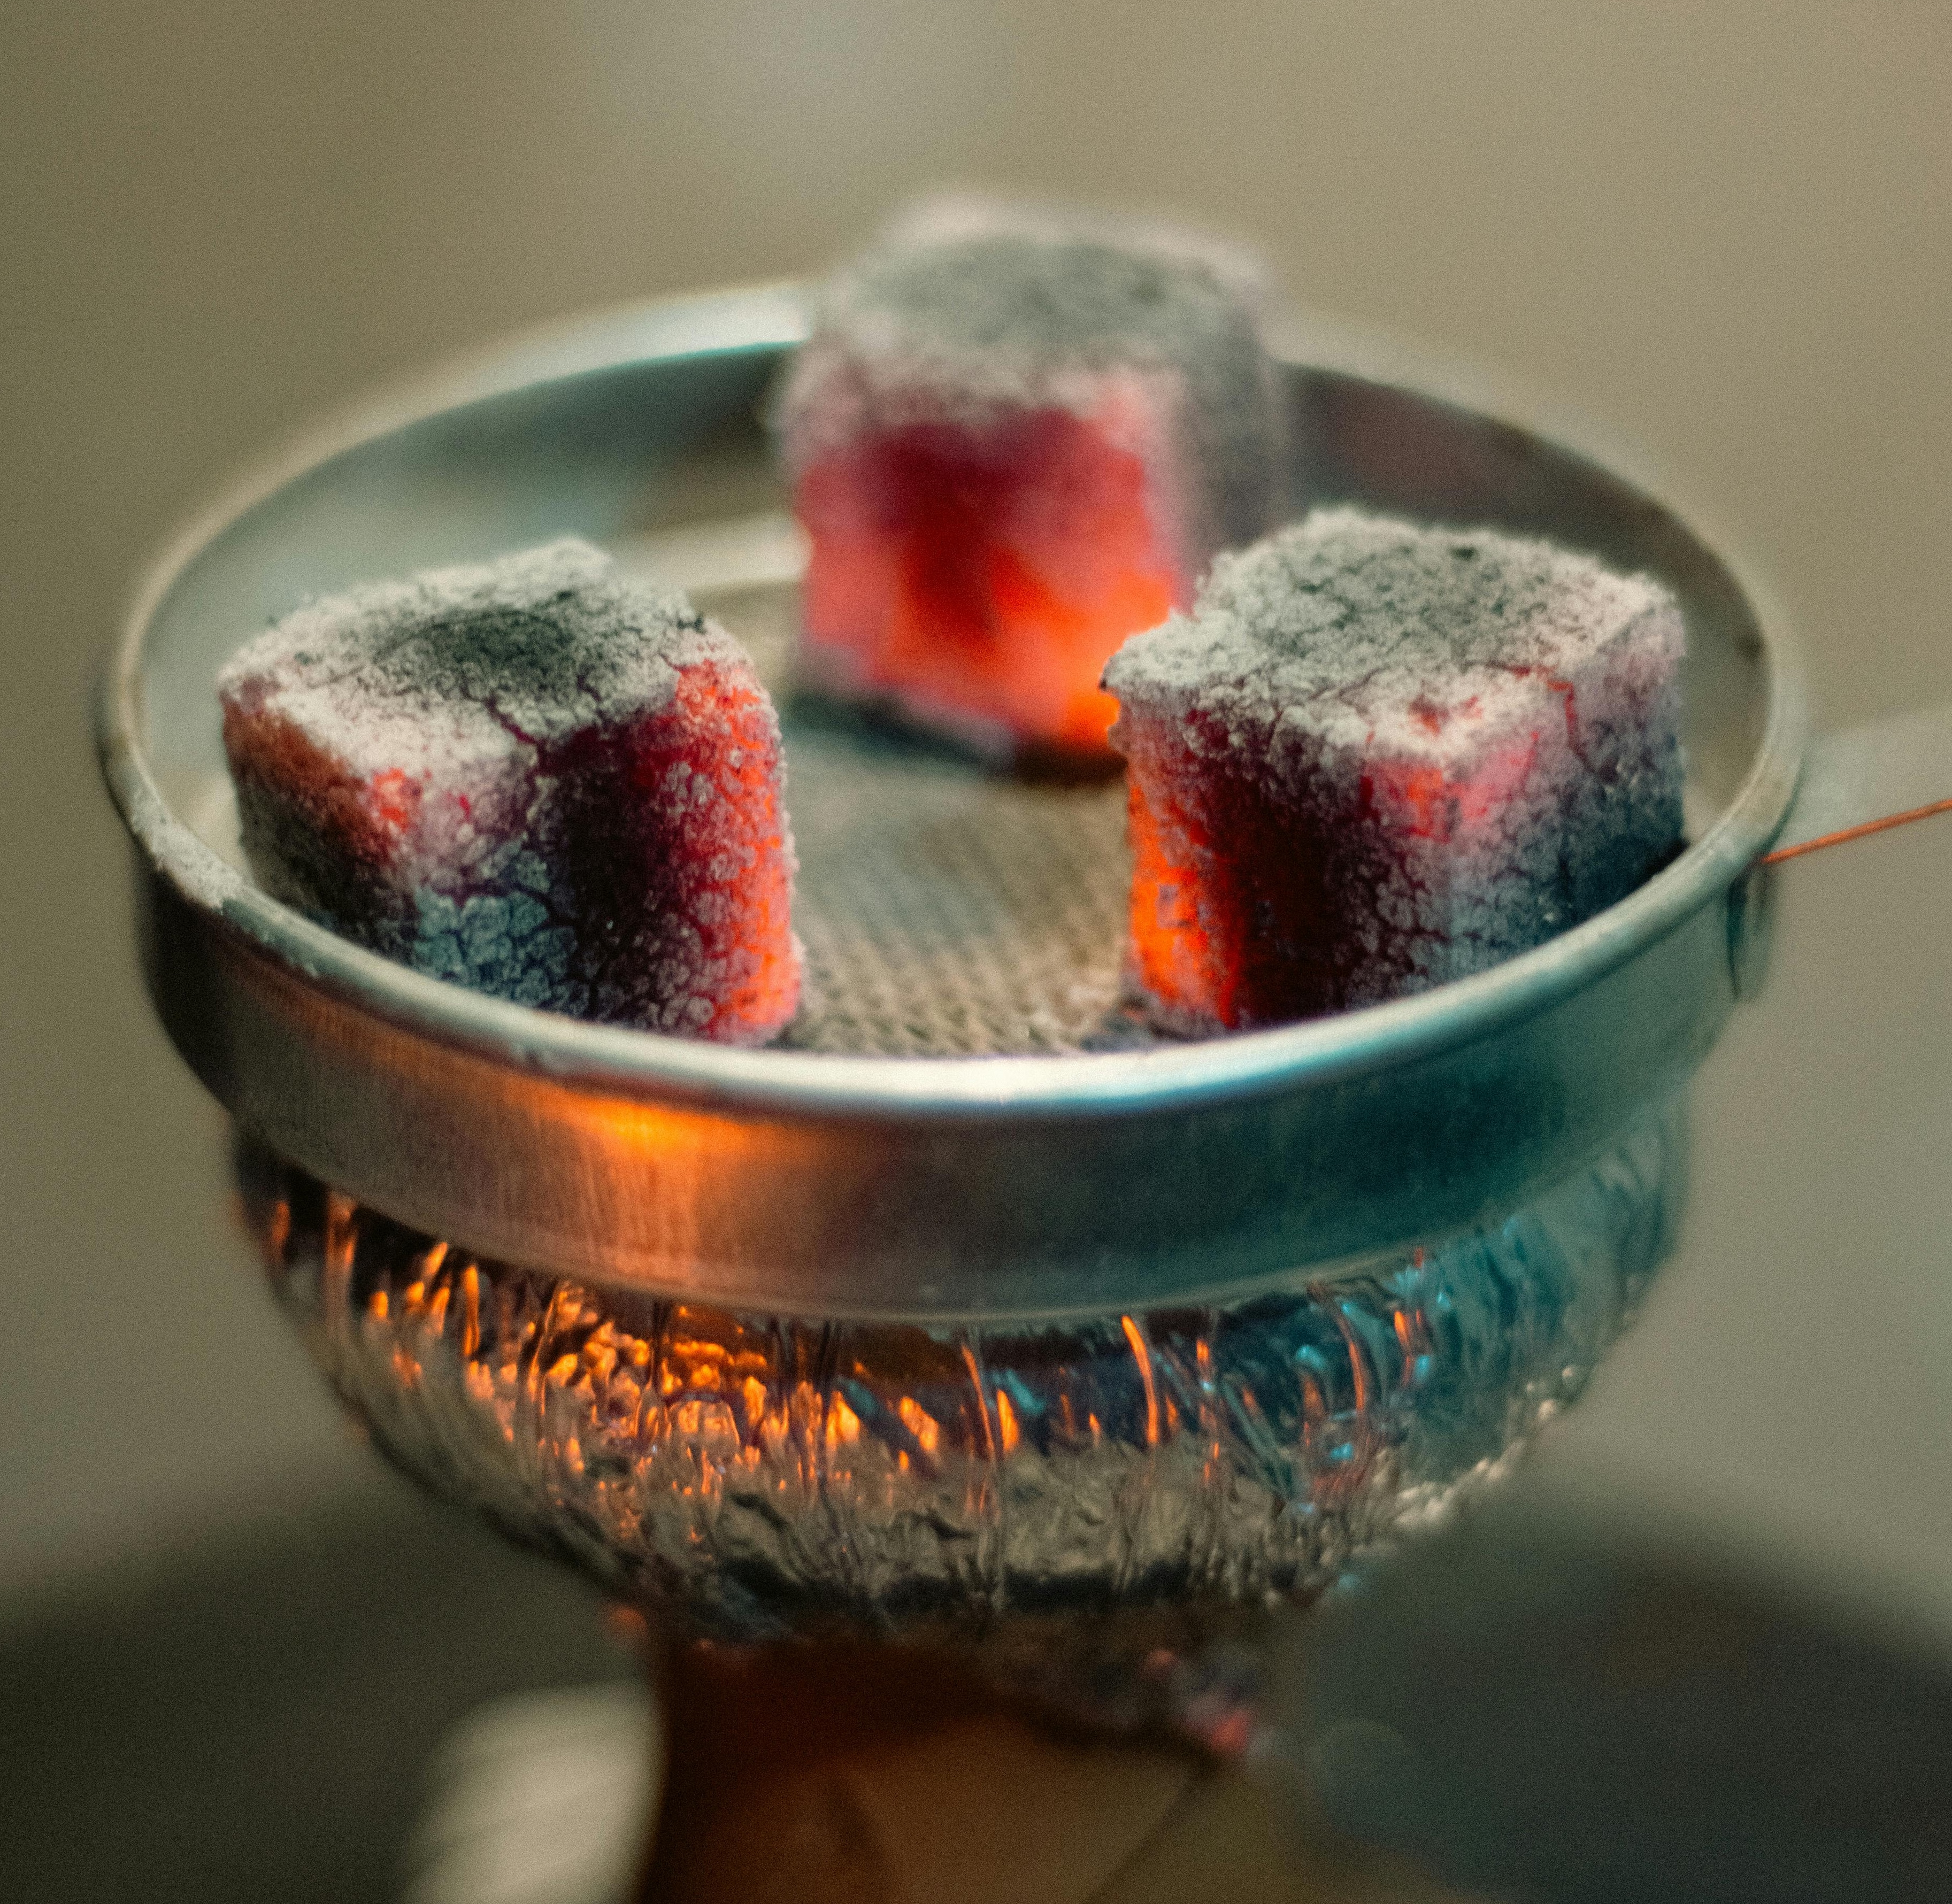
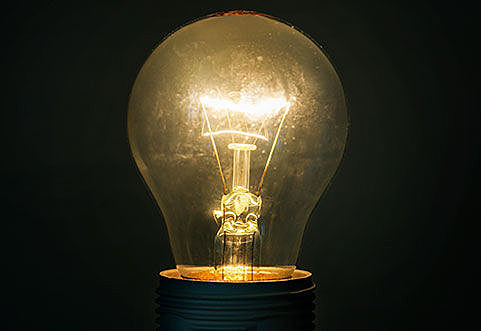
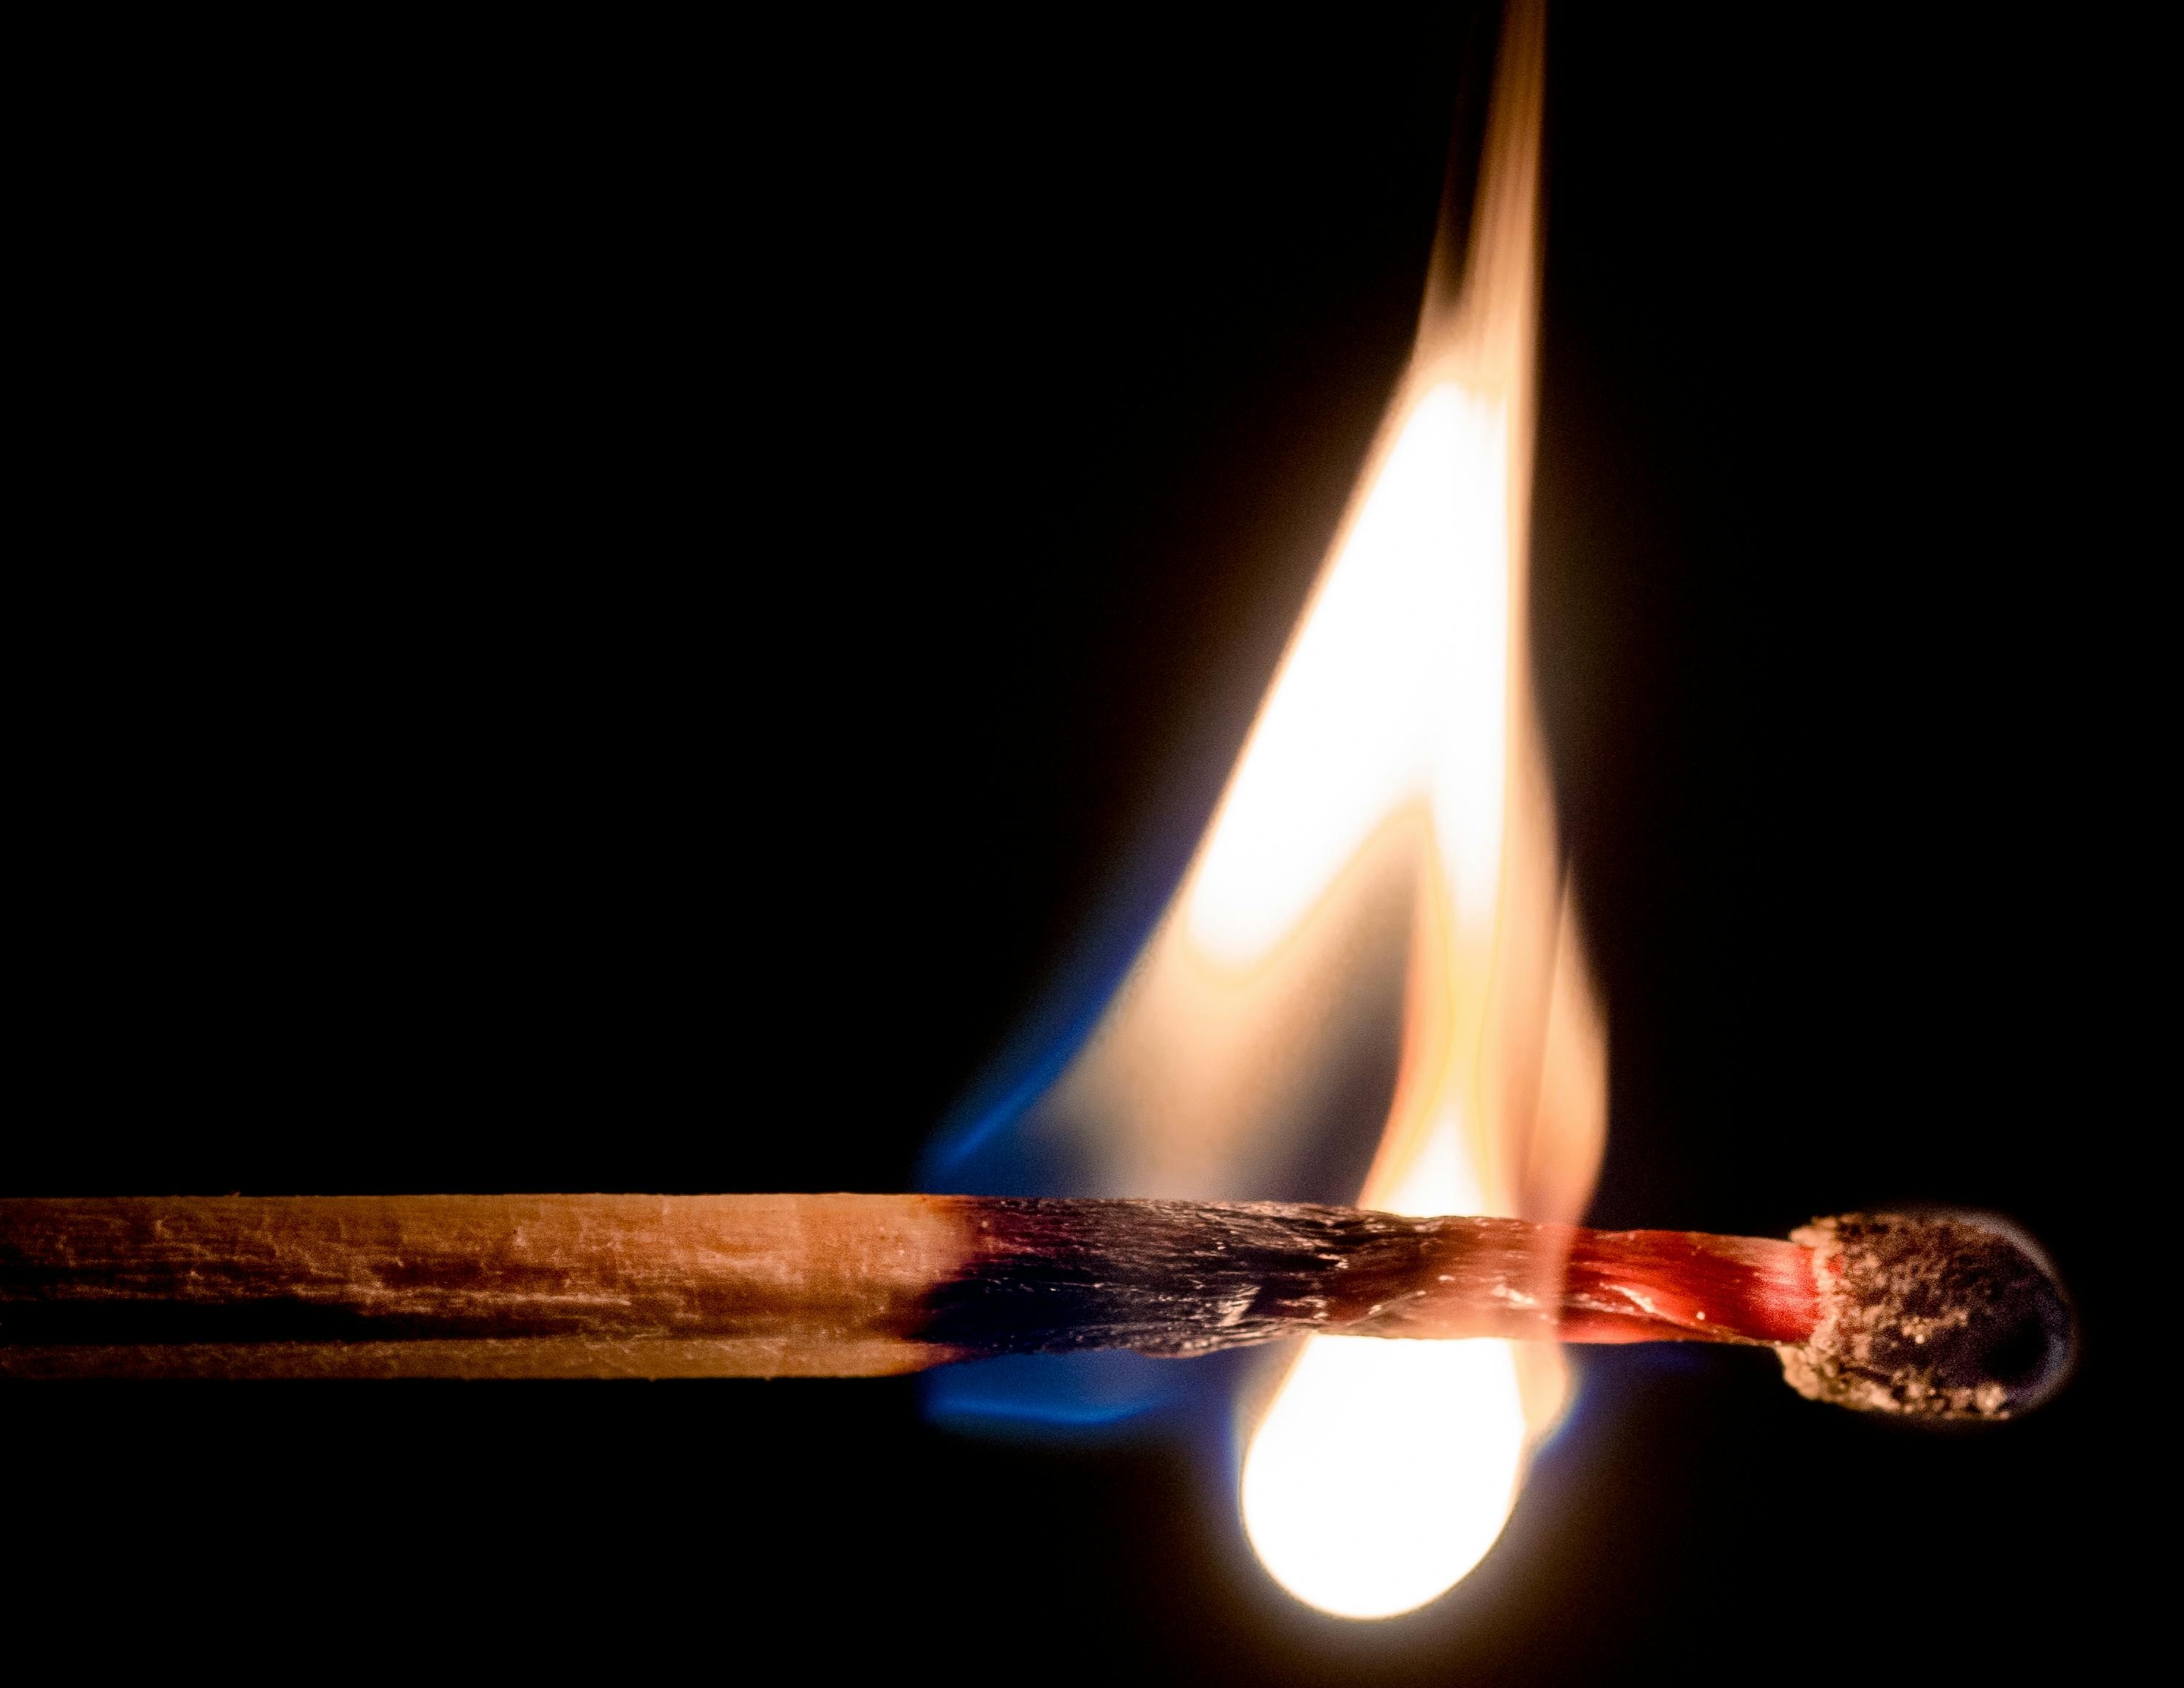
Temperature (Color)

- Temperature describes the hue, or color of the light, measured in Kelvin (K).
- Heated objects emit light photons as they heat up, in a process called Black-Body Radiation.
- As objects get hotter they emit different frequency wavelengths of light, shifting from red to orange to white to blue.


| Color | Kelvin (K) | Celsius (°C) | Fahrenheit (°F) |
| Red | 1000–2000 K | 700–1700 °C | 1300–3100 °F |

| Color | Kelvin (K) | Celsius (°C) | Fahrenheit (°F) |
| Orange –Yellow | 2000–3500 K | 1700–3200 °C | 3100–5800 °F |
| White | 3500–6500 K | 3200–6200 °C | 5800–11200 °F |

| Color | Kelvin (K) | Celsius (°C) | Fahrenheit (°F) |
| Blue | 6500+ K | 6200+ °C | 11200+ °F |


Color Grading in Nuke
I tend to use either an Exposure node for Luminance and a Grade node’s Multiply knob for Color

Or I use a single Grade node, using Gain for Exposure changes, and Multiply for color changes

I also prefer to change my color using the Temperature and Magenta settings of the Color Panel, which allow intuitive corrections which also giving fine control.
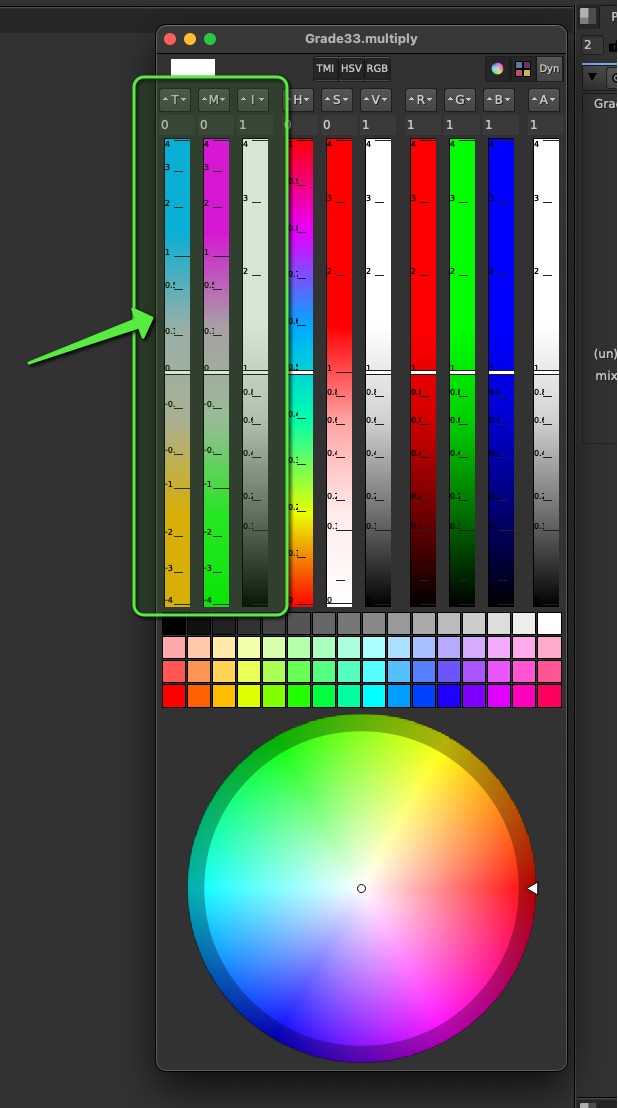
This is also an important way to separate your Luminance correction from your color correction, by making sure the Intensity stays around 1 and Luminance is preserved while changing color.
Adjusting Light Groups with Exposure (Gain or Multiply) for Intensity / Luminance, and a Multiply for Color, are my preferred way to Color Grade my Light Groups


Saturation of Light Groups
Remember that Light Groups are like individual Beauty Renders with only 1 light at a time. So you cannot simply desaturate a light group if you want to desaturate the light color.

You would either have to separate the Lighting information from the material information, using a color pass. But even then you may encounter some issues and artifacting.

Or, you can simply shift the colors of the light group to a more neutral color

Destructive vs Non Destructive workflows
You can use Gamma corrections, but be mindful that it requires an exact order of operations reversal in order to fully restore the original image. So it can be difficult to undo later if your corrections start to stack up

ColorCorrect Nodes can be especially Destructive because they are impossible to reverse, due to the fact that it is pulling a luminance key on it’s input to determine the shadows, midtones, and highlights.
This locks the input of the ColorCorrect, because if you make a change above, you are affecting the result of the ColorCorrect
It means that you either need to keep going, adding more nodes and changes on top, or perhaps start over.
Image each ColorCorrect is dependent on all of the previous ColorCorrects, this can cause a ripple, or chain reaction affect and be altering the results of all or any of the ColorCorrects if they are altered.

Of course in the end of the day, use whatever you need to do to get the shot done! But be mindful that you might be tangling a knot that you cannot untie later.
My advice would be try using Exposure and Multiply Changes for Luminance and Color first, and see how far you can get, and save the fancy ColorCorrects as a last resort, when you need to get the extra mile to completing the shot.
Demo Nuke Script
Download the Demo Nuke Script here:
CG_Compositing_Series_LightGroups_Demo_v07.nk
In the Demo Nuke script, you will find AOV and Light Group Rebuilds for:
- Blender (Junkyard Scene)
- Arnold (Fruitbowl)
- Octane (Fruitbowl)
- Redshift (Fruitbowl)
You will also find sections demoing:
- Exposure
- A junkyard light group rebuild that I have tweaked with Exposure and Multiply as an example
- Saturation demo dealing with saturation of Light Groups
- Section breaking down Destructive and non-destructive workflows in nuke.

Downloads
Junkyard
I’ve created a new Junkyard Render specifically for this Light Groups video, please download the Render and the Cryptomatte file here in order to relink it in the Demo nuke script:
Download Render files here:
Junkyard_LightGroups.zip ( 115 mb )
Fruitbowl
If you haven’t downloaded the FruitBowl Renders already yet, you can do so now:

You can Choose to either download all 3 FruitBowls at once:
FruitBowl_All_Renders_Redshift_Arnold_Octane.zip (1.61 GB)
Or Each FruitBowl Render Individually for faster downloads:
FruitBowl_Redshift_Render.zip (569.1 MB)
FruitBowl_Arnold_Render.zip (562.8 MB)
FruitBowl_Octane_Render.zip (515.4 MB)
The project files and the Renders are separate downloads, so if you have already downloaded 1.1 What and Why files or the Fruitbowl Renders, there are a couple ways to combine them to work.
- Either add the .nk script to the previous package (in the folder above SourceImages, with the other .nk scripts)
- Or simply drop the Render files into the SourceImages folder of the project folder

References
Below are some links to the various research I used to create this video:
First, big shout out again to the Exposure Triangle Simulator website:
Exposure Triangle
http://www.andersenimages.com/tutorials/exposure-simulator/
http://photography-mapped.com/interact.html
https://www.adorama.com/alc/9-online-camera-simulators-to-help-your-photography-skill/
3D Rendering Light Groups
https://www.blog.poliigon.com/blog/4-simple-steps-to-set-up-light-groups-in-blender
https://www.premiumbeat.com/blog/the-role-of-light-groups-in-arnold-for-maya/
YoutTube – Light Groups in Arnold for Maya | Francesco Furneri
https://garagefarm.net/blog/blender-light-groups
Julius Ihle – HDR Prepper Nuke Gizmo for IBL (Updated!)
Photography
https://www.canonoutsideofauto.ca/
https://www.john-rowell.com/blog/2017/3/27/what-is-a-stop-of-light
https://www.photopills.com/articles/exposure-photography-guide
https://www.studiobinder.com/blog/what-is-iso/
https://photographylife.com/what-is-iso-in-photography
https://theauroraguy.com/blogs/blog/iso-is-not-what-you-think-it-is-what-is-iso-really
https://photo.stackexchange.com/questions/52163/digital-iso-vs-post-exposure-correction
https://www.alanranger.com/blog-on-photography/what-is-iso-in-photography
https://skylum.com/how-to/what-is-iso-in-photography
https://petapixel.com/exposure-triangle/
https://www.outdoorphotographyschool.com/aperture-and-f-stops-explained/
https://www.exposureguide.com/focusing-basics/
https://manualmodebasics.weebly.com/shutter-speed.html
https://digitalphotographylive.com/shutter-speed/
https://isblens.weebly.com/shutter-speed.html
https://www.diyphotography.net/what-is-middle-grey-and-why-does-it-even-matter/
https://silentpeakphoto.com/photography-tips/stops-in-photography-explained/
3 Point Lighting
https://lightingpixels.blogspot.com/2013/01/tutorials-does-three-point-lighting-suck.html
https://academyofanimatedart.com/understanding-the-basics-of-3-point-lighting/
Youtube – CINEMATIC LIGHTING: 3 Point Lights | Kriscoart
https://www.linkedin.com/pulse/what-crucial-role-lighting-3d-animation-incredimate-jhkac/
https://www.soundstripe.com/blogs/how-to-master-the-art-of-practical-lighting
BEST Resource you will ever find on the subject of CG Cinematography and Lighting – Onine Book:
https://chrisbrejon.com/cg-cinematography/
Area of Circle
https://www.chilimath.com/lessons/geometry-lessons/area-of-a-circle
https://mathmonks.com/circle/area-of-a-circle
YoutTube – Video 878.1 – How do you double the area of a circle? – Practice | Chau Tu
Youtube – Area of a circle | Perimeter, area, and volume | Geometry | Khan Academy
Youtube – Circle Area (classic visual proof) | Mathematical Visual Proofs
Color Temperature
https://www.studiobinder.com/blog/what-is-color-temperature-definition/
https://nofilmschool.com/what-is-color-temperature-and-how-should-filmmakers-utilize-it
https://www.therookies.co/projects/76980
https://www.wonderopolis.org/wonder/what-is-the-color-of-fire
