For a long time I wanted to release a CG compositing series. Many things stopped me in the past:
Time constraints
Access to good Render examples to work with
Not thinking I had too much to contribute to the subject matter
This series will be focused on answering the following question
How do I best rebuild my CG passes, for the most flexibility as a Compositor?
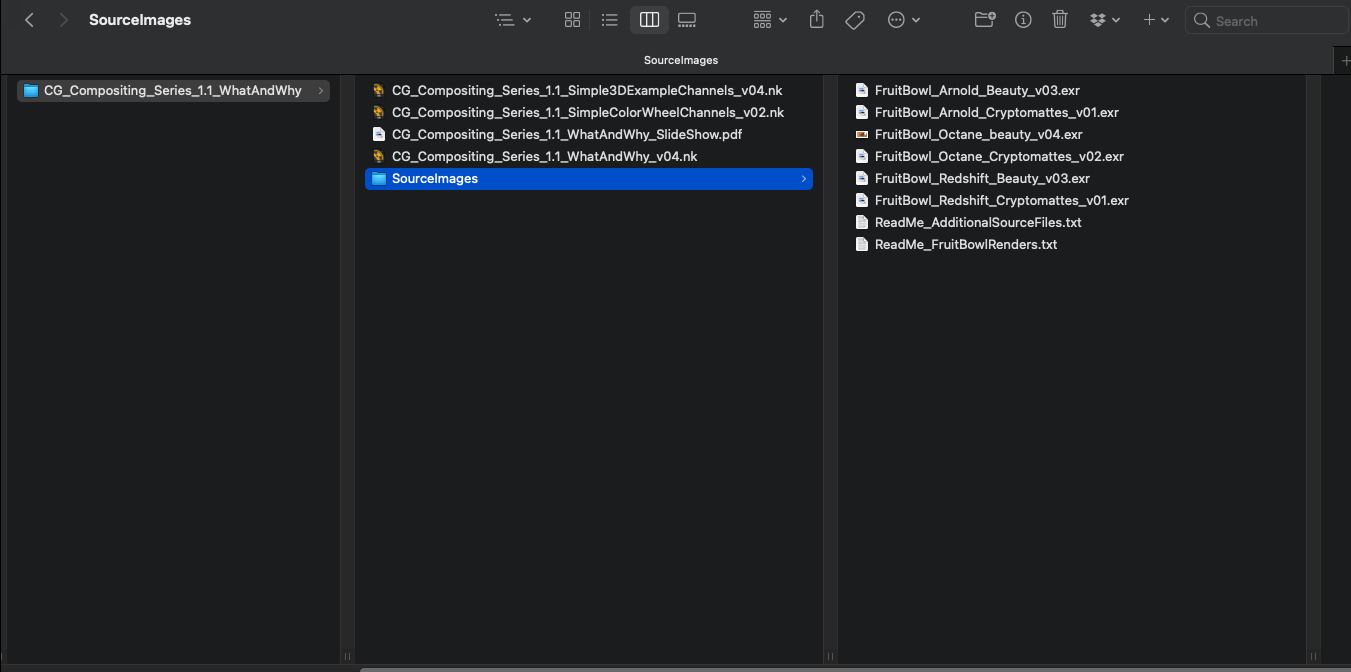
Download the FruitBowl Renders for the Series
My Friend and fellow artist, Chase Bickel, has kindly provided us with some high quality renders of a FruitBowl to download for free and play around with.
Download the FruitBowl renders now, or I will always post the links at the top of each video and blog post for you to download later:
You can place the FruitBowl renders files into the /SourceImages/ folder of the project files folder accompanying each video and nuke will reconnect the read nodes.
For Example:
These Renders are full of common passes you would find in production, including:
AOVs
Lightgroups
IDs
Utility
Gameplan
Start with the Basics –> Build our way to more advanced topics –> End with a proposed template for your CG Rebuild
I will go through different types of AOV passes you would typically find at a studio, what they are, how they are used, and how should think about them in relationship to one another. We will categorise and group different AOVs in order to define them better, and help us find the commonality and patterns between renderers.
This series aims to be useful no matter what renderer your CG comes from, as the principles are the same.
Topics Covered
Differences between Additive and Subtractive Workflows, and the pros and cons of both
Explaining the difference between Material AOVs and LightGroups and how to work with them together seamlessly
This includes an elegant solution to the infamous AOV – Lightgroup paradox
I will cover the importance of making Mattes and alphas, to help us isolate, and automate our CG manipulation. We will go over common utility passes and IDs and show how to do some cool things with them
Using Full CG Render
Will not cover how to integrate CG renders into a live-action plate
Will focus on the CG rebuild and various methods of manipulation to get the most out of your CG renders
Something for everyone
Juniors, Mids, Seniors, TDs, Comp Supervisors
There will be knowledge to be learned across all levels
Perhaps this will one day be a pre-requisite for a full CG Compositing into live-action plate course
This series will take some time to release all episodes, so please have patience
Select the rotation angle and size of the blur. Choose between blur and defocus. Has a perpendicular blur that blurs in the perpendicular direction to the angle chosen.
Binary Alpha is a very simple, yet super convenient expression that I use all the time, and decided to turn into a quick gizmo.
It analyzes a choice of the RGB, RGBA, or Alpha input and outputs an Alpha Channel (or RGBA result) that is Binary, 0 or 1. Any Pixels that are not 0 will be turned into 1 (negative numbers also), and 0 will remain 0.
This is perfect for those “blur, unpremult, set alpha, blur” for tricks extending colors, or if you need a quick matte for finding any rgb color above or below 0, in a CG render passes for example.
The good ol’ blur/unpremult/blur ❤ :
Basic properties:
The literal tcl expression is just:
r!=0 || g!=0 || b!=0 || a! = 0 ? 1 : 0
Which in english, translates to something like: “if red is not 0, or green is not 0, or blue is not 0, or alpha is not 0, then be 1, or else, be 0” So it will include negative pixels as an output as 1 as well.
Super simple but hopefully a time saver if you are like me and hate remembering expressions.
For those who just want to quickly see what the tool does, I’ll include a time-stamped link to that part of the Demo here: https://youtu.be/Kw3bcsmkGuk?t=2145
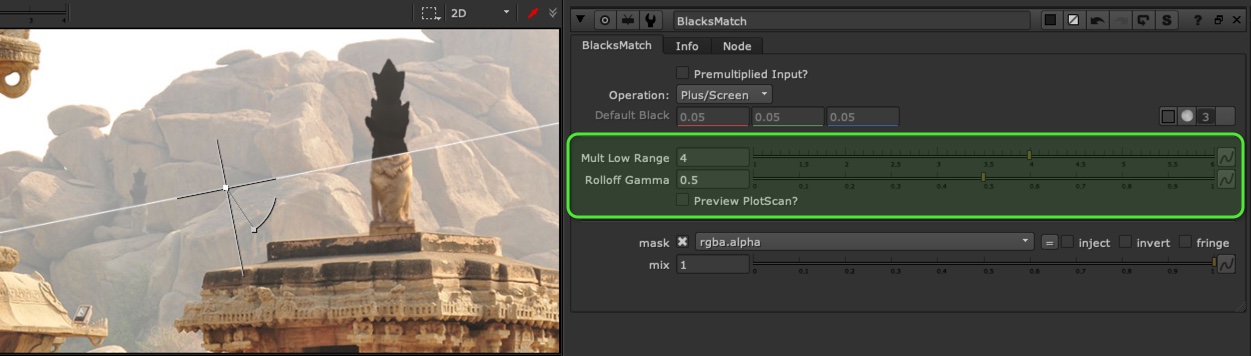
BlacksMatch recreates a Toe operation with merge nodes, meaning you can now plug in an external image are your black color and it will perform the operation taking each pixel’s value into account as the blackpoint.
You can control the Multiply, which is how far above the blackpoint the blacks match with stop affecting your midtones and highlights. For example, if you plugged in 0.15 and had the multiply set to 2, then values above 0.3 remain unaffected.
The “falloff” or Gamma control just controls the falloff of the curve into your blackpoint color. if it’s really high, it will act more like a screen or plus (still ending at the blackpoint color times your multiply control), and if it’s really low, it will act more like a clamp. Your blackpoint will not ever fall below your input color while you manipulate the curves.
There is a preview plotscan button that helps you visualize how your curve is behaving with your settings. Just move the plotscan picker around and it will sample your blackpoint color at that area and give you an overlay of your curve. (Don’t forget to turn it off when you are done)
I personally think this is a tool every comper should have in their toolkit, as it’s by far the most controlable way to match your blacks properly!
The settings of the BlackMatch Tool and a wipe from the tutorial:
There is a full video Tutorial about the BlacksMatch workflow, along with a Tool Demonstration at the end. If you want to know how I made it and whats going on under the hood, please watch the whole video. It might give you some ideas of how to re-think your matching blacks workflow.
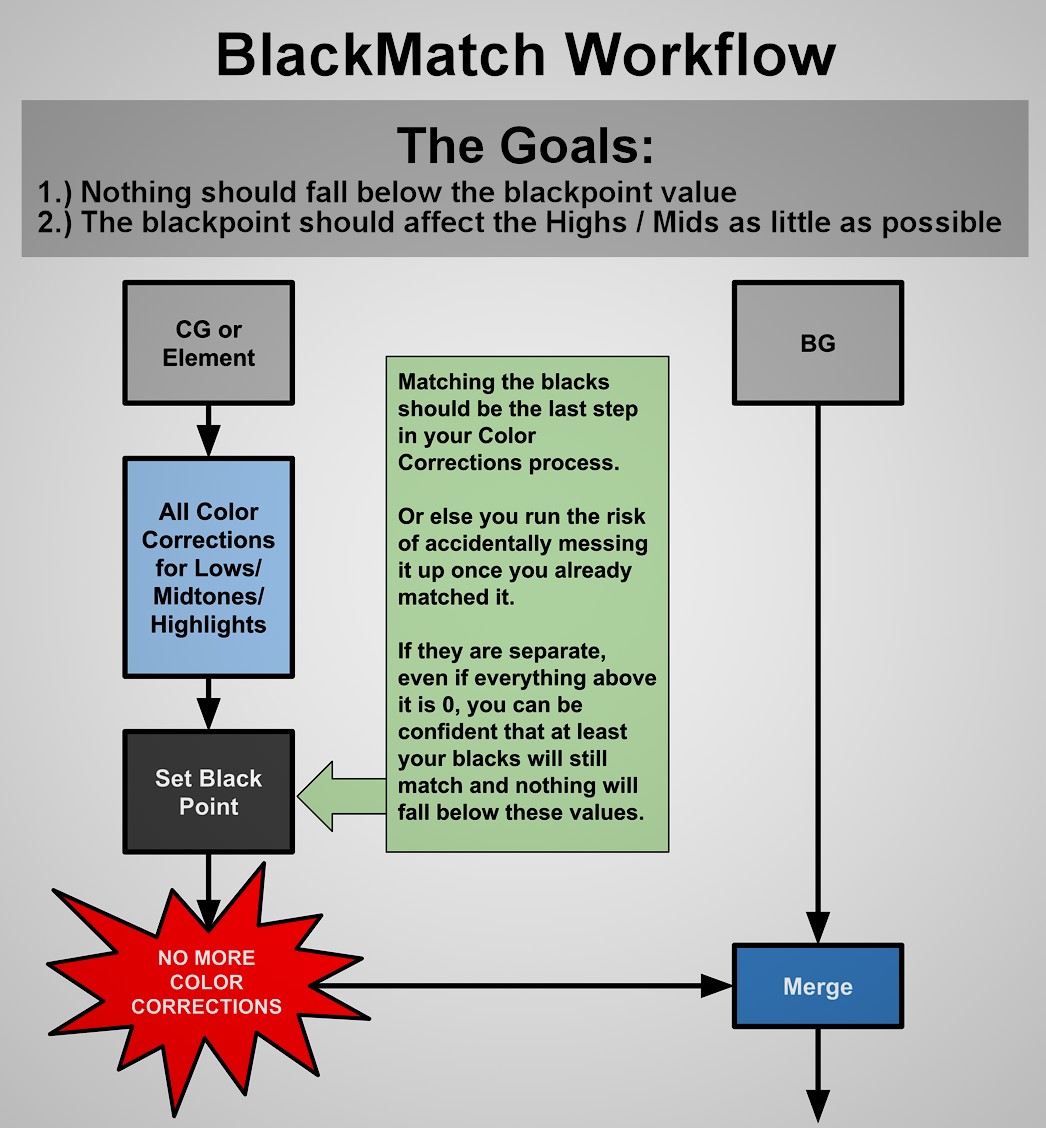
Here is the Flow Chart for the Blacks Match Workflow:
Our goals are:
1.) Nothing should fall below the blackpoint value
2.) The blackpoint should affect the mids/highs as little as possible.
The Most important thing to remember is to try and not adjust any color corrections after you apply your blackpoint.
Here’s a few examples of the importance matching blacks can be to your image:
Here is a picture with just some beauty rendered statues, color corrected and placed into our scene, no blacks match… stands out quite a bit:
Here is a before picture is we just turn off all the color and detail and just place “pure black” statues into our scene:
If we start sampling the colors around the surrounding areas of the statues and applying theses as our blackpoint, still ignore any midtone/highlight color or detail. We can actually see our statues are fitting in quite nicely. You can think of it like “if there were pure black objects in my scene in that area, what would it look like?” and we are getting pretty decent results:
And here is the image with our matched blacks properly combined with our midtones and highlights. But there is a lot of operations used to combine the blackpoint with the midtones and highlights. So let’s take a look at all of them, and study the best way of combining these:
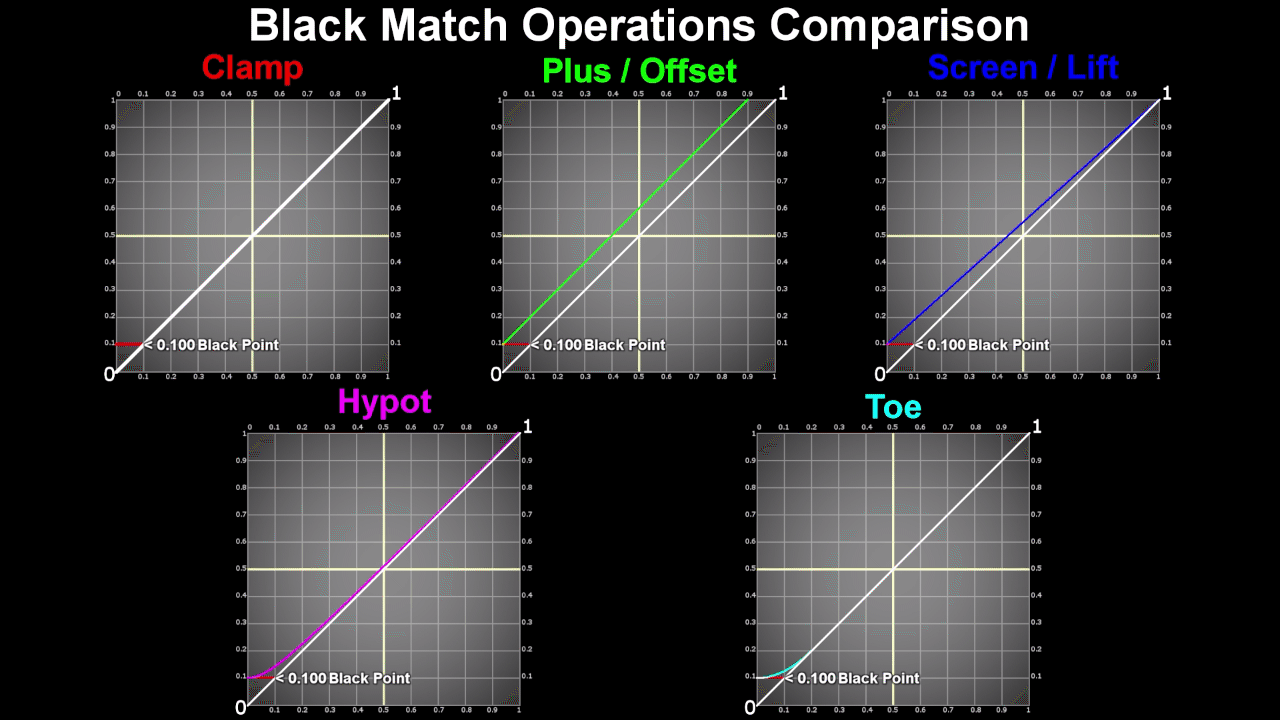
For the second part of our goal, the blacks should affect our midtones and highlights as little as possible. We have to look at different operations of how to apply our blackpoint:
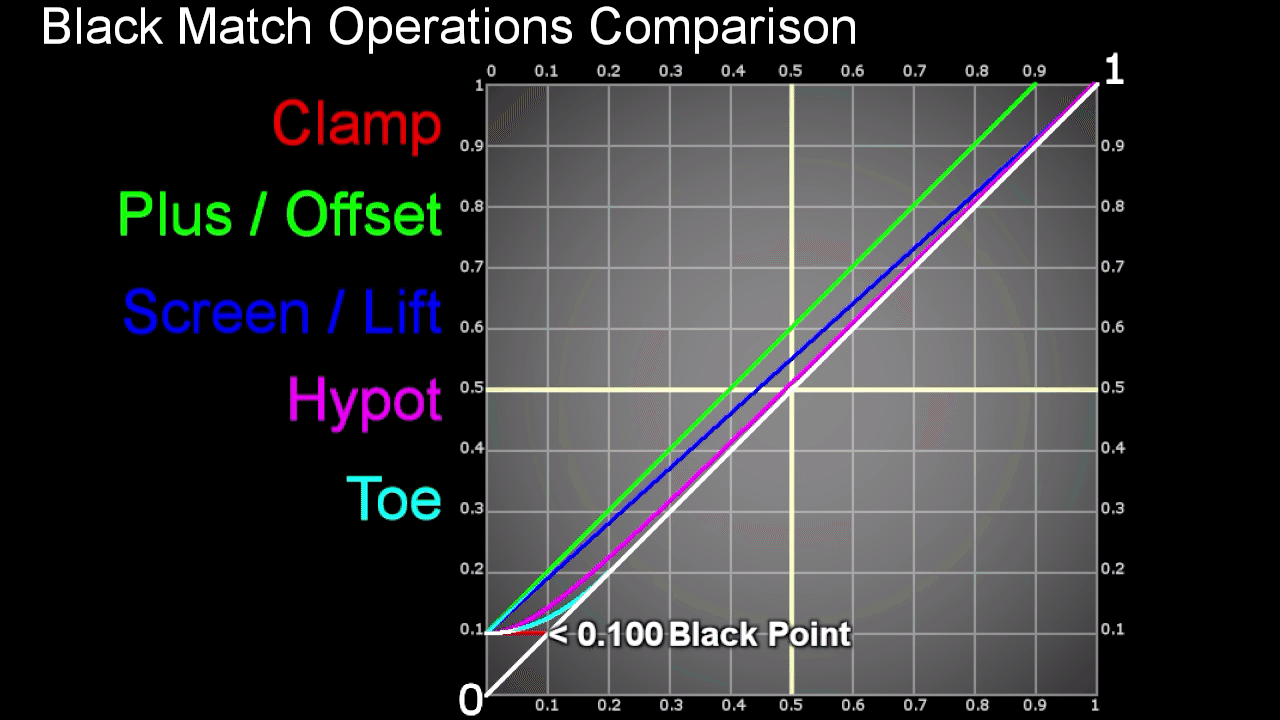
Here’s some graphs comparing the most common operations of how to match the blackpoint and what they are doing to a 0-1 curve.
Here’s a closer look at the curves next to each other:
Here is just an overlay of all the curves on top of each other to compare them to one another:
Here is a close up of a Clamp operation:
Here’s a close up of the plus operation:
Here’s an example of a Screen operation:
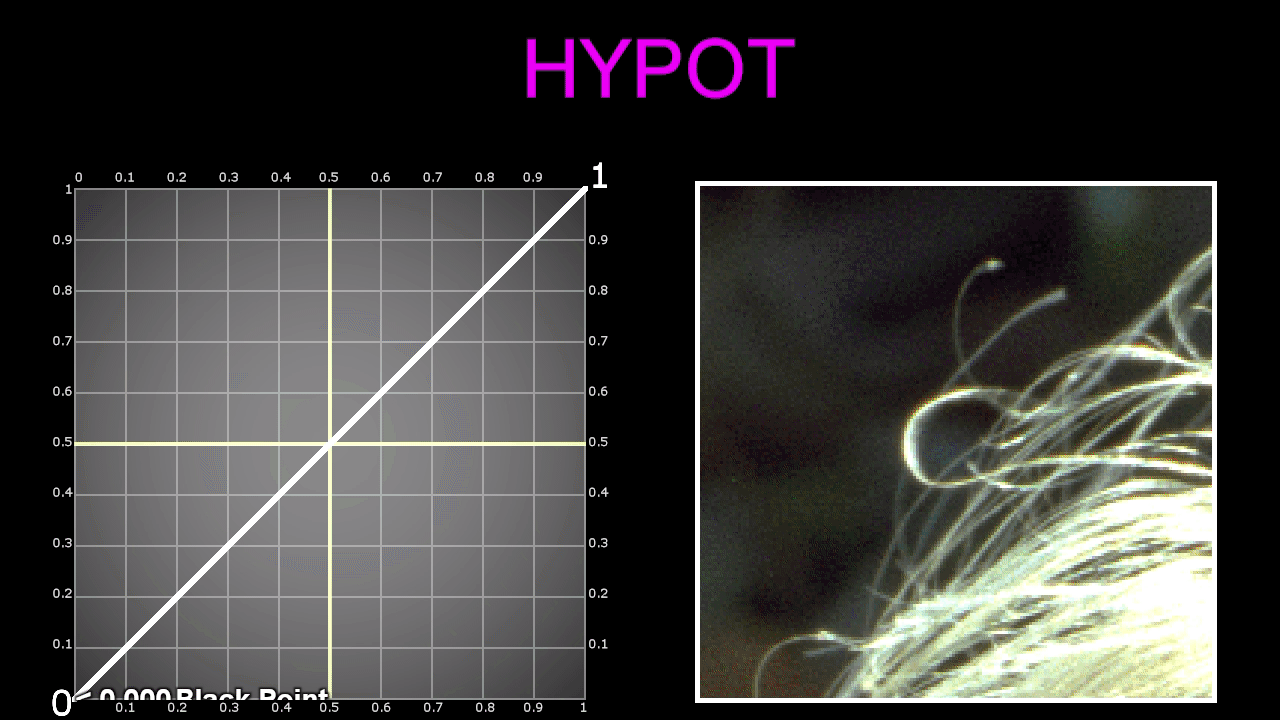
A close up of a Hypot operation:
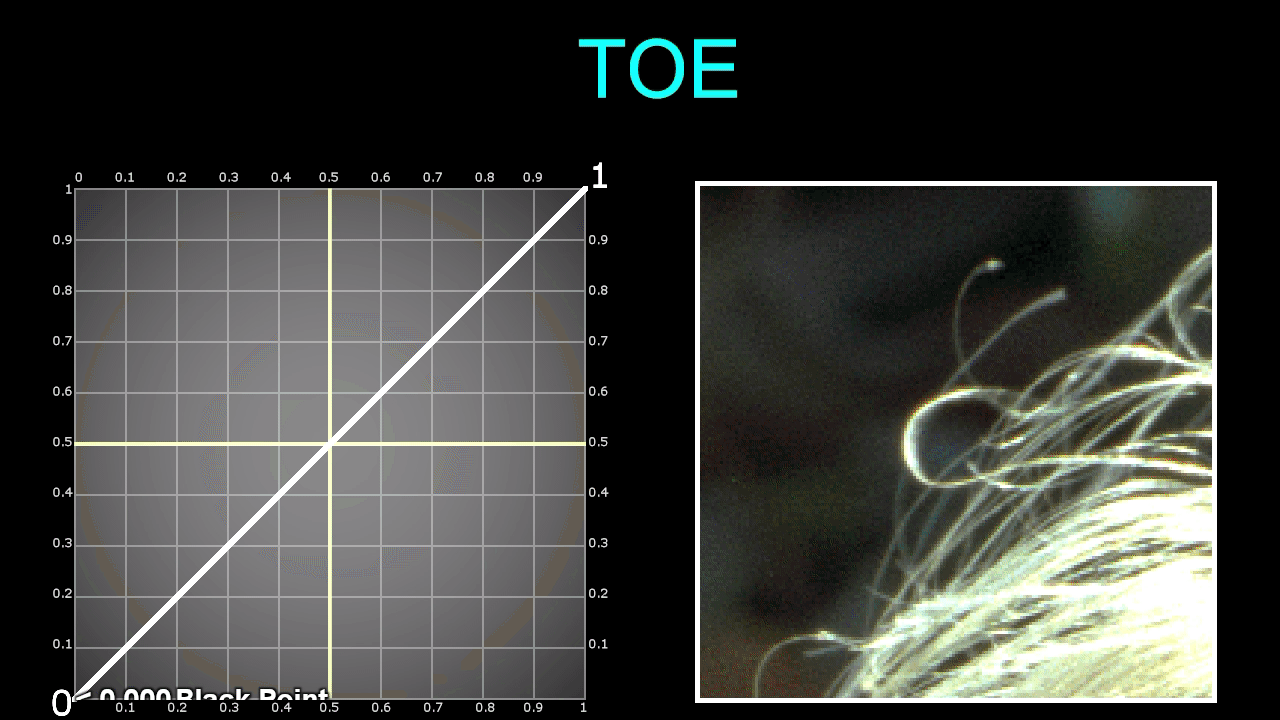
A close up of a Toe operation:
Let’s now talk about the Good, the Bad, and the Ugly… starting with the bad:
A screen and lift do a sililar operation between 0-1, but the screens influence stops at 1, where as a lift is actually using 1 as a pivot point to lift the blacks and lower the highlights above 1. If you set a lift to 1, it will completely decontrast the image, sandwiching every pixel and turning the entire frame to 1.
No matter if you leave a color correct at default range, or start adjusting the range curves, the color correct produces some very strange results because of the S-curve it generates. Because it is sampling the luminance from the bg image, if you enter a black point number higher than the luma key it is calculating, than the curve will first be your black point color, then dip back down to the midtone color and rise back up to your highlights. This creates a really strange image that you’ll want to avoid.
Avoid Lift on a Grade, and avoid ColorCorrect nodes for adjusting your blackpoint.
The Ugly:
Both Clamp and Plus are at the Extremes of our operations, and have the least appealing qualities. You can acheive much more control and better operations using our remains screen, hypot, and toe operations. Here is the gif of the curves compared to one another again so you can see that clamp and plus are at the extremes:
Screen and Hypot are perfectly fine operations, but offer limited control. and Toe… Well we can’t even input an image, and we don’t even know what exactly it is doing. There’s very little documentation on it. Let’s try to reconstruct it:
With a little bit of fiddling around. We can see the top of the toe operation is exactly double the value of the blackpoint… We need to start by re-creating a screen, which is basically an inverted luminance key, used as a mask, that is plusing out blackpoint. From there we can create a screen operation that instead of end at 0-1, ends at 0 to 2x the balckpoint value, and you can see in the example above we have a mini triangle encompassing our toe operation. There it’s a matter of using a gamma of 0.5 on the luma-key mask and we have our toe.
So to reiterate:
A toe is an inverted luma-key, that instead of 0-1 is 0-‘2x the blackpoint color’ and then is gammed by 0.5 and is used as a mask to plus the blackpoint color over the image.
I know… that’s a mouthfull. But what we take away from making this toe for ourselves is that we have controls over 2 things. The multiply of how far above the black color it is affecting our midtones and highlights. And the gamma curve that is controlling our falloff of the curve towards the blackpoint value.
With this knowledge and math, we can create a tool that uses merges to do our math operations, which mean me can plug in an external image as out blackpoint and expose controls for the mult (above the blackpoint) and gamma (falloff) of the curve. And now we have our BlacksMatch tool.
I’ve received a few requests for the script and images I’ve used in the tutorial, so I’ve put together a folder on my dropbox for you guys to download and play around with. This is a preview of the part of the script I am saving for you. It includes the statues over the temple example, a couple of the simple shapes over complex black level images, and the part of the script that I recreated the toe, with the animating graph.
I’m also adding a reference image folder, with some of the cool hazy/foggy complex black point images I found while researching this topic. Maybe they will be good practice for you to bring into nuke and play around.
Finally I am adding in the original statue exr render, with some passes: beauty, depth, position, and normals, in case you want to try and color correct and match the statue render into any of these images or your own backgrounds. Thanks to Ernest Dios for the render.
GradMagic is an interactive 4 point gradient tool, which can link to cornerpin nodes, and can toggle between live sampling from the plate or baking the color values of the corners.
Can be used for various tasks in prep and DMP,or if you just need a quick 4 point gradient map.
Quick Overview of the properties:
It’s pretty straight forward, heres some basic written steps:
1.) Set your cornerpoints manually or by pressing one of the ‘snap to’ buttons. Or alternatively you can link or bake your cornerpoints to an existing cornerpin node (or any node with 4 “to” knobs).
2.) If you need to adjust the points once they are baked/linked/ in place, then show the adjust knobs, set the reference frame to snap the adjust points near the main points, and you can then move each cornerpoint while it still retains its animation path.
3.) You can either keep the node live, bake the corner colors on a single frame, or bake the colors over a framerange. once baked you can adjust the cornerpoints further if you need to cover up more area. You can adjust the ‘sample size’ at the top if you want to average more colors under each corner point.
4.) Finally you can apply a blur to the edges to help with transition, and you can select the output at the top, whether to show the gradient over the BG input, or just the gradient itself.
0:00 – Introduction 4:30 – CC and transform after key 6:49 – CC and transform before key 12:03 – Advanced Keying Template flowchart 15:25 – Advanced Keying Template 40:10 – Advanced Keying Template Compressed 40:55 – Advanced Keying walkthrough script 41:59 – outro
Hey guys,
Sorry for the long overdue tutorial wrapping up this keying series. Here is the advanced keying template video, along with a flowchart and download link to the template scripts, which you can save to your toolsets for your own use in your nuke scripts.
Here is the Template Flow Chart from the video for you to download and review:
Here is the download to the Advanced Keying Template Package:
http://www.thefoundry.co.uk/products/nuke/learn1/ – scroll down to 2d compositing | Compositing Basics. Click on the link that says Download Assets for Basic Workflows (535 MB). Here you will find the girl and desert BG found in this tutorial.
https://mango.blender.org/ – Tears of steal open source project. Free 4K footage for people to download and practice. Highly recommended. scroll down to the blog post called ALL4K FRAMES – NOW AVAILABLE ON XIPH.ORG.
Finally, I want to thank everyone for your continued support, views, shares, comments, and emails. It all means a lot to me and you’ve certainly motivated me to keep going. Thank you.
As always, if there are any questions, just leave a comment or shoot me an email and I will try my best to respond. Hopefully with this series of tutorials, and now this template, you guys will be fully equipped to handle even the toughest of keys.
Here is the first part in the advanced keying series. I’ve started with the ALPHA section, and made a custom slide for just ALPHA, where you can see the many topics I plan on covering in future videos, but for now I am just covering 1.1 Pre-processing the Green Screen. Here is the slide for ALPHA:
It’s a long video, but it’s full of useful tips and techniques. I recommend watching the whole thing if you get a chance, but if you’re in a rush and want to skip to certain sections here are the Timecodes for you:
Please guys, I know I covered a lot but if you have any questions, or if you would like me to do a written recap on all the sections here in this blog post, please just let me know and I’d be happy to write it up for you. Leave a comment with any questions, or if you think I messed something up, or if you’d like to contribute to the conversation and have anything to add to this tutorial. I enjoyed putting this together and look forward to the rest of the keying tutorials I plan on putting together. Please share if you learned something =)
So I knew I wanted to do a keying tutorial awhile back, but I didn’t want it to be the same old crappy keying tutorial that you always see online. The teacher always talks about how to use the tools, and not about the main concepts or techniques behind them, the end result, what we are actually after.
I have put together this introduction video, and a part 1 video “ALPHA 1.1 Pre-Processing Greenscreen”, as a push to get this stuff out to you guys. Here is the Slide in the video for you guys to save for your own use:
The 3 main parts are ALPHA, DESPILL, and MERGE OPERATION.
Here are some time codes to skip to in the video if you so please:
I will go into all of these in far more details, this video is just me talking and doing a rundown of what to expect in upcoming videos.
I recommend you guys browse through the following videos on Nukestation (a GREAT website and central location for nuke tutorials) if you are new to keying or compositing. The video I am doing is quite advanced, and you’re probably going to want to get a firm grip on the keying tools in nuke before watching. http://nukestation.com/category/keying/
A new name accompanied with some new tutorials to christen the site.
It’s been a few months, I’ve been working hard both at work and on side projects, one of which is the daunting task of categorizing and analyzing all of the gizmos and tools on Nukepedia.com. I came up with a good workflow to check the tools, and I am going 1 category at a time, but it is pretty time consuming.
I’ve also been working on an Advanced Keying Breakdown, which I will be posting for the next month or so. It is very in depth, more than I have seen from any other keying tutorial yet. It focuses on the concepts and techniques of keying, rather than specific tools.
If you like what you have been seeing on this website, please share with others, I’d like to get these tutorials out to anyone who needs them. Thanks!
Without further adieu,